Catalog excerpts

MARTIN® Insertale Dust Collector Go to MARTIN^ Insertable Dust Collector web page Operator's Manual
Open the catalog to page 1
Important MARTIN ENGINEERING HEREBY DISCLAIMS ANY LIABILITY FOR: DAMAGE DUE TO CONTAMINATION OF THE MATERIAL; USER’S FAILURE TO INSPECT, MAINTAIN AND TAKE REASONABLE CARE OF THE EQUIPMENT; INJURIES OR DAMAGE RESULTING FROM USE OR APPLICATION OF THIS PRODUCT CONTRARY TO INSTRUCTIONS AND SPECIFICATIONS CONTAINED HEREIN. MARTIN ENGINEERING’S LIABILITY SHALL BE LIMITED TO REPAIR OR REPLACEMENT OF EQUIPMENT SHOWN TO BE DEFECTIVE. Observe all safety rules given herein along with owner and Government standards and regulations. Know and understand lockout/tagout procedures as defined by American...
Open the catalog to page 2
Section Page List of Figures . . . . . . . . . . . . . . . . . . . . . . . . . . . . . . . . . . . . . . . . . . . . . . . . . . . . . . . . . . . . ii Introduction . . . . . . . . . . . . . . . . . . . . . . . . . . . . . . . . . . . . . . . . . . . . . . . . . . . . . . . . . . . . . . 1 General . . . . . . . . . . . . . . . . . . . . . . . . . . . . . . . . . . . . . . . . . . . . . . . . . . . . . . . . . . . . . . . . . . . . . . Location requirements for transfer point installations . . . . . . . . . . . . . . . . . . . . . . . . . . . . . . . . . . References . . . . . . . . . . . ....
Open the catalog to page 3
List of Figures & Tables List of Figures Figure 1 2 3 4 5 6 7 8 Title Page ® Dimensions for MARTIN Insertable Dust Collector, P/N INS-08XX and INS-10XX . . . . . . . . . . . . . . . . . . . . . . . . . . . . . . . . . . . . . . 4 Dimensions for MARTIN® Insertable Dust Collector, P/N INS-15XX. . . . . . . . 5 Dimensions for MARTIN® Insertable Dust Collector, P/N INS-18XX and INS-20XX . . . . . . . . . . . . . . . . . . . . . . . . . . . . . . . . . . . . . . 6 Dimensions for MARTIN® Insertable Dust Collector, P/N INS-30XX. . . . . . . . 7 Electrical and Plumbing Detail . . . . . . . . . . ....
Open the catalog to page 4
The MARTIN® Insertable Dust Collector is an automatic, reverse air dust filter designed to remove dust from the air in conveyor transfer points, silo vents, bucket elevators, and screens. The unit is made up of a group of filter elements mounted on a sealed frame. The elements are fitted side-by-side in an individual sealing arrangement that effectively separates the dirty (inlet) side of the filter from the clean (outlet) side. The elements are always removed for maintenance from the clean side of the filter. This manual provides instructions for locating and installing the MARTIN®...
Open the catalog to page 5
Safety All safety rules defined in the above documents and all owner/employer safety rules must be strictly followed when working on this equipment. Materials required In addition to standard hand tools, a hoist is required to install this equipment. MARTIN® Insertatile Dust Collector
Open the catalog to page 6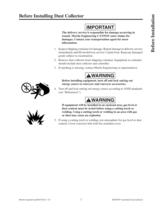
Before Installing Dust Collector The delivery service is responsible for damage occurring in transit. Martin Engineering CANNOT enter claims for damages. Contact your transportation agent for more Inspect shipping container for damage. Report damage to delivery service immediately and fill out delivery service's claim form. Keep any damaged goods subject to examination. Remove dust collector from shipping container. Equipment in container should include dust collector and controller. If anything is missing, contact Martin Engineering or representative. Before installing equipment, turn off...
Open the catalog to page 7
g Installing Dust Collector CÖ 1. Make sure conveyor belt structure and chutework will support dust ^ collector. See Table V for weight specifications. 2. Determine how to best install dust collector on your application. See 3. Follow instructions in the included installation manual to install dust Figure 1. Dimensions for MARTIN® Insertable Dust Collector, MARTIN® Insertable Dust Collector
Open the catalog to page 8
□PTIDNAL HDTTDM CLEAN AIR Figure 2. Dimensions for MARTIN® Insertable Dust Collector, P/N INS-15XX MARTIN® Insertatile Dust Collector
Open the catalog to page 9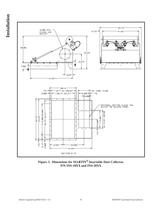
□PTIDNAL HDTTDM CLEAN AIR □UTLET GR ACCESS PANEL Figure 3. Dimensions for MARTIN® Insertable Dust Collector, MARTIN® Insertable Dust Collector
Open the catalog to page 10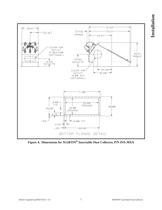
BETTEM FLANEE DETAIL Figure 4. Dimensions for MARTIN® Insertable Dust Collector, P/N INS-30XX MARTIN® Insertatile Dust Collector
Open the catalog to page 11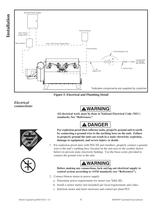
Electrical Power Supply* Motor Starter* Timer Enclosure Timer 120V Power Supply Wires* Filter-Regulator Unit Supply Line* Lockout Valve "Indicates components are supplied by customer Figure 5. Electrical and Plumbing Detail All electrical work must be done to National Electrical Code (NEC) For explosion-proof dust collector units, properly ground unit to earth by connecting a ground wire to the earthing boss on the unit. Failure to properly ground the unit can result in a static electricity explosion, damage to equipment, and severe injury or death. For explosion-proof units with INS-XE...
Open the catalog to page 12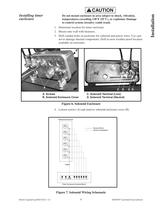
Installing timer Do not mount enclosure in area subject to shock, vibration, temperatures exceeding 130°F (55°C), or explosion. Damage to control system circuitry could result. 1. Determine location for timer enclosure. 2. Mount onto wall with fasteners. 3. Drill conduit holes in enclosure for solenoid and power wires. Use care not to damage internal components. Drill in most weather-proof location B. Solenoid Enclosure Cover C. Solenoid Terminal (Line) D. Solenoid Terminal (Neutral) Figure 6. Solenoid Enclosure 4. Loosen screws (A) and remove solenoid enclosure cover (B). Solenoid...
Open the catalog to page 13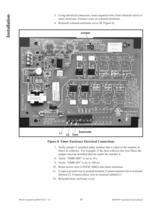
5. Using electrical connectors, route required wires from solenoid valves to timer enclosure. Connect wires to solenoid terminals. 6. Reinstall solenoid enclosure cover (B, Figure 6). Figure 8. Timer Enclosure Electrical Connections 7. Verify jumper is installed under number that is equal to the number of filters in collector. For example, if the dust collector has four filters the jumper must be installed directly under the number 4. 10. Route power wire (120VAC 60Hz) into timer enclosure. 11. Connect ground wire to ground terminal. Connect neutral wire to terminal labeled L2. Connect...
Open the catalog to page 14All Martin Engineering catalogs and technical brochures
-
Cougar® Ring Vibrators
2 Pages
-
Martin® Return Reservoir
1 Pages
-
Martin® Removable Nozzle
1 Pages
-
Martin® QC1? Cleaner HD Max
2 Pages
-
Martin® Sonic Horns - 230Hz
2 Pages
-
Martin® Return Roller Basket
1 Pages
-
Martin® Air Cleaner
4 Pages
-
Martin® Return Roller Guard
1 Pages
-
Martin® Retractable Nozzle
2 Pages
-
EVO® Combination Cradle
2 Pages
-
Martin® Inspection Door HD
2 Pages
-
MARTIN® DUST BAGS
26 Pages
-
Hydraulic Screen Vibrator
2 Pages
-
MARTIN® MP3 Railcar Vibrator
18 Pages
-
MARTIN® Brush Cleaners
28 Pages
-
HAWG BONE® Secondary Cleaner
26 Pages
-
MARTIN® SHD Belt Cleaner
38 Pages


