- Catalogs
- Martin Engineering
- MARTIN® DUST BAGS
MARTIN® DUST BAGS
1 /26Pages

MARTIN® DUST BAGS
1 /26Pages
Catalog excerpts

Go to MARTIN^ Dust Bag web page Operator's Manual
Open the catalog to page 1
Important MARTIN ENGINEERING HEREBY DISCLAIMS ANY LIABILITY FOR: DAMAGE DUE TO CONTAMINATION OF THE MATERIAL; USER’S FAILURE TO INSPECT, MAINTAIN AND TAKE REASONABLE CARE OF THE EQUIPMENT; INJURIES OR DAMAGE RESULTING FROM USE OR APPLICATION OF THIS PRODUCT CONTRARY TO INSTRUCTIONS AND SPECIFICATIONS CONTAINED HEREIN. MARTIN ENGINEERING’S LIABILITY SHALL BE LIMITED TO REPAIR OR REPLACEMENT OF EQUIPMENT SHOWN TO BE DEFECTIVE. Observe all safety rules given herein along with owner and Government standards and regulations. Know and understand lockout/tagout procedures as defined by American National...
Open the catalog to page 2
Section Page List of Figures . . . . . . . . . . . . . . . . . . . . . . . . . . . . . . . . . . . . . . . . . . . . . . . . . . . . . . . . . . . . ii Introduction . . . . . . . . . . . . . . . . . . . . . . . . . . . . . . . . . . . . . . . . . . . . . . . . . . . . . . . . . . . . . . 1 General . . . . . . . . . . . . . . . . . . . . . . . . . . . . . . . . . . . . . . . . . . . . . . . . . . . . . . . . . . . . . . . . . . . . . . Location requirements for transfer point installations . . . . . . . . . . . . . . . . . . . . . . . . . . . . . . . . . . References . . . . . . . . . . . . ....
Open the catalog to page 3
List of Figures List of Figures Figure 1 2 3 4 Title Page ® MARTIN Dust Bag Assembly ø12.00 X 72.00, P/N 34839-XX. . . . . . . . . . . . . . . . . 12 MARTIN® Dust Bag Assembly ø24.00 X 72.00, P/N 34840-XX. . . . . . . . . . . . . . . . . 14 MARTIN® Static Dissipating Dust Bag Assembly ø12.00 X 72.00, P/N 34839-XXSD16 MARTIN® Static Dissipating Dust Bag Assembly ø24.00 X 72.00, P/N 34840-XXSD18 Martin Engineering M3678-03/07 ii MARTIN® Dust Bag
Open the catalog to page 4
General The MARTIN® Dust Bag provides passive relief for positive air pressure produced at loading zones. These breather bags filter outgoing air to minimize the escape of dust to the plant environment. Attached with a clamp to a flange installed in the chute cover, each MARTIN® Dust Bag includes a stainless steel grounding strap to disperse static electricity and grommets to hang the bag from a mounting frame. Location requirements for transfer point installations To ensure the MARTIN® Dust Bag’s maximum effectiveness, make sure the transfer point is properly sealed and designed with dust control...
Open the catalog to page 5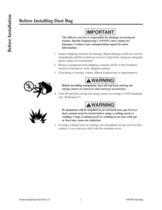
Before Installation Before Installing Dust Bag IMPORTANT The delivery service is responsible for damage occurring in transit. Martin Engineering CANNOT enter claims for damages. Contact your transportation agent for more information. 1. Inspect shipping container for damage. Report damage to delivery service immediately and fill out delivery service’s claim form. Keep any damaged goods subject to examination. 2. Remove equipment from shipping container. Refer to Part Numbers section of manual to verify shipped contents. 3. If anything is missing, contact Martin Engineering or representative....
Open the catalog to page 6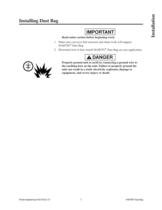
Installation Installing Dust Bag IMPORTANT Read entire section before beginning work. 1. Make sure conveyor belt structure and chute work will support MARTIN® Dust Bag. 2. Determine how to best install MARTIN® Dust Bag on your application. ! DANGER Properly ground unit to earth by connecting a ground wire to the earthing boss on the unit. Failure to properly ground the unit can result in a static electricity explosion, damage to equipment, and severe injury or death. Martin Engineering M3678-03/07 3 MARTIN® Dust Bag
Open the catalog to page 7
Installation 1. Locate MARTIN® Dust Bags approximately 1/3 the length of the transfer chute downstream from the load zone. Ensure area above chute has at least 73 in. (1854 mm) of clearance. 2/3 L 1/3L L = Transfer Chute Length 2. Remove a section of top cover 36.5 in. (927 mm) long. 36.5 (927) Martin Engineering M3678-03/07 4 MARTIN® Dust Bag
Open the catalog to page 8
NOTE There will be a gap between weldment and top cover on the downstream side. 4. Align upright weldment with tab on top cover weldment and securely weld together. Weld Securely 1/4 Martin Engineering M3678-03/07 5 MARTIN® Dust Bag Installation 3. Place top cover weldment into opening in top cover and slide weldment upstream until weldment touches the existing top cover. Use C-clamps to hold top cover weldment to existing structure.
Open the catalog to page 9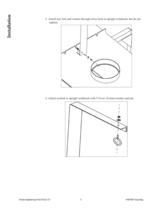
Installation 5. Attach nut, bolt and washer through lower hole in upright weldment, but do not tighten. 6. Attach eyebolt to upright weldment with 5/16-in. (8-mm) washer and nut. Martin Engineering M3678-03/07 6 MARTIN® Dust Bag
Open the catalog to page 10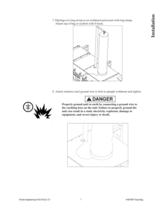
8. Attach stainless steel ground wire to bolt in upright weldment and tighten. ! DANGER Properly ground unit to earth by connecting a ground wire to the earthing boss on the unit. Failure to properly ground the unit can result in a static electricity explosion, damage to equipment, and severe injury or death. . Martin Engineering M3678-03/07 7 MARTIN® Dust Bag Installation 7. Slip bag over ring on top cover weldment and secure with ring clamp. Attach top of bag to eyebolt with S-hook.
Open the catalog to page 11
Installation 9. Attach MARTIN® Dust Curtain to curtain base angle with 1/2-in. (13-mm) screws. 10. Slide dust curtain assembly into gap between top cover weldment and existing top cover. Martin Engineering M3678-03/07 8 MARTIN® Dust Bag
Open the catalog to page 12
12. Fill all gaps with silicone caulk. Martin Engineering M3678-03/07 9 MARTIN® Dust Bag Installation 11. Secure MARTIN® Dust Curtain Assembly to top cover weldment with 1/2-in. (13-mm) washers and nuts.
Open the catalog to page 13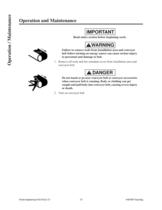
Operation / Maintenance Operation and Maintenance IMPORTANT Read entire section before beginning work. ! WARNING Failure to remove tools from installation area and conveyor belt before turning on energy source can cause serious injury to personnel and damage to belt. 1. Remove all tools and fire retardant cover from installation area and conveyor belt. ! DANGER Do not touch or go near conveyor belt or conveyor accessories when conveyor belt is running. Body or clothing can get caught and pull body into conveyor belt, causing severe injury or death. 2. Turn on conveyor belt. Martin Engineering...
Open the catalog to page 14All Martin Engineering catalogs and technical brochures
 Cougar® Ring Vibrators
2 Pages
 Martin® Return Reservoir
1 Page
 Martin® Removable Nozzle
1 Page
 Martin® QC1? Cleaner HD Max
2 Pages
 Martin® Sonic Horns - 230Hz
2 Pages
 Martin® Air Cleaner
4 Pages
 Martin® Retractable Nozzle
2 Pages
 EVO® Combination Cradle
2 Pages
 Martin® Inspection Door HD
2 Pages
 Hydraulic Screen Vibrator
2 Pages
 MARTIN® MP3 Railcar Vibrator
18 Pages
 MARTIN® Brush Cleaners
28 Pages
 HAWG BONE® Secondary Cleaner
26 Pages
 MARTIN® SHD Belt Cleaner
38 Pages


- Surface treatment brush
- Vibration motor
- Washing brush
- Conveyor roller
- Plastic brush
- Pneumatic vibrator
- Cylindrical brush
- Hopper vibrator
- Multi-product vibrator
- Polypropylene brush
- Ball vibrator
- Cylindrical spiral brush
- Belt cleaner
- Conveyor belt pre-cleaner
- Impact bed
- Secondary conveyor belt cleaner
- Air cannon
- Hydraulic vibrator
- Conveyor brush
- Conveyor belt tracker