
Catalog excerpts

tr.row {} td.cell {} div.block {} div.paragraph {}
Open the catalog to page 1
Magnification10x20x30x50x100x Field of view 13.8 mm 6.9 mm 4.6 mm 2.7 mm 1.3 mm Working distance ~ 55 mm ~ 50 mm ~ 54 mm ~ 48 mm ~ 28 mm Option: Rotary table > ZoompositionWorking distanceField of viewҘ Magnification 0.7 92 mm 21.3 mm ~ 10x 1 92 mm 14.9 mm ~ 15x 2 92 mm 7.4 mm ~ 30x 3 92 mm 5.0 mm ~ 45x 4 92 mm 3.7 mm ~ 60x 4.5 92 mm 3.7 mm ~ 65x Option: Rotary table MA 143-6-70 MA 143-6-70G >
Open the catalog to page 3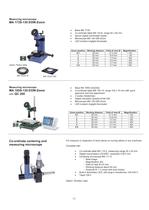
ZoompositionWorking distanceField of viewMagnification 0.7 92 mm 21.3 mm ~ 10x 1 92 mm 14.9 mm ~ 15x 2 92 mm 7.4 mm ~ 30x 3 92 mm 5.0 mm ~ 45x 4 92 mm 3.7 mm ~ 60x Option: Rotary table 4.5 92 mm 3.7 mm ~ 65x MA 143-6-70 MA 143-6-70G >
Open the catalog to page 4
tr.row {} td.cell {} div.block {} div.paragraph {} .font0 { font:44.00pt "Arial", sans-serif; } .font1 { font:20.00pt "Arial Black", sans-serif; } ( r f ! ?
Open the catalog to page 5
Microscopes are normally supplied with reticles R 1 .Any of the reticles shown below can be supplied. They are not interchangeable. Other designs can be supplied to customers specification at en extra charge. R 1 R 1-1 R 1-2 R 1-2-2 R 3 R 3-4 R 4 R 5-7 > 12 circles 23 circles 23 circles 32 circles R 6 R 6-1 R 13 R 14 R-M R-M-6 R-M-11 R-M-12 > 100 divisions 100 divisions 3x50 = 150 divisions 6x20 = 120 divisions R 1 / R 1-1 R 1-2 R 1-2-2 R 3 R 4 R 3-4 / R-M/ R-M-6 R-M-11R-M-12 10x 0.5 0.5 0.125 0.1 12.5x 0.1 15x 0.2 0.125 20x 0.25 0.25 0.05 25x 0.2 0.2 0.075 0.05 30x 0.1 0.1 42x 0.02 50x 0.1...
Open the catalog to page 6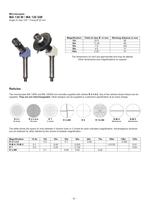
tr.row {} td.cell {} div.block {} div.paragraph {} .font0 { font:4.00pt "Arial Black", sans-serif; } Reticles
Open the catalog to page 7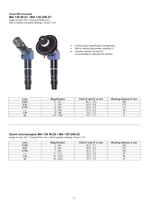
Angle of view 120 / Fixing И 39.65 mm / with or without 4 position-settings / Zoom 1:6.5 Continuously magnification changement With or without goniometer (reading 5) Possible reticles: R9 and R7 (no possibility to calibrate the reticles) Lens Magnification Field of view Ҙ in mm Working distance in mm 0.25x 3 - 16x 85.2 - 13.2 356 0.5x 5 - 33x 42.6 - 6.6 175 0.75x 8 - 49x 28.4 - 4.4 113 ----- 10 - 65x 21.3 - 3.3 92 1.5x 15 - 98x 14.2 - 2.2 51 2x 20 - 130x 10.7 - 1.7 6 >
Open the catalog to page 8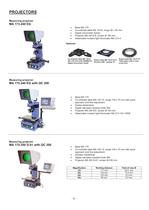
Base MA 175 Co-ordinate table MA 143-6, range 50 x 50 mm Digital micrometer Sylvac Projector MA 240 EG, screen 150 mm Detachable incident light illuminator MA 213-4 Optional: > Co-ordinate tableMA 143-6 (50 x 50 mm)withDIGIMATICdigital micrometer heads Rotary table MA 143-6-70 GDivision 360ذ,reading 10'Rotary table MA 143-6-70Table glass with or less cross-wire Base MA 175 Co-ordinate table MA 145-15, range 150 x 70 mm with quick approach and fine adjustment Scales Heidenhain Digital calculator Quadra-Chek 200 Projector MA 240 EG, screen 150 mm Detachable incident light illuminator MA...
Open the catalog to page 9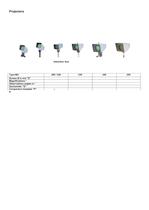
Our projection heads can be supplied for incident "E" (examination of the surface) and transmitted "D" (examination of the profile, outline) light. The following advantages make their use on various machine-tools possible: Small size Light weight Simple tube attachment ( 25 or ؘ 30 mm) Other means of attachment on request Real image Our optical system guarantees a very good distortion less optical image. All types are equipped with light shields to assure their use in brightly lit rooms. Our illuminators for transmitted "D" and incident "E" light make the solution of a difficult projection...
Open the catalog to page 10
E - 1 E Ņ - 4 E - 6 E Ņ - 7 E - 8 E Ņ - 43 > 10x 20x 10/20/50/100x 30x "E" The illustrated screens are the most generally used from our standard range. Other standard types are also available on request. "P" / "F" The same symbols as on the screens are offered on comparison templates or films. Goniometer (MA... - G) > Measurement with built-in optical angle measuring unit , direct on thescreen.Read out accuracy 10'. Comparison templates (MA...-P) A special guide allows the use of comparison templates. Mat films with all standard symbols are available. These films are placed in a double...
Open the catalog to page 11
ZoompositionWorking distanceField of viewMagnification 0.7 90 mm 13.6 x 10.2 mm ~ 20x 1 90 mm 9.5 x 7.1 mm ~ 30x 2 90 mm 4.8 x 3.5 mm ~ 65x 3 90 mm 3.2 x 3.4 mm ~ 95x 4 90 mm 2.4 x 1.8 mm ~ 130x 4.5 90 mm 2.1 x 1.6 mm ~ 145x >
Open the catalog to page 12
Co-ordinate table MA 143-8, range 70 x 70 mm > Scales Micro Zoom-optic MA 705-Z1 with CCD colour camera Circular incident light, structured in 6 groups and composed of 54 white LED's Sectors selection and light intensity regulation Measurement calculator QC 300 with live video and integrated image processing and automatically detection of the measurement points > ObjectiveZoom 6.5x Zoom 12x Fieldofview * in mm: 5.8x3.7 - 0.89x0.56 6.7x4.4 - 0.57x0.36 * Camera 1/3" and adaptor 0.67x Base MA 185S (Granite) Co-ordinate table MA 145-15, range 150 x 70 mm with quick approach and fine adjustment...
Open the catalog to page 13
Base MA 186S (Granite) Co-ordinate table motorized MA 146-25, range 200 x 100 mm 3 scales Heidenhain (3 axes X,Y and Z) PC-System with Intel Pentium 4, Windows XP 2 TFT - flat monitors 19" Comparison software VideoCAD Measuring software QC 5000 Zoom-optic MA 705-Z2 with colour camera LED ring light Glass scale VR 103 > Co-ordinate table MA 145-15, range 150 x 70 mm, quick approach and fine adjustment 2 scales Heidenhain 1 Zoom optic MA 705E-Z2 (1/3") 1 Zoom optic MA 705E-Z2 (1/2") 2 LED ring light and 2 LED - coaxial illuminators Glass scale VR 075 PC-System with Intel Pentium 4, Windowsή...
Open the catalog to page 14
Visualisation of a video image and a cross-wire with a Y/C signal. Full screen. Memorisation of the video image in the format, *.jpg or *.bmp. > Display and measuring of video images on the PC, both in live and in still (freeze) mode. The displayed images can be measured and added with text, circles, lines, saved in standard file formats (*.jpg, *.tif, *.bmp etc.) and processed in other Window-programs. The value for measuring can be saved in an ASCII-file. 3 different thicknesses of lines and 6 measuring colours are at disposal. After each measurement a new colour can be chosen. For...
Open the catalog to page 17
Simple and fast comparison of the CAD files. > Free positioning of the work pieces as so as alignment and positioning of the drawings. High accuracy of measurement with magnifications adapted at your needs. High capacity of measurement, defined by the measuring range of the co-ordinate table. Optical magnification from 5x to 800x. Numerical Zoom with automatically adaptation of the drawing and of the video image. Digitalisation, display and memorisation of the form deviation. Maximal contrast with incident light illuminator given by the sensibility of the video equipment. Direct access to...
Open the catalog to page 18All Marcel Aubert S.A. catalogs and technical brochures
-
Catalog
24 Pages
-
Catalog
25 Pages
-
z01_ma212_92_95
2 Pages
-
p01_projektoren
2 Pages
-
m01_ma175_130gwz_qc2
2 Pages
-
m01_ma331_113egw
2 Pages
-
Cold light sources
2 Pages


