

LW30 Scrubber Drier

LW30 Scrubber Drier
- NEUTROLUX: Suitable for all hard floors, maintaining shine on glossy surfaces and adding slight shine to matte surfaces.
- ACTIPLUS: Effective for removing mineral, animal, and vegetable oils and fats.
- TEXTILE: Designed for cleaning textile surfaces using an injection/extraction kit.
- Water Flow Issues: Ensure the detergent tank contains clean water without foam and that filters are clean. If the pump overheats, allow it to cool before restarting.
- Pump Issues: If the pump doesn't switch on, check for overheating or blocked tubes.
- Suction Issues: If the machine doesn't suck, check if the dirty water tank is full or if the float has closed the suction due to impact.
Catalog excerpts

Scrubber drier Scrubber Drier LW 30pro - 38pro Atmospheric Water Injection (without pump) LW 30 – Lavinia LindWash 30 Class A Models: OWNERS GUIDE AND PARTS MANUAL ISTRUZIONI PER L’USO E LISTA DELLE PARTI DI RICAMBIO BEDIENUNGSANWEISUNG UND ERSATZTEILLISTE MODE D’EMPLOI ET PIÈCES DE RECHANGE INSTRUCCIONES PARA EL USO Y PIEZAS DE RECAMBIO LW30 – Lavinia
Open the catalog to page 1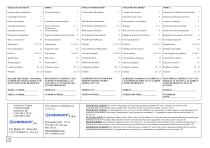
Important safety instructions Grounding instructions Conoscere la vostra macchina Assembly instructions Operating instructions Messa in funzione Istruzioni per il funzionamento Brush pressure adjustment Regolazione della pressione del rullo Spray / extraction kit Maintenance Brush replacemenrt Parts list Ihre Maschine kennenlernen Die Maschine in Betrieb setzen Instrucciones importantes de seguridad Instructions mise a terre Know your machine Instrucciones para toma de tierra Pour connaître votre machine Instrucciones para el montaje Mise en service de la machine Réglage de la pression du rouleau...
Open the catalog to page 2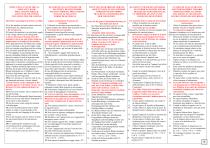
WHEN USING AN ELECTRICAL APPLIANCE, BASIC PRECAUTIONS SHOULD ALWAYS BE FOLLOWED, INCLUDING THE FOLLOWING QUANDO SI USANO APPARECCHI ELETTRICI, DEVONO ESSERE SEGUITE NORMALI PRECAUZIONI, INCLUSE LE SEGUENTI NORME DI SICUREZZA Leggere attentamente il manuale di Istruzioni 1. Utilizzare la macchina su pavimenti duri e 1.Use the machine on hard surfaces and only bagnati soltanto per effetto della macchina stessa. moistened by the cleaning process. 2. Non immergere la macchina. 2. Do not immerse. 3.Connect the machine to an electricity supply Alimentare la macchina alla tensione corrispondente a quella...
Open the catalog to page 3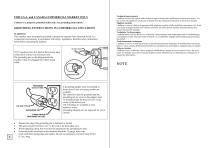
FOR U.S.A. and CANADA COMMERCIAL MARKET ONLY Connect to a properly grounded outlet only. See grounding instructions. GROUNDING INSTRUCTIONS IN COMMERCIAL SITUATIONS WARNING This machine must be properly grounded to protect the operator from electrical shock, in a commercial environment, in accordance with safety regulations. Read the safety instructions below before operating the machine. 120 V machines have this kind of three-prong plug at the end of a three-wire electrical cord. The grounding pin on this plug grounds the machine when it is plugged into a three prong outlet. A grounding adapter...
Open the catalog to page 4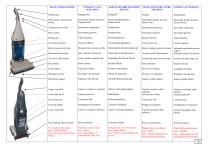
KNOW YOUR MACHINE LERNEN SIE IHRE MASCHINE KENNEN POUR CONNAITRE VOTRE MACHINE Handle grip Water pump / electrovalve switch Interruttore pompa dosatrice / elettrovalvola Wasserpumpenschalter / Elektroventil Interrupteur pompe doseuse / électro-valve Interruptor bomba dosador / electrovàlvula Vacuum motor switch Interruttore aspirazione Interrupteur aspiration Interruptor aspiración Main switch Interruttore generale Interrupteur général Interruptor general Tappo dosatore Bouchon doseur Tapón dosador Tank release button Gancio serbatoio Croché réservoir Gancho depósito Brush pressure adj. knob...
Open the catalog to page 5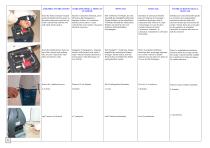
ASSEMBLY INSTRUCTIONS Insert the femal connector located inside the handle/electric panel, on the male connector located on top of the vertical body until the two side safety hooks snap in. Inserire il connettore femmina, posto all’interno dell’impugnatura / impianto elettrico, nel connettore maschio, posto sopra il corpo verticale fino a far scattare i due ganci laterali di sicurezza. Insert the handle/electric panel on top of the vertical body making sure you don’t punch the water tubes and electric cords. ISTRUZIONI PER LA MESSA IN FUNZIONE INSTRUCCIONES PARA EL MONTAJE Den weiblichen Verbinder,...
Open the catalog to page 6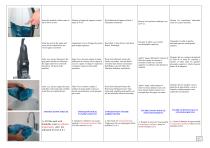
Insert the aesthetic rubber cups on top of the 4 screws. Montare gli appositi cappucci estetici sopra le 4 viti. Die ästhetischen Kappen auf den 4 Schrauben montieren. Hook the cord in the upper anti stress hook located below the swivel upper cord hook Agganciare il cavo all’apposito gancio para strappi superiore. Das Kabel in den oberen Anti-Ruck Haken befestigen. After use, always disconnect the plug and wind the cord between the upper and lower cord hook located on the back of the machine. Dopo l’uso, staccare sempre la spina dalla presa di corrente ed avvolgere il cavo tra i ganci avvolgicavo...
Open the catalog to page 7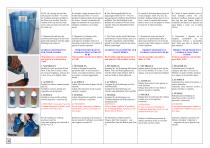
B. Fill the dosing cap until the indicated level (26ml = 1%) with the Lindhaus detergent suitable to the floor to be washed. Pour the content of the cap into the clean water tank and close the tank with the same cap. B. riempire il tappo dosatore fino al livello indicato (26ml. 1%) con il prodotto Lindhaus adatto al pavimento da lavare. Versare il contenuto del tappo nel serbatoio di acqua pulita e chiudere il serbatoio con il tappo stesso. B. Den Dosierungsdeckel bis zur angezeigten Stufe (26 ml = 1%) mit dem geeigneten Lindhaus Waschmittel auffüllen. Den Deckelinhalt in den Behälter mit sauberem...
Open the catalog to page 8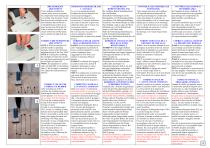
DISPOSITIVO PER REGOLARE L’ALTEZZA La vs. lava-asciuga pavimenti Lindhaus ha diversi dispositivi di sicurezza per proteggere i componenti da danni dovuti a sovraccarico. Il circuito elettronico che mette in funzione la spia rossa sulla base indica che il motore è in sovraccarico perché c’è troppa pressione sul rullo. Se il sovraccarico è eccessivo il circuito spegnerà il motore elettrospazzola e la spia rossa rimarrà accesa. CORRECT BRUSH PRESSURE CORRETTA REGOLAZIONE ADJUSTMENT DELLA PRESSIONE RULLO STEP 1: With the machine ON PASSO :1 con la macchina accesa e and the handle in operating con...
Open the catalog to page 9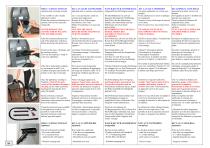
SPRAY / EXTRACTION KIT (optional only on pump version) Your scrubber is also a handy upholstery washer. Rotate the connector blocking lever upwarts. Pull out the connector energically. NEVER REMOVE THE CONNECTOR BY PULLING THE FLEXIBLE HOSE Insert the connector placed at the end of the upholstery wash hose. Rotate downwarts the hook lever. WASCH-KIT FÜR STOFFBEZÜGE KIT LAVAGE TAPISSERIES (en option seulement sur version avec (freigestellt nur für Pumpenversion) pompe) Votre autolaveuse est aussi un pratique La vs. lava pavimenti è anche un Ihr Schrubbautomat ist auch ein lave-tapisserie comodo...
Open the catalog to page 10All Lindhaus catalogs and technical brochures
 HF6 pro eco Force
4 Pages
 HEALTHCARE pro eco FORCE
1 Page
 LW30-38pro
4 Pages
 LW46 Hybrid
4 Pages
 Professional Line
16 Pages
 PB14 DCS ECO SPREADER
1 Page
 ACTIVA SINGLE MOTOR UPRIGHT
4 Pages
 FULL-LINE PRO
16 Pages
 DP5 BACK PACK
1 Page
 Neutrolux
5 Pages
 LINDA HEPA CLASS A++
4 Pages
 Valzer Hepa Class "A"
8 Pages
 L46 Hybride
20 Pages


- Electric vacuum cleaner
- Industrial vacuum cleaner
- Dry vacuum cleaner
- Mobile vacuum cleaner
- Dust vacuum cleaner
- Compact vacuum cleaner
- Wet vacuum cleaner
- Single-phase vacuum cleaner
- Scrubber-dryer
- Electric scrubber-dryer
- Battery-powered scrubber-dryer
- Vacuum cleaner with HEPA filter
- Walk-behind scrubber-dryer
- Low-noise vacuum cleaner
- Compact scrubber-dryer
- Portable vacuum cleaner
- Hard cleaning job detergent
- Cleaning detergent
- 2-motor vacuum cleaner
- Battery-powered vacuum cleaner