- Catalogs
- JWIPC TECHNOLOGY CO., LTD.
- JEC-2510 (AMR-TGU) User’s Manual
JEC-2510 (AMR-TGU) User’s Manual
1 /40Pages

JEC-2510 (AMR-TGU) User’s Manual
1 /40Pages
Catalog excerpts
JEC-2510 (AMR-TGU) User’s Manual
Open the catalog to page 1
Disclaimer The content of this manual is the intellectual property of the Company, and the copyright belongs to the Company. The ownership of all parts of this product, including accessories and software, is vested in the Company. Without the written permission of the Company, this manual and its any content shall not be imitated, copied, extracted or translated into other languages in any form. We have carefully prepared this manual with an attitude of being responsible for users, but we do not guarantee that the contents of this manual are completely accurate. This manual is a purely technical...
Open the catalog to page 2
Safety Instructions General Safety Instructions A Caution Before you have read related safety instructions, please do not expand your device. A Warning This is a Class A product. In a domestic environment, this product may cause radio interference, in which case, the user may be required to take practical measures against interference. This device is compliant with the relevant safety measures required for information technology. If you have any doubt about the effectiveness of the installation in the planned environment, please contact your service representative. Repair The device can only...
Open the catalog to page 3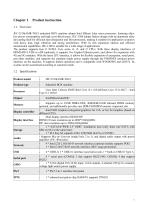
JEC-2510(AMR-TGU) industrial BOX machine adopts Intel Elkhart Lake series processor, featuring ultra-low power consumption and high cost-effectiveness. JEC-1300 adopts fanless design with an aluminum alloy die-casting shell for efficient heat dissipation and firm protection, making it suitable for application scenarios with heavy dust, high vibration and strong interference. With its rich expansion options and efficient transmission capabilities, JEC-1300 is suitable for a wide range of applications. The product supports Gen.11 INTEL Core series i3, i5, and i7 CPUs. With three display interfaces...
Open the catalog to page 6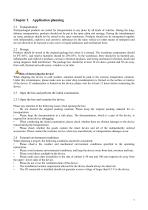
Application planning Well-packaged products are suited for transportation to any place by all kinds of vehicles. During the longdistance transportation, products should not be put in the open cabin and carriage. During the transshipment on route, products should not be stored in the open warehouse. Products should not be transported together with inflammable, explosive and corrosive substances by the same vehicle (or other means of transport) and are not allowed to be exposed to rain, snow or liquid substances and mechanical force. Products should be stored in the original package box when it...
Open the catalog to page 9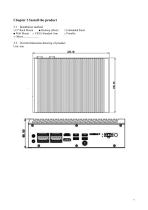
Chapter 3 Install the product 3.1 Installation method □ 19" Rack Mount ■ Desktop (Deck) □ Embedded Panel ■ Wall Mount □ VESA Standard Arm □ Portable □ Others 3.2 Overall dimension drawing of product Unit: mm
Open the catalog to page 10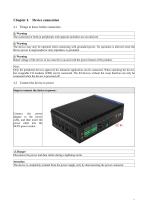
Device connection 4.1 Things to know before connection Warning The connected or built-in peripherals with opposite polarities are not allowed. Warning The device may only be operated when connecting with grounded power. No operation is allowed when the device power is ungrounded or only impedance is grounded. Warning Rated voltage of the device in use must be in accord with the power feature of the product. Note: Only the peripheral devices approved for industrial application can be connected. When operating the device, hot swappable I/O modules (USB) can be connected. The IO devices without...
Open the catalog to page 12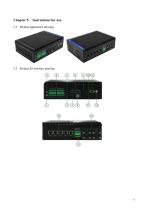
5.1 Product appearance drawing 5.2 Product IO interface drawing
Open the catalog to page 13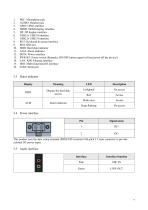
2. AUDIO: Headset jack 3. GPIO: GPIO interface 4. HDMI: HDMI display interface 8. PS/2: Keyboard & mouse interface 10. HDD: Hard disk indicator 12. DCIN: Power interface 13. PWR-BT: Power switch (Remarks: ON/OFF button signal will not power off the device!) This product uses the 4pin crimp terminal (PHOENIX terminal with pitch 3.5 mm) connector to provide external DC power input:
Open the catalog to page 14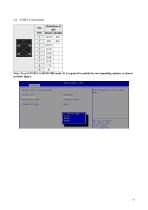
required to enable the corresponding options, as shown Note: To set COM1/2 to RS232/485 mode: It is in below figure:
Open the catalog to page 15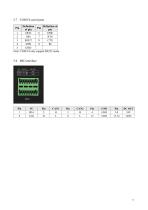
5.7 COM3/4 serial ports Definition Definition of Pin of pin pin 1 DCD 6 DSR 2 SIN 7 RTS 3 SOUT 8 CTS 4 DTR 9 RI 5 GND Note: COM3/4 only support RS232 mode Pin
Open the catalog to page 16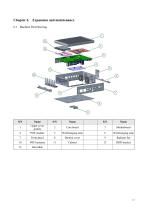
6.1 Machine Part Drawing
Open the catalog to page 17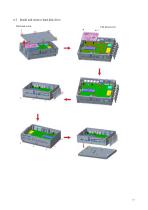
6.2 Install and remove hard disk drive Flat head screw Flat head screw
Open the catalog to page 18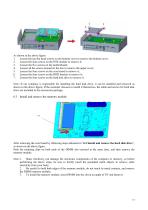
As shown in the above figure: 1. Loosen the ten flat head screws on the bottom cover to remove the bottom cover; 2. Loosen the four screws on the POE module to remove it; 3. Loosen the five screws on the motherboard; 4. Loosen all the screws around on the box to remove the upper cover; 5. Loosen the four screws on the core board to remove it; 6. Loosen the four screws on the HDD bracket to remove it; 7. Loosen the four screws on the hard disk drive to remove it. Note: If our company is responsible for installing the hard disk drive, it can be installed and removed as shown in the above figure;...
Open the catalog to page 19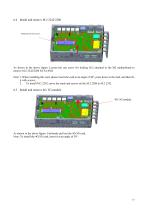
Motherboard with screws As shown in the above figure: Loosen the one screw for locking M.2 attached to the M2 motherboard to remove M.2 2242/2280 SATA SSD. Note: 1.When installing this card, please insert the card at an angle of 30°, press down to the stud, and then fix it with screws; 2. To install M.2 2242, move the studs and screws on the M.2 2280 to M.2 2242. 6.5 Install and remove 4G/ 5G module 4G/ 5G module As shown in the above figure: Uniformly pull out the 4G/5G card. Note: To install the 4G/5G card, insert it at an angle of 30°.
Open the catalog to page 20
7.1 BIOS explanation This motherboard uses AMI BIOS. The full name of BIOS is Basic Input Output System. It is stored in a ROM (Read-Only Memory) chip on the computer motherboard. When you turn on your computer, BIOS is the first program to run. It mainly has the following functions: a. Initialize your computer and detect hardware, this process is called POST (Power On Self Test). b. Load and run the operating system. c. Provide the lowest and most basic control over your computer hardware. d. Manage your computer through SETUP. The modified BIOS data will be stored in a battery-maintained CMOS...
Open the catalog to page 21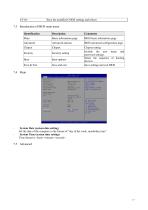
Save the modified CMOS settings and reboot 7.3 Introduction of BIOS main menu • System Date (system date setting) Set the date of the computer in the format of “day of the week, month/day/year”. • System Time (system time setting) Time format is <hour><minute><second>.
Open the catalog to page 22All JWIPC TECHNOLOGY CO., LTD. catalogs and technical brochures
 JWIPC Industrial Product Catalog
35 Pages
 ISG308
3 Pages
 ISG305
3 Pages
 ISG305P
3 Pages
 ISG308P
3 Pages
 ISF105
3 Pages
 ISF105P
3 Pages
 ISF108
3 Pages
 ISF108P
3 Pages
 ISG308P-24V
3 Pages
 ISG3200-10TS
4 Pages
 ISG3200-12TS-P
4 Pages
 ISG3200-28TS
4 Pages
 Datasheet JEA-E68I
3 Pages
Archived catalogs
 AIoT7-H510 User’s Manual
44 Pages
 ISF106TF-P
2 Pages
 ISF108P-24V
2 Pages
 ISG3200-12TS
2 Pages
 ISG302TS-HPW
1 Page
 ISF102TF
1 Page
 ISF105TF-P
2 Pages
 S3200 Series-datasheet
2 Pages
 S4300 Series-datasheet
2 Pages
 S5600 Series-datasheet
2 Pages
 S5800 Series-datasheet
2 Pages
 S6200 Series-datasheet
2 Pages
 AIoT9-H510 User’s Manual
38 Pages
 JWIPC BOX PC Selection Guide
2 Pages
 Datasheet IPC-4U810
2 Pages
 E088 User’s Manual
19 Pages


- Panel PC
- Industrial panel PC
- Panel PC with touch screen
- Fanless panel PC
- Ethernet switch
- LCD panel PC
- LCD screen
- Monitor with touchscreen
- Industrial monitor
- Industrial computer
- HDMI monitor
- Intel® Core™ PC
- Fanless PC
- IP65 panel PC
- Intel® Core™ panel PC
- VESA mounting panel PC
- Industrial network switch
- HDMI PC
- Embedded PC
- Linux panel PC