
- Catalogs
- JOHN GUEST
- Room Pack step by step

Room Pack step by step

Room Pack step by step
JG Underfloor Room Packs are designed for underfloor heating in single rooms up to 30m², such as conservatories, bathrooms, kitchens, and extensions. They offer a cost-effective, easy-to-install solution with high heat output, suitable for various subfloor types.
- Components include a pre-assembled control unit, a programmable thermostat, and JG Layflat® Pipe and Clips.
The thermostatic blending valve can be set between 35°C and 60°C. Initial settings should be 40-45°C for screed floors and 55-60°C for timber floors. Maximum floor surface temperatures should not exceed 29°C, or 27°C for timber finishes. An optional floor probe can be used to monitor temperatures.
The control unit activates the pump based on a minimum temperature setting. The blending valve maintains the heating circuit temperature by mixing boiler flow with return flow. The pump runs until the primary heating water temperature drops 5°C below the set temperature.
All wiring must be done by a qualified installer following IEE regulations. The pump comes with a plug-in cable, and a fused spur should be installed adjacent to the unit.
- Ensure the maximum area to be heated is 30m² and the boiler can handle the extra output.
- Install UFH pipe on a solid floor with appropriate insulation and screed.
- Tools required include a damp proof membrane, floor insulation, and various installation tools.
- Prepare the floor with insulation and a vapour barrier.
- Install the control unit using a wall bracket.
- Lay the underfloor heating pipe circuits, maintaining consistent spacing.
- Connect the control unit to the pipe circuit and existing heating system.
- Lay the floor screed and allow it to dry naturally.
- Install and program the JG Aura thermostat.
Catalog excerpts

Room Pack Step by step installation guide
Open the catalog to page 1
1. Room pack overview 2. Temperature settings 3. Operation 4. Wiring 5. Installing your Room Pack • Before you get started • Choosing the right pack • Preparing the floor • Installing the control unit • Laying underfloor heating pipe circuits • Connecting the control unit to the pipe circuit • Connecting to an existing heating system • Laying the floor screed • Installing JG Aura heating controls (thermostat) 1. Room Pack overview JG Underfloor Room Packs provide underfloor heating at affordable prices and are ideal for single rooms up to 30m2, including conservatories, bathrooms, kitchens and...
Open the catalog to page 2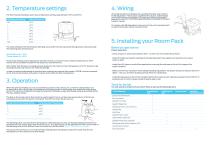
All wiring should be undertaken by a qualified installer and conform to IEE regulations. The pump is supplied with a plug-in cable already connected forease of installation. A fused spur should be installed adjacent to the unit. The mains cable should be connected to the spur fused at 3 amps. The thermostatic blending valve has a temperature setting range between 35°C and 60°C. Blending Valve Setting Water Temperature To comply with IEE Regulations, the pump on the unit is provided with an earth connection via the connection box. 5. Installing your Room Pack The initial setting of the thermostatic...
Open the catalog to page 3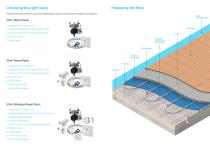
Choosing the right pack There are three Room Packs to choose from depending on the floor area and type of heating control required. Edge Insulation Strip 20m2 Room Pack: 1 x Single Room Control Unit Floor Finish 1 x Programmable Room Thermostat (230v) 1 x 15mm x 150m Coil of Polybutylene Pipe 200 x Pipe Clips JG Layflat Polybutylene Barrier Pipe Pipe Staples Protective Membrane 30m2 Room Pack: Insulation 1 x Single Room Control Unit 1 x Programmable Room Thermostat (230v) 2 x 15mm x 100m Coils Of Polybutylene Pipe 300 x Pipe Clips 8 x Pipe Inserts 2 x 15mm Equal Tees 2 x 15mm Stem Elbows 30m2...
Open the catalog to page 4
Step 1 Fit floor insulation on top of the oversite concrete. Make sure the floor insulation meets design/ buildingregulations - typically 100mm in depth. Installing the control unit Step 5 Using the wall bracket, fix the provided control unit to the wall using a hammer drill and 8mm masonry bit. The control unit should be fixed vertically with the mixing valve at either the top or the bottom, or horizontally with the electrical connection box uppermost. Plug the control unit into a suitable socket or wire to a fused spur (3amp fuse). Hints & Tips For extensions with greater heat loss, for example...
Open the catalog to page 5
Step 7 continued Make sure you maintain a consistent space of 200mm between the runs or 150mm for areas with high heat loss. For consistent spacing between runs use an appropriately sized spacer batten: e.g. 200mm space - 15mm pipe = 185mm spacer batten. Connecting the control unit to the pipe circuit Return to existing heat source Flow from existing heat source Return from UFH pipe circuit Hints & Tips Always feed the pipework from the bottom of the coil. Handle the pipe gently, especially around bends, to prevent it from kinking. You may also need to use additional pipe clips on bends depending...
Open the catalog to page 6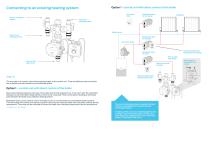
Connecting to an existing heating system Option 1 - control unit with direct control of the boiler Hot water timer Return to heating system Motorised valve for hot water Flow from heating system Boiler return Return from UFH pipe circuit Motorised valve for heating Flow from boiler Programmable room thermostat for heating Motorised valve for UFH Flow to UFH from boiler Flow to UFH pipe circuit Return from UFH to boiler See section 3 (Operation) for values Pump on/off control Programmable room thermostat for UFH The next step is to connect the existing heating supply to the control unit. There...
Open the catalog to page 7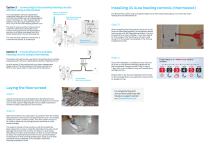
Installing JG Aura heating controls (thermostat) Option 2 – connecting to the existing heating circuits without using a thermostat In an installation without a dedicated underfloor heating circuit for the control unit, the thermostat will not independently switch the boiler on. This means that the control unit will only provide heat to the UFH circuit if the main heating system is on. Return to Existing Heating Source The built in sensor will turn the pump on when the water from the boiler to the control unit is above the set temperature and turn it off when the water from the boiler drops below...
Open the catalog to page 8
Reliance Worldwide Corporation (UK) Limited Horton Road West Drayton UB7 8JL United Kingdom Tel: +44 (0) 1895 449233 Manufactured & distributed by Reliance Worldwide Corporation. Z2105/239/0320
Open the catalog to page 9All JOHN GUEST catalogs and technical brochures
 push-fit solutions
21 Pages
 JG Underfloor Heating
24 Pages
 Wireless Thermostats
19 Pages
 ROOM PACK
16 Pages
 speedfit underfloor
24 Pages
 The Push-fit People
8 Pages
 speedfit speedfit AIR products
68 Pages
 OEM Design & support
12 Pages
 Speedfit Air Products
24 Pages
 Making a good connection
4 Pages
 System Connections
7 Pages
 Cartridge Systeme
12 Pages
 JG Speedfit® Air Products
66 Pages
 JG Speedfit® Air Products
66 Pages


