
- Catalogs
- Interspiro
- user manual 90USA and 90USA-S


user manual 90USA and 90USA-S

user manual 90USA and 90USA-S
InTERSPIRO offers a 12-month warranty covering defects in materials, workmanship, and non-compliance with specifications. Claims require proof of purchase and must be directed to an authorized distributor or InTERSPIRO. The warranty excludes misuse, improper maintenance, unauthorized alterations, and is non-transferable. It does not cover incidental or consequential damages.
Cautions and Limitations
1. Use air-line respirators with air meeting CGA G-7.1 Grade D or higher.
2. Adhere to specified pressure ranges and hose lengths.
3. Electrical parts are not evaluated for flammable atmospheres.
4. Proper use and maintenance are essential to prevent injury or death.
5. Comply with MSHA, OSHA, and other regulations.
6. Use only exact replacement parts.
7. Refer to user instructions for use and maintenance.
Special User Instructions
Approved for oxygen-deficient atmospheres with specific air quality and pressure requirements. Follow guidelines for emergency entry into hazardous atmospheres and ensure proper air supply management.
Safety Notice
Use only with approved InTERSPIRO products. Maintenance and repairs must be performed by certified personnel. Third-party changes are not covered. Compressed air must meet CGA G-7.1 Grade D standards.
Key Procedures
- Cylinder Mounting: Secure with a textile strap, ensuring proper connection and avoiding over-tightening.
- Positive Pressure Activation: For 90USA-S, activate by closing the ambient air hatch. For 90USA, it activates automatically with the first breath.
- Face Mask Connection: Follow steps for connecting and disconnecting the face mask, ensuring not to damage the internal speech diaphragm.
Accessories
Includes alternate cylinder assemblies, airline hoses, and various kits for enhanced functionality.
Pre-Use Check
1. Ensure positive pressure is off and open the cylinder valve fully.
2. Check the shoulder-mounted pressure gauge; it must read full before use. Maintain air cylinders at no less than 90% of rated pressure.
3. Close the cylinder valve and check for leaks by observing the pressure gauge for one minute.
4. Open the by-pass valve slightly to allow air evacuation and check the pressure gauge when the alarm sounds.
Donning Procedure
1. Loosen straps and don the apparatus, adjusting the shoulder straps to position the pack on the lower back.
2. Fasten and tighten the waist belt.
3. Fit the face mask and tighten the head harness straps.
4. Activate positive pressure if applicable.
Check Before Use
1. Listen for leakage and adjust the face mask if necessary.
2. Check air flow by inserting fingers between the sealing edge and face.
3. Ensure the pressure gauge reads full.
Removing the Apparatus
1. Switch off positive pressure and remove the face mask.
2. Close the cylinder valve and unfasten the waist belt.
3. Remove the apparatus and purge air from the system.
Cleaning and Disinfection
1. Clean the apparatus with mild detergent and rinse with clean water.
2. Dry the apparatus and ensure no water ingress.
3. Follow specific procedures for cleaning face masks and breathing valves, ensuring they are completely dry before reassembly.
Storage
Store in a cool, dry, and dust-free environment, protecting rubber parts from sunlight and heat.
Extra Air Connection
The apparatus can be equipped with an extra-air manifold for various connections, ensuring proper use of couplings.
Service and Testing
Follow the "Service and Testing Schedule" for maintenance, available on the InTERSPIRO website.
Catalog excerpts
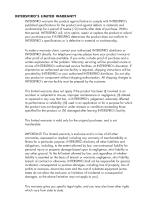
INTERSPIRO’S LIMITED WARRANTY INTERSPIRO warrants this product against failure to comply with INTERSPIRO’s published specifications for the product and against defects in materials and workmanship for a period of twelve (12) months after date of purchase. Within that period, INTERSPIRO will, at its option, repair or replace the product or refund your purchase price if INTERSPIRO determines the product does not conform to INTERSPIRO´s specifications or is defective in material or workmanship. To make a warranty claim, contact your authorized INTERSPIRO distributor or INTERSPIRO directly. For telephone...
Open the catalog to page 2
D. Air-line respirators can be used only when the respirators are supplied with respirable air meeting the requirements of CGA G-7.1 Grade D or higher quality. E. Use only the pressure ranges and hose lengths specified in the user’s instructions. I. Contains electrical parts which have not been evaluated as an ignition source in flammable or explosive atmosphere by MSHA/NIOSH. J. Failure to properly use and maintain this product could result in injury or death. M. All approved respirators shall be selected, fitted, used, and maintained in accordance with MSHA, OSHA, and other applicable regulations....
Open the catalog to page 3
ALTERNATE CYLINDER ASSEMBLY ALTERNATE REGULATOR ASSEMBLY BREATHING VALVE ALTERNATE AIRLINE HOSES S.Special or critical users instructions and/or specific use limitations apply. Refer to users instructions before donning. O.Refer to users instructions, and/or maintenance manuals for information on use and maintenance of these respirators. N.Never substitute, modify, add, or omit parts. Use only exact replacement parts in the configuration as specified by the man ufacturer. regulations. M.All approved respirators shall be selected, fitted, used, and maintained in accordance with MSHA, OSHA, and...
Open the catalog to page 4
user manual 90USA and 90USA-S 1 SAFETY NOTICE The product must only be used together with other approved INTERSPIRO products. The product must only be used by personnel in good health and trained in the use of respiratory protective equipment. Individuals with beards or large sideburns may not obtain an adequate seal. The apparatus must be maintained, serviced and tested as described in this user manual, INTERSPIRO service manuals and INTERSPIRO test instructions. INTERSPIRO IS NOT RESPONSIBLE FOR MAINTENANCE AND REPAIRS NOT CARRIED OUT BY A HOLDER OF A VALID NTERSPIRO CERTIFICATE COMBINATIONS...
Open the catalog to page 6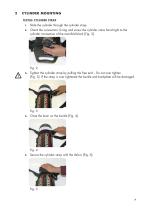
cylinder mounting textile cylinder strap 1. Slide the cylinder through the cylinder strap. Check the connection O-ring and screw the cylinder valve hand tight to the cylinder connection of the manifold block [Fig. 2]. Tighten the cylinder strap by pulling the free end – Do not over tighten [Fig. 3]. If the strap is over tightened the buckle and backplate will be damaged. Close the lever on the buckle [Fig. 4]. Secure the cylinder strap with the Velcro [Fig. 5].
Open the catalog to page 7
Positive pressure is activated by closing the ambient air hatch by pushing the exhalation valve cover against the face mask. To shut off positive pressure and breathe ambient air, simultaneously press down the indicator arm and push the exhalation valve cover away from the face mask. [Fig. 6 and Fig. 7] Fig. 6 Activated positive pressure Positive pressure is automatically activated by the first breath and can be switched off manually by pushing the lever against the diaphragm housing. [Fig. 8 and 9] Fig. 8 Activated positive pressure Fig. 9 Positive pressure switched off
Open the catalog to page 8
4 Connecting and disconnecting the face mask 90USA-s - Connecting the face mask 1. Insert the breathing valve, with the ambient air hatch closed, into the face mask [Fig. 10] and move the external speech cone down to lock the breathing valve in position. In the correct position the lower lip of the speech cone covers the serial number on the breathing valve. Tighten the hand screw [Fig. 11]. ATTENTION! When pushing the breathing valve in place, the fingers shall not be positioned on the internal speech diaphragm since this can damage it. 2. Connect the breathing valve to the breathing hose [Fig....
Open the catalog to page 9
90USA - Connecting the face mask 1. Connect the breathing valve to the mask by pushing the valve into the connection piece and turning it counter clockwise until the bayonet coupling is locked. [Fig. 13] ATTENTION! When pushing the breathing valve in place, the fingers shall not be positioned on the internal speech diaphragm since this can damage it. 2. Mount the external speech cone in the face mask. Tighten the hand screws by hand. [Fig. 14] 90USA - disconnecting the face mask 1. Loosen the two hand screws and remove the external speech cone. Turn the breathing valve clockwise until it disengages...
Open the catalog to page 10
5 APpARATUS PRE-USE CHECK 1. Switch off positive pressure, see section 3. Open the cylinder valve fully. With the cylinder valve still open and the positive pressure turned off, read the shoulder mounted pressure gauge. NOTE! The cylinder valve pressure gauge and the shoulder mounted pressure gauge must read full prior to use. Air cylinders of all SCBA shall be maintained at not less than 90 percent of the rated pressure stamped on the cylinder. 4. Close the cylinder valve. The needle of the shoulder mounted pressure gauge should not move during one minute: If it does - indicating leakage - repairs...
Open the catalog to page 11
Loosen the shoulder straps and the waist belt and don the apparatus. Initially adjust the shoulder straps so as to position the pack on the lower back. Place the neck strap over the head. Fasten waist belt buckle and tighten. [Fig. 15 and Fig. 16] Adjust the shoulder straps [Fig. 17], ensuring the majority of the weight is carried on the hips. Readjust both waist and shoulder straps as necessary and tuck in any loose straps. Fig. 17 Switch off positive pressure, see section 3. Open the cylinder valve fully. Fit the face mask onto the head by first inserting the chin and then pulling the head...
Open the catalog to page 12
Tighten the straps on the head harness, starting with the two at the bottom [Fig. 19]. Pull the straps at an approximate angle of 45 degrees to the rear. Do not overtighten the head harness. Activate the positive pressure, see section 3. The positive pressure activates automatically. Hold your breath and listen for leakage, adjust the face mask if necessary. Check that a strong air flow is heard when two fingers are inserted between the sealing edge and face. [Fig. 20]. Check the operation of the by-pass by opening the valve and ensure a good flow of air into the face mask. Close the by-pass....
Open the catalog to page 13All Interspiro catalogs and technical brochures
 Firefighting Catalog
68 Pages
 Divator MKIII
64 Pages
 DIVATOR RS4
16 Pages
 Product News - Fall 2014
2 Pages
 Catalog
52 Pages

- Pressure limiter
- Single-stage pressure regulator
- Warning light
- LED beacon light
- Strobe warning light
- Hard hat
- Filtering respirator
- Air pressure regulator
- High-pressure pressure regulator
- Fall-arrest harness
- Respirator with valve
- Gas cylinder
- Full-face respirator
- Radio data transmission radio transmitter
- Cylinder pressure regulator
- Modular pressure regulator
- Helmet with respirator
- EN 358 harness
- Wireless radio transmitter