- Catalogs
- Integrated Visual Data Technology Inc
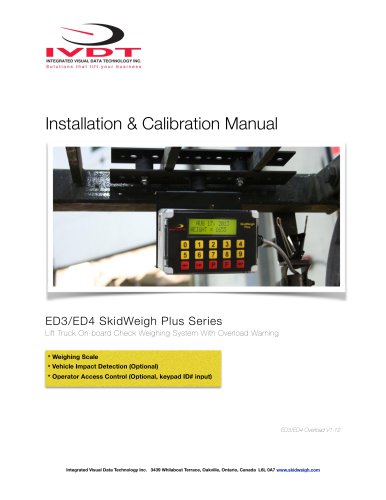
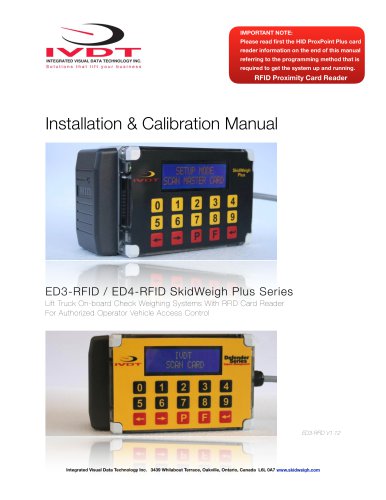
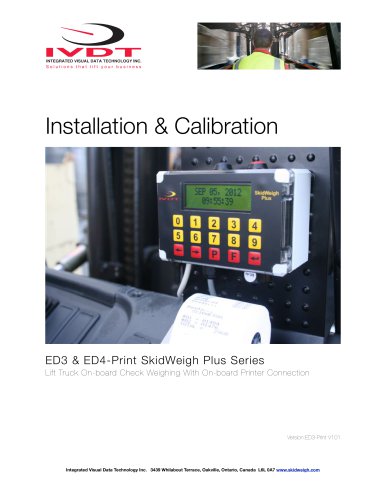
- Installation Instructions for ED2 Series
Installation Instructions for ED2 Series

Installation Instructions for ED2 Series
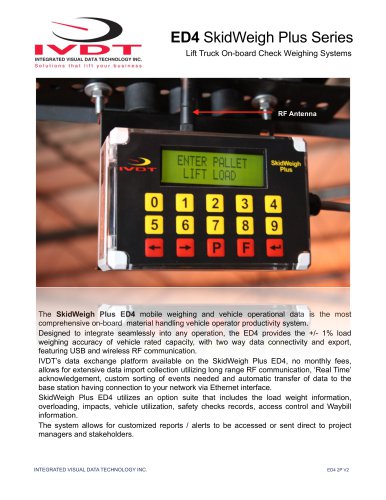
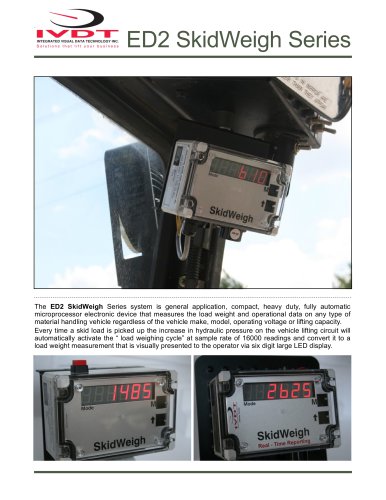
This guide outlines the steps for installing, calibrating, testing, and using the SkidFleet system, which includes an optional impact detection module. For further assistance, contact customer support.
Safety Precautions
Before installation, disconnect the vehicle battery. Ensure all components are securely mounted and do not interfere with vehicle controls. Installation should be conducted by a qualified technician, using soldering or crimp connectors for wire connections, ensuring proper insulation.
Electro-Magnetic Compatibility
The system adheres to CE standards for electromagnetic compatibility, ensuring stability and emission control.
System Components
The SkidFleet system comprises a digital indicator, hydraulic pressure transducer, and an installation manual. It measures hydraulic pressure changes to determine load weight.
Pressure Transducer Installation
Install the transducer in the hydraulic line between the lift control valve and lift cylinder. Ensure the hydraulic circuit is pressure-free before installation and use thread seal for a secure fit.
Mounting the Digital Indicator
Mount the indicator on the vehicle dashboard or operator guard enclosure using the provided bracket. Additional mounting items may be necessary depending on the vehicle model.
Electrical Connections
The system operates on 12 to 55 V DC. Follow specified color codes for wiring connections. The system includes internal short circuit protection.
Calibration Procedure
Calibration involves lifting empty and loaded forks to establish zero and known load weights. Use a known load weight for accurate calibration. The system can display weights in pounds or kilograms.
Optional Features
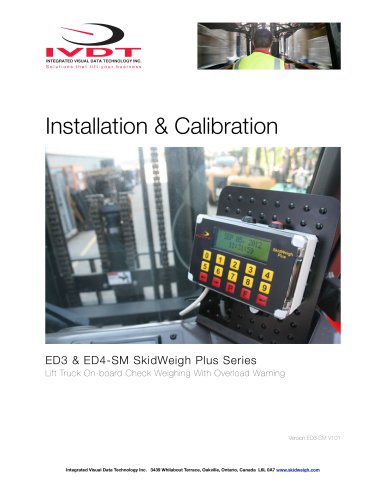
Some models include overload warning and impact detection functions. Enter the overload value after calibration if applicable.
Conclusion
Adhering to these guidelines ensures proper installation and operation of the SkidFleet system. For more details, refer to the full manual or contact support.
The lift truck impact monitoring system detects impacts and displays the G-force value to the operator. There are two configurable impact warning settings: low (default 2.0 G) and high (default 4.0 G). The low setting provides a visual warning, while the high setting also enables event reporting via USB or wireless. Supervisors can adjust these settings using a password-protected system.
Impact Value Adjustment Procedure
Supervisors can change the impact settings by accessing the system with a password. The procedure involves pressing the admin icon, entering the password, and adjusting the low and high impact values.
Operational Considerations
Different operations may require different impact settings due to factors like vehicle type and load conditions. The low setting is used for detecting minor impacts, while the high setting is for reporting significant impacts.
The SkidFleet system provides various functionalities through its LCD display:
- Load Weighing: Proper procedure involves lifting the load slightly above the ground. The system displays the load weight and allows printing of weight tickets.
- Waybill ID Input: Optional feature for entering a Waybill number when printing load weights.
- Accumulative Load Weight Total: Allows totaling of load weights using the 'Add' key.
- Tare Input: Tare values can be set via keypad or reweighing. The system displays a 'TR' sign when tare is active.
- Parts Count by Weight: Allows input of individual part weights and calculates total part counts based on load weight.
Visual Indications
The system provides automatic visual indications for utilization, impact, and overload conditions.
Catalog excerpts

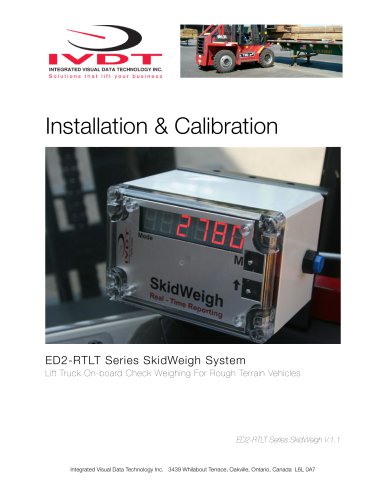
Installation & Calibration SkidFleet System System without OSHA Safety Check Procedures Integrated Visual Data Technology Inc. 3439 Whilabout Terrace, Oakville, Ontario, Canada L6L 0A7
Open the catalog to page 1
General Installation Guide This SkidFleet system installation & calibration guide describes how to install, calibrate, test and use your on-board check weighing with optional impact detection module. Following the instructions in this guide will enable you to get your system operating quickly and easily. In the event that you require additional assistance, please contact customer support via e-mail at [email protected] or visit www.skidweigh.com or contact us at the address or contact number below: Integrated Visual Data Technology Inc. 3439 Whilabout Terrace, Oakville, ON, Canada, L6L 0A7...
Open the catalog to page 2
* Hydraulic pressure transducer with 3 wires cable * Installation & calibration manual and operator usage instruction Operational principal The SkidFleet system check weighing operational principal is based on the hydraulic pressure transducer mounted in the vehicle lifting hydraulic circuit that will automatically activate the “weighing cycle / specic algorithm ” every time a skid load is lifted just above the ground. The increase in pressure is converted in an electronic signal at the sample rate of 16000 readings which is converted into a load weight reading. The SkidFleet models equipped...
Open the catalog to page 3
Selecting the mounting location for digital indicator Use the mounting bracket to fasten digital indicator on the vehicle dashboard, side railing or preferably on the top of the operator guard enclosure, right hand side. There are many examples of mounting locations that will depend on the vehicle model. However, additional mounting items such as a at brackets may be needed to help secure the unit to upper right corner of the guard or side railing. Compact size All of the SkidWeigh systems are compact size, housing dimension of only 178 mm x 144 mm x 48 mm. Electrical Connections All SkidFleet...
Open the catalog to page 4
Electrical power short circuit protection - All of the SkidFleet systems are internally short circuit protected with resettable fuse. There is no need to install external inline fuse in orange wire connected to the ignition switch. - Automotive 60 V load dump protection. Reversal power supply protection. “Quick test to determine if electrical connections are done right” After you have connected electrical power and pressure transducer cable you can check the system operation. - Lower the forks to the ground - Press Home input and activate “Clock & More” input on LCD display. - Press “Pressure...
Open the catalog to page 5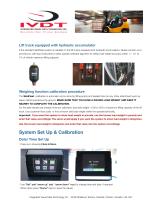
Lift truck equipped with hydraulic accumulator If the standard SkidFleet system is installed on the lift trucks equipped with hydraulic accumulators, please contact us to provide you with input instruction to enter specic software algorithm to obtain load weight accuracy within +/- 0.1 to 1% of vehicle maximum lifting capacity. Weighing function calibration procedure The SkidFleet calibration is automatic and is done by lifting empty and loaded forks (or any other attachment such as paper clamp) just above the ground. MAKE SURE THAT YOU HAVE A KNOWN LOAD WEIGHT AND KEEP IT NEARBY TO COMPLETE...
Open the catalog to page 6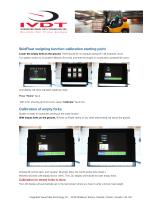
SkidFleet weighing function calibration starting point Lower the empty forks to the ground. There should be no hydraulic pressure in lift hydraulic circuit. Turn ignition switch to on position (electric lift trucks) and start the engine on combustion powered lift trucks. LCD display will show standard weighing mode. Press “Home” input. With LCD showing all of the icons, press “Calibrate” input icon. Calibration of empty forks System is ready for automatic zeroing of the scale function. With empty forks on the ground, lift forks or (Paper clamp or any other attachment) just above the ground. Activate...
Open the catalog to page 7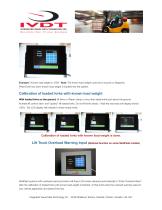
Example:” Known load weight is 1528”. Note: The known load weight could be in pounds or kilograms. Press Enter key when known load weight is inputed into the system. Calibration of loaded forks with known load weight With loaded forks on the ground, lift forks or (Paper clamp or any other attachment) just above the ground. Activate lift control valve and “quickly” lift loaded forks. Do not lift forks slowly ! Wait few seconds until display shows 100%. The LCD display will indicate to lower empty forks. Calibration of loaded forks with known load weight is done. Lift Truck Overload Warning Input...
Open the catalog to page 8
Lift Truck Impact Detection (Optional on some SkidFleet models) Lift truck impacts are a common occurrence in all kinds of material handling operations. In most cases, impact events are to be expected. The SkidFleet Series, lift truck impact monitoring function will detect all of the impacts and visually show to the operator the actual value in G forces. Thera are two impact values warning setting, low and high that can be set for each particular application. Default values are 2.0 G and 4.0 G. The low impact value is only an indication/warning to the operator of the minimum impact detection...
Open the catalog to page 9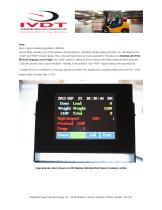
Note: Every material handling operation is different. Vehicle lifting capacity, type of the vehicles, driving loaded or unloaded, loading trailers activities, etc. will inuence the “LOW” and “HIGH” impact values. This is the learning process for every application. The idea is to minimize all of the lift truck impacts, low or high. Use “LOW” setting to detect all of the impacts with lower threshold value (Example 2.0G) and provide only a visual indication / warning to the operator. Use “HIGH” impact value as the reporting tool. * Sudden lift truck acceleration or stopping, driving on uneven oor,...
Open the catalog to page 10
INTEGRATED VISUAL DATA TECHNOLOGY INC. Solutions that lift your business User's Manual Lift Truck / Operator Load weighing starting point Insert the forks into the load, lower the LCD will show "Load Weight Total" Proper weighing procedure Lift the load weight just above the Do not lift the load "slowly" or to different forks load heights LCD will show "Please Wait" with % of the weighing cycle status Printing individual load ■ After few seconds LCD will show "Done" with lifted load weight value The SkidFleet with optional onboard printer connected if you press "Print" key you will get a printout...
Open the catalog to page 11All Integrated Visual Data Technology Inc catalogs and technical brochures
 IM2-Defender Series
2 Pages
 Installation & Calibration
12 Pages
 ED3 SkidWeigh Plus Series
2 Pages
 SkidWeigh ED2
2 Pages
 ED4 SkidWeigh Plus Series
2 Pages
 ED4 SkidWeigh
10 Pages
 ED4 SkidWeigh
14 Pages
 Forklift Impacts detection
14 Pages
 ED3
ED314 Pages
 SkidWeigh ED3
23 Pages
 SkidWeigh Forklift Scale
10 Pages
 SidWeigh OL Series
11 Pages
 ED2-EP SkidWeigh
2 Pages
 Usage SkidWeigh
2 Pages
 ED3- SkidWeigh Plus-Print
9 Pages
 ED2-SkidWeigh
2 Pages
 SkidWeigh printers
4 Pages
 SP-1000 Series
11 Pages


- Measuring machine
- Waterproof scale
- Balance with separate indicator
- Access control system
- IP67 scale
- Management system
- Visual measurement system
- RFID access control system
- Communication controller
- Forklift truck scale
- Dimensional inspection system
- Overload indicator
- Hydraulic scale
- Digital overload indicator
- Forklift truck management system
- Forklift truck monitoring system
- Data communication controller