X500
1 /89Pages

X500
1 /89Pages
Catalog excerpts

3D DRUCKER MADE IN GERMANY Congratulations on your purchase of your personal X500 3D printer German RepRap
Open the catalog to page 1
German RepRap
Open the catalog to page 2
German RepRap
Open the catalog to page 3
German RepRap X500 3D Printer The X500 is the answer to the current demand on the market and offers in addition to the large construction volume of 500 x 400 x 450 (XxYxZ) millimetres further innovations which are the focus of the requirements of industrial use. With its steel frame and a total weight of approx. 180 kg, the machine offers an extremely high stability. A new extruder technology makes it possible to process future material developments precisely. The cooling circuit allows a stable process even at maximum building chamber temperature.
Open the catalog to page 6
applications are provided with the printer. Recommended Requirements • Intel Core i7 CPU German RepRap 1.2 System Requirements Note that the minimum system requirements listed below are for Simplify3D and Repetier-server only. These Minimum Requirements: Intel Pentium 4 CPU 4GB RAM OpenGL 2.0 capable system Internet connection required 1GB of available hard-disk space Supported Platforms: • Windows Vista or later, 32 as well as 64-Bit • Mac OS X 10.7 or later • Ubuntu, Debian, and Fedora-based distributions are all supported (Ubuntu 10.04 LTS or later) Please note that you must use one of...
Open the catalog to page 7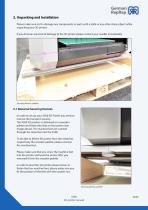
German RepRap 2. Unpacking and Installation Please make sure not to damage any components or parts with a knife or any other sharp object while unpacking your 3D printer. If you discover any kind of damage to the 3D printer please contact your reseller immediately Securing devices, palette 2.1 Removal Securing Devices In order to set up your X500 3D Printer you need to remove the transport security. The X500 3D printers is delivered on a wooden palette and fixed onto that on four points (see image above). The machine feet are screwed through the metal bar into the X500. To be able to lift the...
Open the catalog to page 8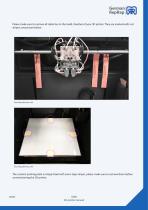
German RepRap Please make sure to remove all cable ties in the build chamber of your 3D printer. They are marked with red stripes, see picture below. Securing devices, axis Securing devices, axis The ceramic printing plate is simply fixed with some tape stripes, please make sure to remove them before commissioning the 3D printer.
Open the catalog to page 9
German RepRap 2.2 Installation Site Every electronic device is emitting heat, so does your 3D printer. Those emission are within the permitted range. Never the less it is possible that sensitive surfaces might discolour due to the permanent heat emission. Please position your 3D printer on a stable, flat and resistant surface. Please note: Leave at least 1m of open space around all sides of your 3D printer for easy maintenance. 3. Commissioning Before starting your first 3D print, you should do a full check-up to see if the printer is fully functional. These small tests can be done via the touch...
Open the catalog to page 10
German RepRap Operating Mode When the X500 is connected to the power supply you can start your printer by using the main switch at the back and the key at the front of the printer. After a short initialization phase the start-up screen appears on the display and the printer is ready to use. In this mode you can upload G-Codes, heat up the machine and traverse the axis. If you open the lid while a 3D print is currently running the printer will shut down immediately and the executed print is lost. WARNING: Surfaces as well as the extruder and printed object will remain hot for some time after the...
Open the catalog to page 11
Extruder Temp. Graph Sprache Nachrichten German RepRap3.3 Turn 3D Printer On/ Off Before starting the initial check-up please make sure that your printer is connected to power supply and that the main-lid is properly closed. Furthermore check that the main switch at the back is turned on and that the operating key is inserted and turned on After a short initialising phase you should see the following screen on the touch display. This chapter only contains view-ports of the display which are necessary for the initial check-up Please read chapter 9. Touch-Display for a detailed overview....
Open the catalog to page 12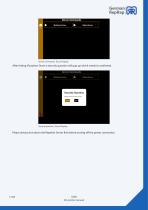
Shutdown Server Reboot Server German RepRap Server Commands, Touch-Display After hitting Shutdown Server a security question will pop up which needs to confirmed. Server Commands Security Question Realty shut down the server? Security question, Touch-Display Please always shut down the Repetier-Server first before turning off the power connection.
Open the catalog to page 13
German RepRap3.3 Touch Display/ Preparation In order to familiarize with your 3D printer, its recommended to slow down the travel speed of the printer. If all axis are traversing slower, you have more time to intervene if, contrary to expectation, problems appear. Starting from the home screen navigate to Parameter (see. p.11) and turn down Speed to 50%. Printer Status ■ Extruder 2 Light On/Off Printer Status, Touch-Display 3.4 Heating Elements To verify if all heating elements are working properly, please check if in Printer Status temperatures are displayed for Extruder 1&2 as well as for...
Open the catalog to page 14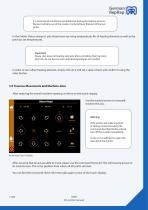
German RepRap It is normal and sometimes inevitable that during the heating process filament will drip out of the nozzle. It is the leftover filament of the test prints. In the Printer Status viewport you should now see rising temperatures for all heating elements as well as the previous set temperatures. Important: Please shut down all heating elements after controlling their functionality! You do not have to wait until all temperatures are reached. In order to turn off an heating element, simply click on it and set a value of zero and confirm it using the enter button. 3.5 Traverse Movements...
Open the catalog to page 15
German RepRap 3.6 PET-Foil for Print-Bed Coating Adding the PET-Foil onto the ceramic printing plate is mandatory and ensures a stable printing process. The PET-Foil functions as the coating of the ceramic printing bed and increases the adhesion between the printed object and the surface. Furthermore its prevents the ceramic plate from getting damaged and doing so it extends the lifespan of it. Please make sure that while applying PET-Foil to the printing bed the 3D printer is not connected to the power grid. Also, please note that you can take out the ceramic plate while attaching the printed...
Open the catalog to page 16


