x400v4
1 /89Pages

x400v4
1 /89Pages
Catalog excerpts
Congratulations on purchase of your personal
Open the catalog to page 1
German RepRap
Open the catalog to page 2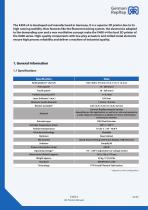
German RepRap The X400 v4 is developed and manufactured in Germany. It is a superior 3D printer due to its high running stability. New features like the filament tracking system, the electronics adapted to the demanding user and a new ventilation concept make the X400 v4 the best 3D printer of the X400 series. High-quality components with low-play actuators and milled metal elements ensure high process reliability and deliver a machine of industrial quality.
Open the catalog to page 6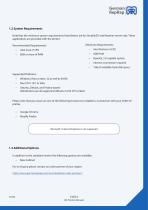
applications are provided with the printer. Recommended Requirements • Intel Core i7 CPU German RepRap 1.2 System Requirements Note that the minimum system requirements listed below are for Simplify3D and Repetier-server only. These Minimum Requirements: Intel Pentium 4 CPU 4GB RAM OpenGL 2.0 capable system Internet connection required 1GB of available hard-disk space Supported Platforms: • Windows Vista or later, 32 as well as 64-Bit • Mac OS X 10.7 or later • Ubuntu, Debian, and Fedora-based distributions are all supported (Ubuntu 10.04 LTS or later) Please note that you must use one of...
Open the catalog to page 7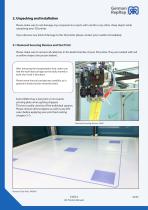
German RepRap 2. Unpacking and Installation Please make sure to not damage any components or parts with a knife or any other sharp object while unpacking your 3D printer. If you discover any kind of damage to the 3D printer please contact your reseller immediately 2.1 Removal Securing Devices and Test Print Please make sure to remove all cable ties in the build chamber of your 3D printer. They are marked with red or yellow stripes (see picture below). After removing the transportation lock, make sure that the tool head carriage can be easily moved in both, the X and Y, directions. Please move...
Open the catalog to page 8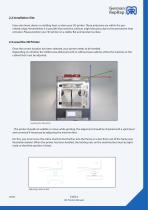
German RepRap 2.2 Installation Site Every electronic device is emitting heat, so does your 3D printer. Those emissions are within the permitted range. Nevertheless it is possible that sensitive surfaces might discolour due to the permanent heat emission. Please position your 3D printer on a stable, flat and resistant surface. 2.3 Level the 3D Printer Once the correct location has been selected, your printer needs to be levelled. Depending on whether the X400v4 was delivered with or without base cabinet, either the machine or the cabinet feet must be adjusted. . The printer should not wobble or...
Open the catalog to page 9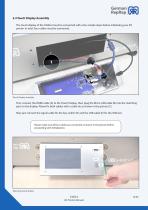
German RepRap 2.4 Touch Display Assembly The touch display of the X400v4 must be connected with a few simple steps before initializing your 3D printer. In total, four cables must be connected. Touch Display Assembly First, connect the HDMI cable (A) to the Touch Display, then plug the Micro USB cable (B) into the matching port on the display. Please fix both cables with a cable tie as shown in the picture (C). Now just connect the signal cable for the key switch (D) and the USB cable (E) for the USB slot. Please make sure all four cables are connected as shown in the picture before proceeding...
Open the catalog to page 10
German RepRap Then mount the touch display using the four marked screws. The screws only need to be screwed in as there are already threads in the housing of the X400v4. 2.5 Mounting the Spool Holder The holder for the filament is dismantled for compact shipping and must be mounted in a few simple steps. Mount the spool holder First loosen the marked screw and use it to mount the filament holder (see pictures above). Then fix the filament guide (L-bracket) with the help of the two fixing screws. If you are going to use big spools (2,1kg) use the holes closer to the centre of the 3D printer (see...
Open the catalog to page 11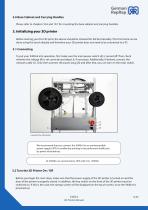
German RepRap 2.6 Base Cabinet and Carrying Handles Please refer to chapters 10.6 and 10.7 for mounting the base cabinet and carrying handles. 3. Initializing your 3D printer Before starting your first 3D print, the device should be checked for full functionality. This first check can be done using the touch display and therefore your 3D printer does not need to be connected to a PC. 3.1 Connecting To put your X400v4 into operation, first make sure the main power switch (A) is turned off. Then check whether the voltage (B) is set correctly and adjust it, if necessary. Additionally, if desired,...
Open the catalog to page 12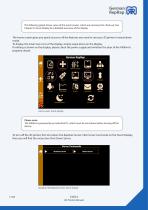
G-Codes \Bewegen/ Filament wechseln Drucker Netzwerk German RepRap The following graph shows views of the touch screen, which are necessary for check-up. See Chapter 9. Touch Display for a detailed overview of the display. The home screen gives you quick access to all the features you need to use your 3D printer in stand-alone mode. To display the lower two icons of the display, simply swipe down on the display. If nothing is shown on the display, please check the power supply and whether the door of the X400v4 is properly closed. German RepRar Drucker Netzwerk Import Konsole Extruder...
Open the catalog to page 13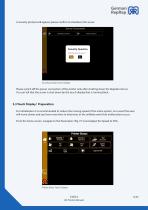
German RepRap A security prompt will appear, please confirm to shutdown the server. Security prompt, Touch-Display Please switch off the power connection of the printer only after shutting down the Repetier-Server. You can tell that the server is shut down by the touch display that is turning black. 3.3 Touch Display/ Preparation For initialization it is recommended to reduce the moving speed of the entire system. As a result the axes will move slower and you have more time to intervene, in the unlikely event that malfunctions occur. From the home screen, navigate to the Parameters (Fig. P.13)...
Open the catalog to page 14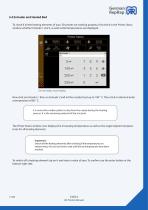
German RepRap To check if all the heating elements of your 3D printer are working properly, first check in the Printer Status window whether Extruder 1 and 2, as well as Bed temperatures are displayed. Printer Status M_ Extruder 2 Turn on heaters, Touch-Display Now click on Extruder 1, then on Extruder 2 and let the nozzles heat up to 190 ° C. Then click on Bed and enter a temperature of 60 ° C. It is normal for molten plastic to drip from the nozzle during the heating process. It is the remaining material of the test print The Printer Status window now displays the increasing temperatures...
Open the catalog to page 15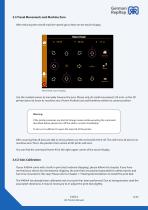
German RepRap 3.5 Travel Movements and Machine Zero After reducing the overall machine-speed go to Move on the touch-display. Move Head, Touch-Display Use the marked arrows to manually traverse the axes. Please only do small movements (20 mm), as the 3D printer does not know its machine zero ( Home Position) yet and therefore neither its current position. Warning: If the printer produces any kind of strange noises while executing the command described below, please turn off the eletric current immediately. To do so it is sufficient to open the main lid of the printer. After assuring that all...
Open the catalog to page 16


