x1000
1 /55Pages

x1000
1 /55Pages
Catalog excerpts
3D DRUCKER MADE IN GERMANY Congratulations on your purchase of your personal
Open the catalog to page 1
German RepRap
Open the catalog to page 2
German RepRap The X1000 is a professional 3D printer, especially designed for processing various plastic materials with extra-large work area and optional dual extruder. With a layer thickness up to 0.1 mm and a printing surface of 1000x800x600 mm, this 3D printer can produce either big models or several small objects with highest precision. A closed switch gear cabinet, an emergency stop switch and an optional CO2 based dual fire protection system ensure that the requirements derived from an industrial work environment are completely satisfied.
Open the catalog to page 4
German RepRap 1.2 System Requirements Note that the minimum system requirements listed below are for the Simplify3D-Software and Repetier-Server only. These applications are provided with the printer. • Intel Pentium 4 or better Ubuntu/Debian Linux Please note that you must use one of the following browsers to establish a connection with your X1000 3D printer. • Google Chrome Mozilla Firefox Microsoft´s Internet Explorer is not supported 1.3 Additional Options In addition to the standard version the following options are available: • Dual extruder CO2 based dual fire protection system For an...
Open the catalog to page 5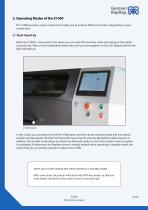
German RepRap 2. Operating Modes of the X1000 The X1000 provides various modes that enable you to perform different functions depending on your current task. 2.1 Red/ Stand-by When the X1000 is connected to the mains you can reach the stand-by mode by turning on the printer using the key. After a short initialization phase the start-up screen appears on the LCD display and the red light will light up. In this mode, you can keep the lid of the X1000 open and heat up the extruder heads and let material extrude simultaneously. All other functions (like traversing the axis) are blocked for safety...
Open the catalog to page 6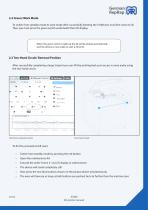
German RepRap 2.2 Green/ Work Mode To switch from standby mode to work mode after successfully booting the X1000 you must first close its lid. Then you must press the green switch underneath the LCD display. When the green switch is light up the lid will be locked automatically and the device is now ready to start a 3D print. 2.3 Two-Hand Circuit/ Removal Position After successfully completing a large 3d print you can lift the printing bed up to access is more easily using the two-hand circuit. LCD menu, manual control Two-hand circuit To do this, proceed as foll vows: • • Execute the order “home...
Open the catalog to page 7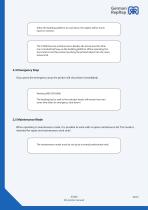
German RepRap Allow the building platform to cool down, the object will be much easier to remove. The X1000 has two machine zeros. Besides the actual one the other one is located half way up the building platform. When operating the two-hand circuit this prevent pushing the printed object into the maintenance lid. 2.4 Emergency Stop If you press the emergency stop, the printer will shut down immediately. Warning RISK OF BURN: The heating bed as well as the extruder heads will remain hot even some time after an emergency shut down! 2.5 Maintenance Mode When operating in maintenance mode, it is...
Open the catalog to page 8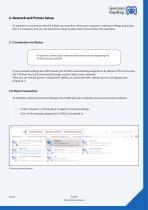
German RepRap 3. Network and Printer Setup To establish a connection with the X1000 you must first check your computer´s network settings and adapt them, if necessary. The you can launch the setup routine and put the printer into operation. If necessary, contact your network administrator about integrating the X1000 into your network. If your network settings are DHCP based, the X1000 is automatically assigned an IP address. If this is the case the X100 just has to be connected through a patch cable to your network. Then you can see the printer´s assigned IP address as well as the MAC address...
Open the catalog to page 9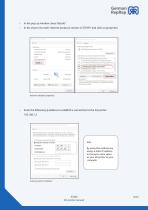
German RepRap • In the pop up window chose “details” In the shown list mark “internet protocol, version 4 (TCP/IP)” and click on properties Network adapter properties Enter the following ip address to establish a connection to the 3d printer: 192.168.1.2 Info: By using this method you assign a static IP-address in the same name space as your 3D printer to your computer Entering static IP address
Open the catalog to page 10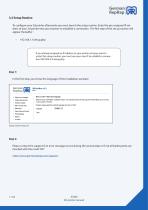
German RepRap 3.3 Setup Routine To configure your 3d printer afterwards you must launch the setup routine. Enter the pre-assigned IP-address of your 3d printer into your browser to establish a connection. The first step of the set up routine will appear thereafter : • If you already assigned an IP-address to your printer and you want to restart the setup routine, you must use your new IP to establish a connection XXX.XXX.X.X/setup.php . Step 1: In the first step, you chose the language of the installation assistant Setup routine step one Step 2: Please contact the support if an error message...
Open the catalog to page 11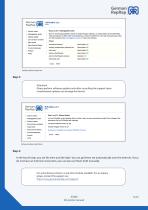
German RepRap Setup routine step two Step 3: Attention! Please perform software updates only after consulting the support-team. Unauthorized updates can damage the device! Setup routine step three Step 4: In the fourth step, you set the time and the date. You can get them set automatically over the internet. If you do not have an internet connection, you can also set them both manually. For some devices, there is a real-time module available. For an inquiry please contact the support via: https://www.germanreprap.com/support/
Open the catalog to page 12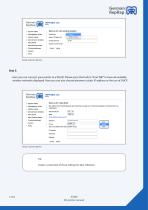
German RepRap Setup routine step four Step 5: Here you can connect your printer to a WLAN. Please press the button “Scan Wifi” to have all available wireless networks displayed. Here you can also choose between a static IP-address or the use of DHCP. Setup routine step five Tip: Create a screenshot of these settings for later reference.
Open the catalog to page 13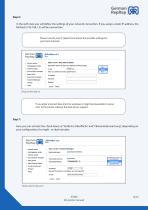
German RepRap Step 6: In the sixth step you will define the settings of your network connection. If you assign a static IP-address, the fall-back (192.168.1.2) will be overwritten. Please consult your IT department about the possible settings for your local network. Setup routine step six If you enter incorrect data into this windows it might be impossible to reconnect to the printer without the help of our support. Step 7: Here you can activate the check-boxes at “Grafische Oberfläche” and “Filamentüberwachung”, depending on your configuration, for single - or dual extruder. Setup routine step...
Open the catalog to page 14


