


Complete X Series E-Stops Catalog

Complete X Series E-Stops Catalog
The document provides a detailed overview of IDEC's X Series Emergency Stop (E-Stop) switches, emphasizing their 'Safe Break Action' design. This innovative feature ensures that the Normally Closed (NC) contacts open in case of damage, enhancing safety by preventing machine operation during emergencies.
Traditional E-Stop switches rely on spring pressure to keep NC contacts closed, which can fail under improper installation or excessive force. The 'Safe Break Action' reverses this, using spring pressure to open contacts if the switch is damaged, ensuring reliable machine stoppage.
The X Series E-Stops are designed for Level 4 safety applications, featuring up to four contacts in a compact form. They are secured from the rear of the control panel, preventing unauthorized removal. The switches offer both push-turn and push-pull reset methods, reducing operator confusion.
The XN4E series allows technicians to use personal padlocks to prevent unauthorized resetting, enhancing safety by ensuring all personnel are clear before machine restart.
The document details specifications such as rated insulation voltage (250V), thermal current (2.5A), and compliance with standards like IEC60947-5. The switches are RoHS compliant and offer IP65 protection.
The guide compares the XA, XW, and XN series, detailing features like contact configuration, electrical and mechanical life, and degree of protection. The XA series, for instance, offers a depth behind the panel of only 27.9mm for up to four contacts.
Part numbers for various configurations of non-illuminated and illuminated XA E-Stops are provided, along with accessories like replacement LED units and terminal covers.
Instructions for removing the contact block and panel mounting are included, emphasizing the importance of not exerting excessive force to avoid damage.
- Contact Block Installation: Align the small marking on the operator base with the TOP marking on the contact block. Press and turn clockwise until the bayonet ring clicks.
- Contact Block Removal: Unlock the operator button, pull back the bayonet ring, turn the contact block counterclockwise, and pull out.
- LED Unit Removal: Use the LED unit removal tool to squeeze the latches and pull out the LED unit.
- LED Unit Installation: Align the top of the LED unit with the TOP marking on the contact block and push in.
- Use 16 AWG maximum wire size.
- Solder at 310 to 350°C within 3 seconds using Sn-Ag-Cu solder.
- Use non-corrosive rosin flux and protective tubes to prevent short circuits.
- Use glass epoxy copper-clad laminated sheets of 1.6 mm thickness.
- Ensure circuits withstand rated voltage and current.
- Minimum applicable load is 5V AC/DC, 1 mA.
- Applicable Standards: IEC60947-5-1, EN60947-5-1, UL508, CSA C22.2 No. 14.
- Operating Temperature: Non-illuminated: –25 to +60°C, Illuminated: –25 to +55°C.
- Operating Force: Push-to-lock: 32N, Pull-to-reset: 21N, Turn-to-reset: 0.27N·m.
- Contact Resistance: 50mΩ maximum.
- Insulation Resistance: 100MΩ minimum.
- Turn off power before installation, removal, wiring, maintenance, and inspection.
- Use the LED unit removal tool to avoid burns.
- Ensure proper wire size and soldering to prevent fire hazards.
- Rated Insulation Voltage: 250V.
- Current: 5A.
- Rated Operating Voltage: 30V, 125V, 250V.
- Terminal Covers: XW9Z-VL2M for contact block, XW9Z-VL2MF for IP20 protection.
- Nameplates: Available in various sizes and styles.
- Shrouds: Compliant with SEMI S2 standards.
- Dimensions: Detailed measurements provided for various components.
- Part Numbers: Listed for different configurations and sizes.
The XN Series E-Stops come with plastic, metallic, and flush bezels, and can accommodate up to 20 padlocks. They feature mushroom heads in different sizes (ø40, ø44, ø60mm) and a "safe break action" mechanism to keep contacts open when detached. They comply with IEC60947-5-5 and OSHA standards, are RoHS compliant, and have a protection degree of IP65.
The switches operate within a temperature range of -25 to +60°C and have a mechanical life of 250,000 operations. They are designed to withstand shocks and vibrations and have a contact resistance of 50mΩ. The switches are available in various configurations with different contact arrangements and illumination options.
The document provides detailed instructions for installing and removing contact blocks and terminal covers. It emphasizes the importance of not using excessive force and ensuring proper alignment during installation. The switches are designed for easy panel mounting and come with accessories like locking ring wrenches and terminal covers.
The document specifies the wire sizes and tightening torques for terminal screws. It also provides guidelines for handling the switches to prevent damage from excessive shocks or vibrations.
The XN Series E-Stops are designed to meet various international safety standards and are suitable for use in safety-related parts of control systems. The document advises performing a risk assessment before operation.
IP20 protection cannot be guaranteed if the installation is not secure, which may lead to electric shocks. It is crucial to ensure proper installation to maintain safety standards.
When resetting the button by pulling or turning, the normally closed (NC) main contacts may experience bounce. Similarly, pressing the button can cause the normally open (NO) monitor contacts to bounce. It is important to consider the contact bounce time, which is approximately 20 milliseconds, when designing a control circuit.
The LED lamp integrated into the contact block is non-replaceable, indicating that the entire unit may need replacement if the LED fails.
To install the anti-rotation ring, align the side without a thread on the operator with the TOP marking, the small 's' marking on the anti-rotation ring, and the recess on the mounting panel. This ensures proper alignment and functionality.
Catalog excerpts

The new IDEC Emergency Stop switches, the XA, XW, and XN series, include revolutionary new technology that will change the way E-Stop switches are designed. This safe break actionӔ concept provides greater levels of human safety and is the fi rst of its kind in the world! > OverviewX Series E-StopsDoor Interlock Switches Enabling SwitchesBarriersAS-Interface Safety at Work Conventional E-Stop switches are designed with spring pressure on the Normally Closed (NC) contacts, keeping them in the closed position and allowing the machine to operate. Improper installation or excessive force to the stop...
Open the catalog to page 2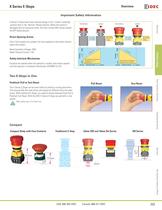
X Series E-Stops have lower internal energy in the LockedӔ (Latching) position than in the NormalӔ (Reset) position. When the switch is damaged from an excessive shock, the main contact (NC) moves toward the OFF (Safe) position. OverviewX Series E-StopsDoor Interlock SwitchesEnabling SwitchesBarriersAS-Interface Safety at Work Direct Opening Action > Even if the contacts are welded, the force applied on the button directly opens the contact. Rated Insulation Voltage: 250VRated Thermal Current: 2.5A Safety Interlock Mechanism > Contacts are opened when the operator is locked, and remain opened...
Open the catalog to page 3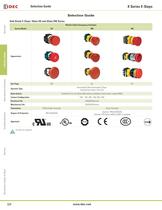
Worlds Safest Emergency SwitchesSeries ModelXAXWXN Appearance > OverviewX Series E-StopsDoor Interlock Switches Enabling SwitchesBarriersAS-Interface Safety at Work See Page 325331337 Operator Type Illuminated & Non-Illuminated E-Stops: Pushlock/Turn Reset, Push-Pull Reset Action Pushlock Pull or Turn Reset (both actions available in each switch, except XN4E) Contact Confi guration 1NO - 1NC, 2NC, 1NO-3NC, 4NC Electrical Life 100,000 Minimum Mechanical Life 250,000 Minimum Termination PCB & Solder TerminalsScrew Terminals Degree of Protection IP65 (IEC60529)Operator: IP65 (IEC60529)Terminal:...
Open the catalog to page 4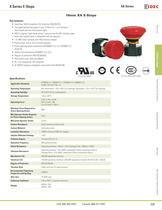
OverviewX Series E-StopsDoor Interlock SwitchesEnabling SwitchesBarriersAS-Interface Safety at Work UL File No. E68691 CCC No. 2005010305150899 Applicable Standards IEC60947-5-1, EN60947-5-1, IEC60947-5-5, EN60947-5-5UL508, CSA C22.2 No. 14 Operating Temperature Non-illuminated: Ֆ25 to +60C (no freezing), Illuminated: Ж25 to +55C (no freezing) Operating Humidity 45 to 85% RH (no condensation) Storage Temperature Ж45 to +80C Push-to-lock: 10.5NPull-to-reset: 10N Turn-to-reset: 0.16Nзm Operating Force Minimum Force Required for Direct Opening Action 60N Min Operator Stroke Required for Direct Opening...
Open the catalog to page 5
OverviewX Series E-StopsDoor Interlock SwitchesEnabling SwitchesBarriersAS-Interface Safety at Work > 0+0.2 Monitor Contacts (NO) Rated Operating CurrentMain Contacts (NC) 17.9 >
Open the catalog to page 7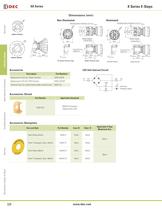
Mounting Panel Thickness: 0.5 to 3.7 > 29.8 29.8 27.2 19.88.7 27.219.88.74.5 OverviewX Series E-StopsDoor Interlock Switches Enabling SwitchesBarriersAS-Interface Safety at Work 3.1 Locking RingRubber Gasket Mounting Panel Thickness: 0.5 to 3.7 XA9Z-VL2Terminal Cover 30.4 Solder Terminal TypePC Board Terminal Type > PC Board TerminalSolder Terminal
Open the catalog to page 8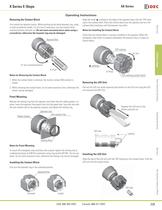
Check that the contact block is securely installed on the operator. When the emergency stop switch is properly assembled, the bayonet ring is in place as shown below. marking on the edge of the operator base with the TOP mark-ing on the contact block. Press the contact block onto the operator and turn the contact block clockwise until the bayonet ring clicks. First unlock the operator button. While pushing up the white bayonet ring, using a small screwdriver (width: 2.5 to 3 mm) if necessary, turn the contact block counterclockwise and pull out. Do not exert excessive force when using a screwdriver,...
Open the catalog to page 9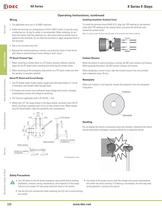
Installing Insulation Terminal Cover 1. The applicable wire size is 16 AWG maximum.2. Solder the terminal at a temperature of 310 to 350C within 3 seconds using a soldering iron. Sn-Ag-Cu solder is recommended. When soldering, do not touch the switch with the soldering iron. Also ensure that no tensile force is applied to the terminals. Do not bend the terminals or apply excessive force to the terminals.3. Use a non-corrosive rosin fl ux. 4. Because the terminal spacing is narrow, use protective tubes or heat shrink-able tubes to avoid burning of wire coating or short circuit. To install the...
Open the catalog to page 10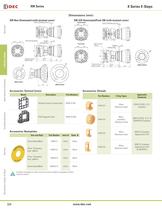
Panel Thickness 0.8 to 6 Gasket Terminal CoverXW9Z-VL2M M3 Terminal Screw Panel Thickness 0.8 to 6 Gasket Terminal Cover 18.520.1 > 3.2 > 0+0.2 22.3R0.8 max. R 0+0.4 R R 0+0.4 OverviewX Series E-StopsDoor Interlock Switches Enabling SwitchesBarriersAS-Interface Safety at Work 24.1
Open the catalog to page 14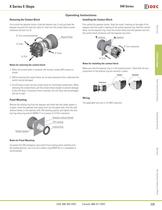
First unlock the operator button. Grab the bayonet ring and pull back the bayonet ring until the latch pin clicks First unlock the operator button. Align the small t marking on the edge of the operator with the small s marking on the yellow bayonet ring. Hold the contact block, not the bayonet ring. Press the contact block onto the operator and turn the contact block clockwise until the bayonet ring clicks. > OverviewX Series E-StopsDoor Interlock SwitchesEnabling SwitchesBarriersAS-Interface Safety at Work , then turn the contact block counter-clockwise and pull out . Turn counterclockwise marking...
Open the catalog to page 15
1. Wire thickness: AWG18 to 16 2. Tighten the M3 terminal screw to a tightening torque of 0.6 to 1.0 Nm. To install the IP20 protection cover, align the TOP marking on the cover with the TOP marking on the contact block, and press the cover toward the contact block. > OverviewX Series E-StopsDoor Interlock Switches Enabling SwitchesBarriersAS-Interface Safety at Work To install the terminal cover, align the TOP marking on the terminal cover with the TOP marking on the contact block. Place the two projections on the bottom side of the contact block into the slots in the terminal cover. Press the...
Open the catalog to page 16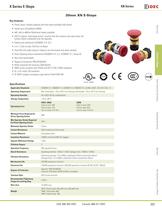
OverviewX Series E-StopsDoor Interlock SwitchesEnabling SwitchesBarriersAS-Interface Safety at Work File No. E68961 Applicable Standards IEC60947-5-1, EN60947-5-1, IEC60947-5-5, EN60947-5-5, UL508, UL991, CSA C22.2 No. 14 Operating Temperature Non-illuminated: Ֆ25 to +60C (no freezing), Illuminated: Ж25 to +55C (no freezing) Minimum Force Required for Direct Opening Action XN4E Operating Humidity 80N 45 to 85% RH (no condensation) Push-to-lock: 32N Pull-to-reset: N/A Turn-to-reset: 0.4 Nзm Min Operator Stroke Required for Direct Opening Action Storage Temperature 45 to +80ְC 4mm Maximum Operator...
Open the catalog to page 17All IDEC catalogs and technical brochures
 MACHINE TOOLS Industry Solutions
28 Pages
 ROBOTICS Industry Solutions
27 Pages
 Relay Selection Guide
16 Pages
 PUSH-IN PRODUCTS
12 Pages
 PRODUCT GUIDE
44 Pages
 HR6S
HR6S32 Pages
 KW2D SERIES
16 Pages
 LED-Leuchten: LF2B
6 Pages
 LED Illumination Units
28 Pages
 LED-Leuchten: LF1B-N
4 Pages
 Katalog FL1E
16 Pages
 RS485-Kommunikationsmodul
2 Pages
 Automation Organizer
2 Pages
 Web-Server-Modul
4 Pages
 MicroSmart DC12V
4 Pages
 FT1A SmartAXIS
36 Pages
 RTE/GT3/GE1A/GT5P/GT5Y
68 Pages
 Universalrelais RR/RY/RH/RU
59 Pages
 RJ.S Relays und Sockets
12 Pages
 RV8H-Baureihe
6 Pages
 E-Stop Switches
16 Pages
 XA series
7 Pages
 High Performance
4 Pages
 HG1X
HG1X3 Pages
 FL1E
FL1E4 Pages
 product brochure
6 Pages
 All Product Brochure
6 Pages
 Complete Contactors Catalog
60 Pages
 Complete Terminal Blocks Catalog
22 Pages
 Complete Timer Catalog
68 Pages
 Complete Relay & Socket Catalog
68 Pages
 Complete Display Lights Catalog
44 Pages
 Complete Safety Overview
6 Pages
 Complete Power Supply Catalog
22 Pages
 Complete O/I Catalog
22 Pages
 Complete PLC Catalog
68 Pages



- Power supply unit
- DC power supply
- AC/DC power supply
- Rectangular housing
- Ethernet switch
- Electric gearmotor
- Industrial network switch
- LED lighting
- Plastic housing
- Single-pole switch
- Windows software
- Cloud-based software
- Push-button switch
- Waterproof network switch
- Power supply for industrial applications
- Switched-mode power supply
- Unmanaged switch
- Photoelectric sensor
- Compact power supply
- Indoor enclosure