
- Catalogs
- Hypro Pressure Cleaning
- Series 9200, 9500, 1536-1551 Operation, Installation & Parts Manual

Series 9200, 9500, 1536-1551 Operation, Installation & Parts Manual

Series 9200, 9500, 1536-1551 Operation, Installation & Parts Manual
Hypro Centrifugal Pumps are designed for high-capacity farm spraying tasks, including liquid fertilizers and chemical applications. They come in various models, such as polypropylene pumps, which are resistant to corrosive liquids. This document provides installation, operation, and repair instructions for Series 9200, 9500P, and 1500 pumps.
Key safety guidelines include avoiding flammable or explosive fluids, shielding moving parts, not exceeding recommended speed, pressure, and temperature (140°F), disconnecting power before servicing, securing discharge lines, inspecting hoses regularly, protecting from freezing, and not operating gasoline engines in enclosed areas.
Drive Source Installation: Mount pulleys close to pump and motor engine shaft bearings, ensure proper belt tension, and align shafts properly for Series 9200 and 9500P. Direct Drive Installation: For gas engine models, apply anti-seize compound and secure the pump with bolts, ensuring free rotation.
Engage PTO clutch slowly, use flow control valves for agitation and nozzle flow, flush the pump with a neutralizing solution after use, and use antifreeze with rust inhibitor for storage.
Ensure the pump is primed, check for air leaks or blockages, and replace worn seals if liquid leaks from the weep port.
Disassemble the pump housing to replace seals, clean and replace worn components, and reassemble ensuring seals are properly installed and lubricated.
Follow the schematic for proper plumbing hook-up, including vent lines, shut-off valves, and control consoles.
Ensure the inlet line matches the pump's inlet port size, fittings are tight, and for non-self-priming models, mount the pump below the liquid level with a downward sloping suction line. Fill the suction line and pump with liquid before starting.
Do not run the pump dry. Use a Hypro Vent Line Kit to prevent air locks and ensure proper priming.
The outlet port should point straight up to retain liquid during priming, and the outlet line should match the pressure port size to optimize flow.
Hypro offers components like electric flow control valves, self-cleaning strainers, pressure gauges, and manual agitation control valves for enhanced control.
High-flow electric proportional valves provide smooth control to boom valves, operable via electronic rate controllers or switch boxes.
Place strainers in the pump outlet line to avoid restrictions, using appropriate size and mesh for effective filtration.
The manual agitation control valve adjusts flow to tank jet agitators for proper mixing.
Electromagnetic flowmeters are recommended for consistent and accurate flow readings.
Electric plunger valves are recommended for rapid response and reliability, with sizing to minimize pressure drop.
Nozzle bodies with shut-off check valves prevent dripping when boom valves are closed.
Hypro provides a limited warranty covering defects in material and workmanship under normal use. For service or warranty assistance, contact Hypro with detailed information about the pump and issue, following return procedures for warranty claims.
Catalog excerpts
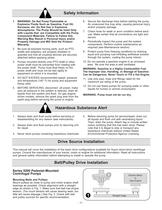
WARNING: Gasoline is a Highly Combustible Fuel.The Improper Use, Handling, or Storage of Gasoline Can be Dangerous. Never Touch or Fill a Hot Engine. 11.Use only pipe, hose and fittings rated for themaximum psi rating of the pump.12.Do not use these pumps for pumping water or otherliquids for human or animal consumption. WARNING: Pump must not be run dry. 1.Always drain and flush pump before servicing ordisassembling for any reason (see instructions).2.Always drain and flush pumps prior to returning unitfor repair.3.Never store pumps containing hazardous chemicals.4.Before returning pump for...
Open the catalog to page 2
GAS ENGINE MOUNT Models 9510Pand 9513P9510Pfits most 8 hp gas engines with flange mount and 1" shafts; 9513Pfits most 5 hp gas engines with flange mount and 3/4" shaft. To install pump onto gas engine, first apply anti-seizecompound to gas engine shaft and to inside of pump hollow shaft. Insert key into engine shaft. Next, slide pump onto engine shaft and secure with four hex head bolts. NOTE: Do not force pump onto shaft. Tighten set screws on pump shaft through slots in flange. Check to make sure pump rotates freely by slowly turning over the gas engine. To Prevent Corrosion Flush Pump After...
Open the catalog to page 4
Cleanup Of Pump Housing 1.Using the circular bottle-type wire brush with air or handdrill, clean the discharge port, suction port and the sealing areas of the o-ring on the pump casing and mounting flange. [The last step should not be performed on the polypropylene models.]2.After wire brush cleaning, it is recommended that the pumpcasing and mounting flange be further cleaned in a solvent tank to remove rust and corrosion particles. Pump Shaft and Bearing Assembly Removal andReplacement Reassemble if drive end is not to be repaired.Be extremely careful with the new seal. Take special care notto...
Open the catalog to page 5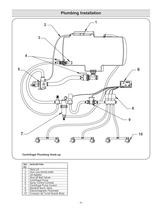
REF.DESCRIPTION NO. 1Tank Lid 2Vent Line #3430-0456 3Jet Agitator 4Shut-off Ball Valves 5Centrifugal Pump 6Spray Control Console 7Centrifugal Pump Control 8Manifold Boom Valve 9Electromagnetic Flowmeter10Compact Jet Turret Nozzle Body -6- >
Open the catalog to page 6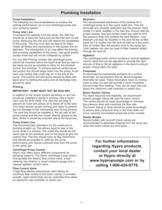
Nozzle Bodies Nozzle bodies with shut-off check valves are recommended to eliminate dripping from the spray tips when the boom valves are shut down. Boom Section Valves For rapid response and reliability,we recommend electric plunger valves be used for boom control. The valves should be sized accordingly to minimize the pressure drop and maximize the flow rate. The boom tubing or hose should be sized accordingly to ensure that a pressure drop in the lines does not occur,causing inconsistent pressures at the nozzles. Agitation Flowmeter The centrifugal pump control contains a manual agitation...
Open the catalog to page 7
THIS WARRANTYIS EXCLUSIVE. HYPRO MAKES NO OTHER WARRANTY, EXPRESS OR IMPLIED, INCLUDING BUT NOTLIMITED TO ANYWARRANTYOF MERCHANTABILITYOR FITNESS FOR APARTICULAR PURPOSE. Hypros obligation under this warranty is, at HyproҒs option, to either repair or replace the product upon return of the entireproduct to the Hypro factory in accordance with the return procedures set forth below. THIS IS THE EXCLUSIVE REMEDYFORANYBREACH OF WARRANTY.IN NO EVENT SHALLHYPRO BE LIABLE FOR ANYINCIDENTALOR CONSEQUENTIALDAMAGES OF ANYKIND,WHETHER FOR BREACH OF ANYWARRANTY, FOR NEGLIGENCE, ON THE BASIS OF STRICT LIABILITY,...
Open the catalog to page 8All Hypro Pressure Cleaning catalogs and technical brochures
 PRODUCT CATALOG
236 Pages
 Transfer Pumps
7 Pages
 Gear Driven
3 Pages
 Centrifugal Pumps
41 Pages
 9302 Series
2 Pages

Archived catalogs
 DBS & DBA Diaphragm Pump OIPM
20 Pages
 Series 2100 Versa-Twin OIPM
16 Pages
 Hydraulic Pressure Washer OIPM
20 Pages
 Hydraulic Pump Selection Guide
38 Pages
 9302 Series Sales Sheet
2 Pages
 UAS Ceramic Nozzles
2 Pages
 HP Stainless Steel Nozzles
2 Pages
 TwinCap Sales Sheet
2 Pages
 ULD Sales Sheet
2 Pages
 ESI Sales Sheet
2 Pages
 Series 5300 OIPM
20 Pages
 2535S OIPM
12 Pages
 PowerLine Plunger OIPM
24 Pages
 Cleanload OIPM
12 Pages
 Foam Marker OIPM
20 Pages
 Series 5200 Piston Pump OIPM
8 Pages


