
- Catalogs
- Hypro Pressure Cleaning
- Series 2100 Versa-Twin OIPM

Series 2100 Versa-Twin OIPM

Series 2100 Versa-Twin OIPM
Catalog excerpts
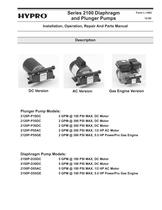
Form L-1493 12-05 Installation, Operation, Repair And Parts Manual Description Plunger Pump Models: DC VersionGas Engine VersionAC Version > 2120P-P18DC2 GPM @ 150 PSI MAX, DC Motor2120P-P35DC2 GPM @ 300 PSI MAX, DC Motor 2120P-P39DC2GPM@300 PSI MAX, DC Motor 2120P-P05AC2 GPM @ 300 PSI MAX, 1/2 HPAC Motor 2120P-P55GE2 GPM @ 300 PSI MAX, 5.5 HPPowerPro Gas Engine Diaphragm Pump Models: > 2150P-D35DC5 GPM@ 100 PSI MAX, DC Motor 2150P-D39DC5 GPM @ 100 PSI MAX, DC Motor 2150P-D05AC5 GPM @ 100 PSI MAX, 1/2 HPAC Motor 2150P-D55GE5 GPM @ 100 PSI MAX, 5.5 HPPowerPro Gas Engine size="-1">
Open the catalog to page 1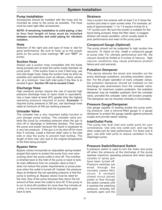
Accessories should be installed with flex hose and bemounted as close to the pump as possible. The hose must be used right after accessories. Use a suction line strainer with at least 3 to 5 times the suction port area in open screen area. For example, an area of approximately 1.1 to 1.9 square inches for a 1/2" suction port. Be sure the screen is suitable for the liquid being pumped. Keep the filter clean. Aclogged strainer will cause cavitation, which usually leads to poor performance and wear of the pump parts. NOTE: If remaining installation is solid piping, a twoto four foot length of hose...
Open the catalog to page 3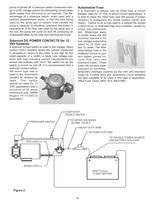
Itis important to always use an inline fuse or circuit breaker rated for 12 VDC in direct current applications. It isbest to place the inline fuse near the source of power(battery) to safeguard the whole system (wires and motor). Failure to do socan lead to a vehicle fire should ashort occur, or extended high amp condition caused by pump over-pressuriza- tion. Blade-type, easy- to-install fuses are the industry standard for low-voltage automotive rated for 32 VDC and are ULlisted. The Maxi (time delay) fuse is the preferred choice to pro- tect higher current cir- cuits than mini andstandard fuses....
Open the catalog to page 4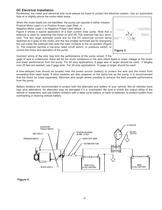
ALTERNATOR START/STOPTOGGLE SWITCH > BATTERYISOLATOR RED LEAD (+) STARTER SOLENOID50 AMP, 12 VOLT MAIN12 VOLT BATTERY PRESSURE SWITCH DEEP CYCLE12 VOLT BATTERY HEAVY DUTY WIRE AUTOMOTIVE FUSE BLACK LEAD (-) >
Open the catalog to page 5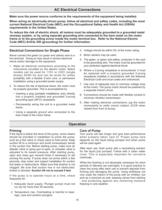
Never connect the green (or green and yellow) wire to alive terminal. Doing so may result in severe electrical shock and/or damage to the equipment.1.Make all electrical connections according to theinstructions provided on the electric motor. Select models can be used for 115V or 230V (single phase) 50/60 Hz and can be wired for either portability with a flexible 3-wire cord, or permanent installation using a grounded power supply.2.To reduce the risk of electrical shock, the motor mustbe properly grounded. This is accomplished by:Inserting a plug (portable installations only) directlyinto a...
Open the catalog to page 6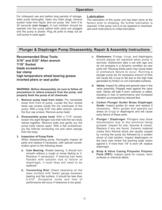
g.Body & Valve Casing Polyester PolymerParts (PBT): Inspect parts for cracks, wornsurfaces or chemical attack. d.Valves: e.Carbon Plunger Guide/ Brass DiaphragmGuide: Inspect for pitting and general wear in thevalve assembly. Poppets wear against the valve seat. Valves will leak if worn unevenly or pitted, resulting in loss of performance and increased vibration accompanied by reduced flow. f.Plunger / Diaphragm: Inspect guides for wear and replace ifnecessary.Worn guides and spacers put stress on U-cup or diaphragms and will cause early failure of these parts. Plungers may showdiscoloration...
Open the catalog to page 7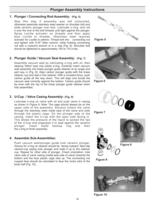
(Fig. 5) Skip this step if assembly was left untouched, otherwise assemble stainless steel washer on shoulder bolt and slide ceramic plunger over bolt. Lubricate o-ring, and roll it over the end of the bolt threads until tight against the plunger. Spray Loctite activator on threads and then apply blue Loctite to threads. (Stainless steel requires activator for Loctite to adhere. Thread bolt into connecting rod and tighten with 3/16" Allen wrench, while holding connecting rod with a crescent wrench or in a vise (Fig. 6). Shoulder bolt should be tightened to approximately 100 to 115 in-lbs. > (Fig....
Open the catalog to page 8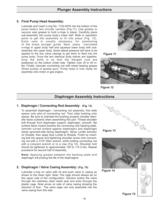
Lubricate and insert o-ring No. 1720-0076 into the bottom of thepump bodys two circular cavities (Fig.11). Use grease or vacuum seal grease to hold o-rings in place. Carefully place sub-assembly into pump bodyҒs lower half. Slide or reposition parts to get the assembly to fit into place (Fig. 12). Extra care is usually necessary for positioning of the brass plunger guide. Next, place lubricated o-rings in upper body half and squeeze lower body with sub- assembly into upper body. Some lateral pressure will have to be applied to the two valve casings to get them to feed into the pump body. Once...
Open the catalog to page 9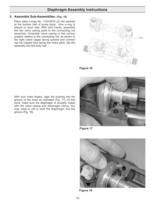
(Fig. 16) Place oiled o-rings No. 1720-0076 (2) into pocketsat the bottom half of pump body. One o-ring is placed on each side. With both hands, assemble the two valve casing parts to the connecting rod assembly. Orientate valve casing in the correct position relative to the connecting rod, as shown to the right (valve cages facing upward and connect ing rod cupped face facing the motor pilot). Set the assembly into the body half. With your index fingers, align the bushing into thegroove of the body as indicated (Fig. 17). At this point, make sure the diaphragm is properly mated with the valve...
Open the catalog to page 10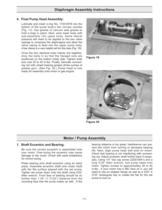
Lubricate and insert o-ring No. 1720-0076 into thebottom of the pump body's two circular cavities (Fig. 11). Use grease or vacuum seal grease to hold o-rings in place. Next, work lower body with sub-assembly into upper body. Some lateral pressure will need to be applied to the two valve casings to compress the diaphragms and allow the valve casing to feed into the upper pump body. Abar clamp is a very helpful aid for this task (Fig. 19).Once the two identical body halves are together,drop the bolts in so that the flanged nuts are positioned on the bottom (inlet) side. Tighten bolts and nuts 35...
Open the catalog to page 11
Hypro warrants to the original purchaser of its products (the PurchaserӔ) that such products will be free from defects in materialand workmanship under normal use for the period of one (1) year for all products except: oil crankcase plunger pumps will be free from defects in material and workmanship under normal use for the period of five (5) years, and accessories will be free from defects in material and workmanship under normal use for the period of ninety (90) days. In addition, Hypro warrants to the purchaser all forged brass pump manifolds will be free from defects in material and workmanship...
Open the catalog to page 16All Hypro Pressure Cleaning catalogs and technical brochures
 PRODUCT CATALOG
236 Pages
 Transfer Pumps
7 Pages
 Gear Driven
3 Pages
 Centrifugal Pumps
41 Pages
 9302 Series
2 Pages

Archived catalogs
 DBS & DBA Diaphragm Pump OIPM
20 Pages
 Hydraulic Pressure Washer OIPM
20 Pages
 Hydraulic Pump Selection Guide
38 Pages
 9302 Series Sales Sheet
2 Pages
 UAS Ceramic Nozzles
2 Pages
 HP Stainless Steel Nozzles
2 Pages
 TwinCap Sales Sheet
2 Pages
 ULD Sales Sheet
2 Pages
 ESI Sales Sheet
2 Pages
 Series 5300 OIPM
20 Pages
 2535S OIPM
12 Pages
 PowerLine Plunger OIPM
24 Pages
 Cleanload OIPM
12 Pages
 Foam Marker OIPM
20 Pages
 Series 5200 Piston Pump OIPM
8 Pages


