
- Catalogs
- Hypro Pressure Cleaning
- Roller Pumps Operation, Installation & Parts Manual

Roller Pumps Operation, Installation & Parts Manual

Roller Pumps Operation, Installation & Parts Manual
- 4-Roller Pump (Series 1200): Max Flow Rate: 62 gpm, Max Pressure: 150 psi, Max RPM: 1000, Ports: 1-1/2" NPT, Shaft: 15/16" Dia.
- 6-Roller Pump (Series 1500): Max Flow Rate: 74 gpm, Max Pressure: 150 psi, Max RPM: 800, Ports: 1-1/2" NPT, Shaft: 1" Dia.
- 5-Roller Pump: Max Flow Rate: 45 gpm, Max Pressure: 200 psi, Max RPM: 1000, Ports: 1" NPT, Shaft: 15/16" Dia.
- 7-Roller Pump (Series 7700): Max Flow Rate: 22 gpm, Max Pressure: 300 psi, Max RPM: 1000, Ports: 3/4" NPT, Shaft: 15/16" Dia.
- 8-Roller Pump: Max Flow Rate: 22 gpm, Max Pressure: 300 psi, Max RPM: 1200, Ports: 3/4" NPT, Shaft: 5/8" Dia.
- Use a pressure relief device to prevent damage from pressure buildup.
- Never pump flammable or explosive fluids.
- Do not exceed maximum speed, pressure, or temperature limits.
- Ensure proper guarding around moving parts.
- Disconnect power before servicing and release all pressure within the system.
- Mount the pump and torque arm to the PTO shaft using specified couplers.
- Ensure proper alignment and tension of belts in belt/pulley drive systems.
- Use appropriate size drive units and avoid unnecessary restrictions in the line.
- Flush the pump after each use to prevent corrosion and ensure smooth operation.
- Inspect and maintain the pump regularly, replacing worn parts as necessary.
- Follow specific instructions for reversing pump rotation if needed.
- Never pump corrosive or abrasive liquids.
- Do not run the pump dry or exceed specified operational limits.
Catalog excerpts
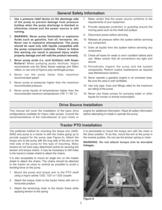
3. Never pump acids (i.e. acid fertilizer) with SuperRollers! When pumping acidic fertilizer, Hyprorecommends only the Silver Series castings and Teflon rollers, or use one of Hypro's poly centrifugal pumps.4.Never run the pump faster than maximumrecommended speed.5.Never pump at pressures higher than the maximumrecommended pressure.6.Never pump liquids at temperatures higher than therecommended maximum temperatures (140˚ F / 60˚ C).engine for additional information. Read all safety informationbefore attempting to install or operate the pump.This manual will cover the installation of the basic...
Open the catalog to page 2
NOTE: No end thrust should be applied to pump whencoupling is connected. 5.Tighten pump mounting; then tighten the set screws oneach coupling. 4 > Priming the Pump To help prime the pump, keep the inlet or suction line asshort as possible with a minimum of bends, elbows and kinks. Make sure all connections are tight and do not leak When direct driving Hypro roller pumps with flexiblecouplings, make sure that the speed (rpm) of the gas engine or electric motor is within the maximum rated rpm of your pump. Also make sure that shaft rotation is correct between the pump and the motor or gas engine...
Open the catalog to page 4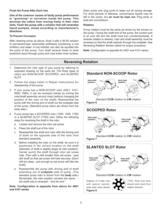
Note: Configuration is opposite for 4001 and 4101 series. 5 air must be kept out. Plug ports orseal port connections. Pump rotation must be the same as shown by the arrows onthe pump. Facing the shaft end of the pump, the suction port is on your left and the shaft must turn counterclockwise. If reverse rotation is desired, rotor and shaft assembly must be reversed so that the shaft extends through the endplate. See Reversing Rotation Section below for proper procedure. Rotation After cleaning pump as above, flush it with a 50-50 solutionof permanent-type automobile antifreeze (containing a rust...
Open the catalog to page 5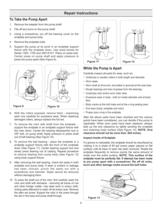
1.Remove the adapter from the pump shaft.2.File off any burrs on the pump shaft. 3.Using a screwdriver, pry off the bearing cover on theendplate and pump body4.Remove the endplate bolts. 5.Support the pump at its ports in an endplate supportfixture with the endplate down. Use wood blocks for Series 1500, 1700 and 4001/4101. Place on press bed. Center press on pump shaft and apply pressure to press the pump apart (See Figure 9). > Carefully inspect all parts for wear, such as: Undersize or swollen rollers in both length and diameter.ՕWorn seals. Worn shaft at drive end, and pitted or grooved at...
Open the catalog to page 6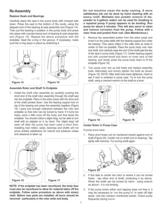
Do not machine clean the body casting. Amore satisfactory job can be done by hand cleaning with an emery cloth. Wettable talc powder mixture (5 lbs. powder to 5 gallons water) can be used for breaking in arepaired pump if pump appears to be binding. Run pump for about 5 minutes. This will also serve to clean and remove corrosion from the pump. Follow with a clear rinse and protect from rust. (See Maintenance.) Replace Seals and Bearings Carefully place the seal in the pump body with crimped sidedown. Press the seal to the bottom of the cavity, using the stepped end of the bearing & seal assembly...
Open the catalog to page 7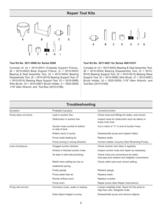
Tool Kit No. 3011-0006 for Series 6500 Consists of: (A= 3010-0001) Endplate Support Fixture;,(B = 3010-0002) Body Support Fixture, (C = 3010-0003) Bearing & Seal Assembly Tool, (D = 3010-0004) Bearing Disassembly Tool, (E = 3010-0010) Bearing Support Tool, (F =3010-0014) Bearing Race Support Tool, (G = 3010-0066) Wire Brush, (H = 3010-0067) Brush Holder, (I = 3020-0009) 1/16" Allen Wrench, and Tool Box (3010-0168). Tool Kit No. 3011-0021 for Series 4001/4101 Consists of: (A= 3010-0003) Bearing & Seal Assembly Tool, (B = 3010-0004) Bearing Disassembly Tool, (C = 3010- 0010) Bearing Support Tool,...
Open the catalog to page 8
Ref.Qty.PartNo.Req'd.NumberDescription Repair Parts Kit No. 3430-0383 (Universal) > Ref.Qty.PartNo.Req'd.NumberDescription Consists of: (6) Ref. 12Super Rollers, (2) Ref. 7 O-Ring Gaskets, and (2) Ref. 4 Viton Seals. 2A16031-0258Name Plate (Specify Pump Model #)322008-0001Sealed Ball Bearing 422112-0001Buna-N Seal (Standard) 422112-0003Viton Seal (Optional) (Std. for SilverCast) 562210-0026Bolt 610200-1500CEndplate (Cast Iron) with seal 610200-1500NEndplate (Ni-Resist) with seal 610200-1500XEndplate (SilverCast) with seal 711720-0003O-ring Gasket for Endplate 810300-1502CRotor (Cast Iron) with...
Open the catalog to page 14
Hypro warrants to the original purchaser of its products (the PurchaserӔ) that such products will be free from defects in material andworkmanship under normal use for the period of one (1) year for all products except: oil crankcase plunger pumps will be free fromdefects in material and workmanship under normal use for the period of five (5) years, and accessories will be free from defects inmaterial and workmanship under normal use for the period of ninety (90) days. In addition, Hypro warrants to the purchaser all forgedbrass pump manifolds will be free from defects in material and workmanship...
Open the catalog to page 20All Hypro Pressure Cleaning catalogs and technical brochures
 PRODUCT CATALOG
236 Pages
 Transfer Pumps
7 Pages
 Gear Driven
3 Pages
 Centrifugal Pumps
41 Pages
 9302 Series
2 Pages

Archived catalogs
 DBS & DBA Diaphragm Pump OIPM
20 Pages
 Series 2100 Versa-Twin OIPM
16 Pages
 Hydraulic Pressure Washer OIPM
20 Pages
 Hydraulic Pump Selection Guide
38 Pages
 9302 Series Sales Sheet
2 Pages
 UAS Ceramic Nozzles
2 Pages
 HP Stainless Steel Nozzles
2 Pages
 TwinCap Sales Sheet
2 Pages
 ULD Sales Sheet
2 Pages
 ESI Sales Sheet
2 Pages
 Series 5300 OIPM
20 Pages
 2535S OIPM
12 Pages
 PowerLine Plunger OIPM
24 Pages
 Cleanload OIPM
12 Pages
 Foam Marker OIPM
20 Pages
 Series 5200 Piston Pump OIPM
8 Pages


