Catalog excerpts

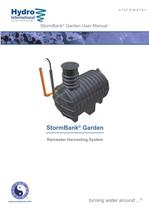
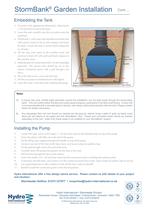
StormBank® Garden Installation stormwater Cont ... Embedding the Tank 1) Excavate to the appropriate dimensions, allowing for a 150 mm bed of sand at the base. 2) Lower the tank carefully into the excavation onto the sand base. 3) Fill the tank 2⁄3 with water, then backfill around the tank with sand in layers of 30 cm and compact each layer by hand. Ensure the tank is evenly hand compacted on all sides. 4) Fill the tank with water to the overflow level and continue to back fill with sand and hand compact to the overflow level. 5) Make the push fit connections with 110 mm watertight pipework. The service duct should be run to the surface connection point, with a pull through cord left in. 6) Place the tank access cover onto the tank. 7) Fill the excavation to finished levels with topsoil. 8) Leave the water in the tank until installing the pump. StormBank® Garden User Manual Topsoil Fill with Water Prior to Backfill Backfill with Sand in 300 mm Steps, Hand Compacted 150 mm Sand Base Note: A) In heavy clay soils, rainfall might permeate around the installation, but not drain away through the surrounding earth. This can collect below the tank and could cause buoyancy, particularly if the tank is left empty. In poor soil it is recommended that a concrete base is formed, with straps used to permanently hold the tank. Please contact Hydro for further information. B) Any downpipes from the roof should run directly into the ground, without using a grille or gully, as these could allow grit and debris to be swept into the StormBank® tank. Paved and concreted areas should be drained separately to the roof - water from these areas is not suitable for your StormBank® system. StormBank® Garden Installing the Pump 1) Using PTFE tape, screw in the larger 1”- 20 mm hose insert to the threaded hole on top of the pump. 2) Screw the plastic inlet filter on to the end of the pump. 3) the lifting rope supplied through the handle on top of the pump. Tie 4) Connect one end of the hose to the hose insert, and secure using two jubilee clips. 5) the pull through cord to the end of the hose. Tie 6) Carefully lower the pump into position on the base of the tank. 7) Pull the hose through the duct to the surface. 8) Screw the smaller 3/4”- 20 mm hose insert into the connection point, including the sealing washer. 9) necessary trim the hose, and connect it to the connection point hose insert, again using two jubilee clips to secure. If 10) Use expanding foam or other sealant to close off the duct ready for backfill. 11) Backfill around the connection point in the desired position. Rainwater Harvesting System Hydro International offer a free design advice service. Please contact us with details of your project and situation. Stormwater Hotline: 01275 337977 • enquiries@hydro-international.co.uk Hydro International • Stormwater Division Shearwater House • Clevedon Hall Estate • Victoria Road • Clevedon • BS21 7RD Tel: 01275 878371 • Fax: 01275 874979 © 2009 Hydro International. All rights reserved. SBKGarden UM B/1009 abcdef abcdef www.savetherain.info turning water around ...®
Open the catalog to page 1
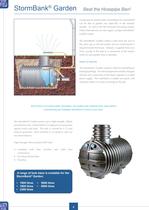
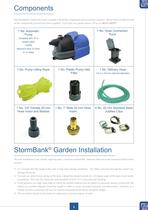
StormBank® Garden Beat the Hosepipe Ban! Components A large part of overall water consumption by a household The StormBank® Garden Kit comes complete with all the components and accessories required. Please check on delivery that can be due to garden use, especially in the summer all the components pictured have been supplied. If you have any queries please call us on: 01275 337977. months. As well as the full rainwater harvesting system, Hydro International can also supply a unique StormBank® Garden system. The StormBank® Garden collects water from the roof in the same way as the full...
Open the catalog to page 2
StormBank® Garden Beat the Hosepipe Ban! Components A large part of overall water consumption by a household The StormBank® Garden Kit comes complete with all the components and accessories required. Please check on delivery that can be due to garden use, especially in the summer all the components pictured have been supplied. If you have any queries please call us on: 01275 337977. months. As well as the full rainwater harvesting system, Hydro International can also supply a unique StormBank® Garden system. The StormBank® Garden collects water from the roof in the same way as the full...
Open the catalog to page 3
StormBank® Garden Installation stormwater Cont ... Embedding the Tank 1) Excavate to the appropriate dimensions, allowing for a 150 mm bed of sand at the base. 2) Lower the tank carefully into the excavation onto the sand base. 3) Fill the tank 2⁄3 with water, then backfill around the tank with sand in layers of 30 cm and compact each layer by hand. Ensure the tank is evenly hand compacted on all sides. 4) Fill the tank with water to the overflow level and continue to back fill with sand and hand compact to the overflow level. 5) Make the push fit connections with 110 mm watertight...
Open the catalog to page 4All Hydro International catalogs and technical brochures
-
HeadCell®
2 Pages
-
Hydro BioinfiltratorTM
2 Pages
-
Hydro-Jet® Screen
2 Pages
-
ZickertTM RSS
4 Pages
-
Meva SSC
2 Pages
-
Lamella
2 Pages
-
Grit King
2 Pages
-
DynaDisc
2 Pages
-
Stormcell®
2 Pages
-
Hydro-Brake®
4 Pages
-
The Hydro StormTrain® Series
16 Pages
-
Hydro-Static ® Screen
2 Pages
-
Zickert ? Z3900
2 Pages
-
Zickert ? Z2000
1 Pages
-
Hydro Vortex Drop ? Shaft
2 Pages
-
Storm King ® Overflow
2 Pages
-
Heliscreen
2 Pages
-
Sludge Screen
2 Pages
-
Meva CPS
2 Pages
-
Vortex Drop Shaft
2 Pages
-
Drop Shaft
2 Pages
-
HiOx
2 Pages
-
DynaSand Oxy & DynaSand Deni
2 Pages
-
DynaSand
2 Pages
-
Up-Flo Filter
2 Pages
-
Stormbloc Inspect
2 Pages
-
StormBank Pro
4 Pages
-
Hydro-Brake Chamber
12 Pages
-
Downstream Defender
2 Pages


