 Website:
Hukseflux Thermal Sensors B.V.
Catalog excerpts

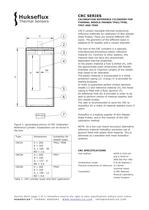
CRC SERIES CALIBRATION REFERENCE CYLINDERS FOR THERMAL NEEDLE PROBES TP02/TP08, TP07 AND TP09 1 D 2 3 4 H IL ND 5 6 7 Figure 1: generalised picture of CRC Calibration Reference Cylinder. Explanation can be found in the text. Type CRC01 Dimensions Suitability for needle types TP02, TP08 H = 260 D = 100 IL = 185 - 30 ND = 1.6 TP07 CRC04 H = 206 D = 100 IL = 137 - 6 ND = 3.6 TP09 CRC05 H = 260 D = 100 IL = 190 - 12 ND = 6.6 Table 1: CRC cylinder types and their application CRC’s contain traceable thermal conductivity reference materials for calibration of Non-SteadyState Probes. There are several different CRC types. The geometry of the different types is adapted to fit needles with a certain diameter. The hart of the CRC cylinders is a specially manufactured amorphous plastic reference material (5). Contrary to other plastics, this material does not have any directionally dependent thermal properties. In the plastic material a hole is drilled (4), with the approximate outer dimensions (ND Needle Diameter and IL Insertion Length) of the needle that needs to be calibrated. The plastic material is incorporated in a metal protection casing (2). A plug (7) is provided for sealing purposes. In order to guarantee perfect contact between needle (1) and reference material (5), the metal casing is filled with a fluid, glycerol (3). An additional hole (6) is provided in order to be able to perform checks of material stability with thin needle probes. The user is recommended to send the CRC to Hukseflux for a check of material stability every 5 years. Hukseflux is a leading supplier of Non-SteadyState Probes, and is the inventor of the CRC calibration method. NOTE: As a low-cost (lower accuracy) alternative reference material Hukseflux promotes use of glycerol filled with plastic fibre material. This is delivered as a standard with most Hukseflux systems. CRC SPECIFICATIONS Test method: ASTM D 5334-00 and D 5930-97 IEEE Std 442-1981 Temperature range: 0 to 60 degrees C Thermal conductivity of reference: 0.2 W/mK (nominal value) Traceability: to NPL National Physical Laboratory, United Kingdom Version 0616 (page 1 of 1) Hukseflux reserve the right to alter specifications without prior notice HUKSEFLUX™ THERMAL SENSORS . WWW.HUKSEFLUX.COM . INFO@HUKSEFLUX.COM
Open the catalog to page 1All Hukseflux Thermal Sensors B.V. catalogs and technical brochures
-
DP01 Dome Protector
2 Pages
-
SBG04
5 Pages
-
FHF06
4 Pages
-
TRSYS20
4 Pages
-
FHF05 series
6 Pages
-
HTR02 series
3 Pages
-
FHF05SC series
4 Pages
-
HF05 heat flux sensor
3 Pages
-
HFS01 high heat flux sensor
3 Pages
-
HFP01SC heat flux sensor
3 Pages
-
IHF01 heat flux sensor
4 Pages
-
HFP03 heat flux sensor
2 Pages
-
IHF02 heat flux sensor
4 Pages
-
GG01 Gardon gauge
4 Pages
-
PMF01 mounting fixture
3 Pages
-
SHR02 shadow ring
2 Pages
-
IR02-TR PYRGEOMETER
2 Pages
-
IR02 pyrgeometer
2 Pages
-
SRA01
2 Pages
-
RA01
2 Pages
-
NR01 net radiometer
3 Pages
-
IR20 & IR20WS pyrgeometer
2 Pages
-
VU01
2 Pages
-
SR20-D2 pyranometer
4 Pages
-
SR22 pyranometer
4 Pages
-
SRA30-M2-D1 albedometer
3 Pages
-
SR25
4 Pages
-
DR20-A1 pyrheliometer
3 Pages
-
SR05-D1A3-PV pyranometer
4 Pages
-
DR30-D1 pyrheliometer
4 Pages
-
SR30-M2-D1
6 Pages
-
SR15 series
4 Pages
-
choose the best pyranometer
5 Pages
-
TP08
2 Pages
-
TP02
2 Pages
-
TP01
1 Pages
-
TRSYS01
1 Pages
-
TNS01
1 Pages
-
THISYS
3 Pages
-
HF03 / LI19
1 Pages
-
HF02
2 Pages
-
SR11-TR PYRANOMETER
2 Pages
-
SR11 PYRANOMETER
2 Pages
-
SBG01 heat flux meter
2 Pages
-
ALUSYS
1 Pages
-
IR20 & IR20WS PYRGEOMETER
2 Pages
-
SR20-TR pyranometer
2 Pages
-
SR12 PYRANOMETER
2 Pages
-
SR20 PYRANOMETER
3 Pages
-
WS01
1 Pages
-
GT series
2 Pages
-
TPSYS02
1 Pages
-
THASYS
2 Pages
-
IR02-TR
1 Pages
-
DR01
2 Pages
-
SR11-TR
1 Pages
-
NF02
1 Pages
-
HFP01
1 Pages


