
- Catalogs
- HTC Professional Floor Systems
- EZwood™ grinding guide


EZwood™ grinding guide

EZwood™ grinding guide
This guide provides instructions for grinding wooden floors using HTC's EZwood™ system. It highlights the benefits of the system, such as no marks when starting and stopping, the ability to grind against the grain, and a virtually dust-free process.
Tools and Accessories
The guide lists essential tools and accessories, including:
- EZ SL 30 Wood and EZ SL 50 Wood tools for removing lacquer and oil.
- Flexible tool holders and holders for abrasive paper and pads.
- Foamflex and abrasive paper in various grit sizes (40 to 120).
- EZwood oil pads and a steel brush for cleaning tools.
Grinding and Tooling Guide
The guide outlines different alternatives for grinding, depending on the condition of the floor:
- Alternative 1: Use sandpaper starting from 60 grit to 120 grit.
- Alternative 2: Use EZ SL 50 followed by sandpaper from 60 grit to 120 grit.
- Alternative 3: Use EZ SL 50 with a progression from 40 grit sandpaper to 120 grit.
- Alternative 4: Use EZ SL 30 with a progression from 40 grit sandpaper to 120 grit.
Step-by-Step Procedure
The guide provides a detailed step-by-step procedure for grinding:
- Clean the floor thoroughly.
- Set up the machine and attach the necessary holders and sandpapers.
- Begin with edge and corner grinding.
- Connect the dust extractor and start grinding, maintaining a low speed.
Finishing
Instructions for applying finishing products like oil or hardwax-oil are provided, including switching to specific pad holders and pads for the final finish.
Contact Information
Contact details for HTC offices in Sweden, Germany, USA, UK, and France are provided for further assistance.
Catalog excerpts
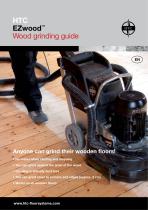
EN Anyone can grind their wooden floors! • No marks when starting and stopping • You can grind against the grain of the wood • Grinding is virtually dust-free • You can grind close to corners and edges (approx. 2 cm) • Works on all wooden floors
Open the catalog to page 1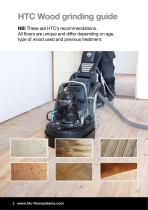
HTC Wood grinding guide NB! These are HTC’s recommendations. All floors are unique and differ depending on age, type of wood used and previous treatment.
Open the catalog to page 2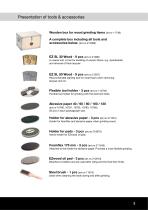
Presentation of tools & accessories Wooden box for wood grinding items A complete box including all tools and accessories below. (art.no 212008) EZ SL 30 Wood - 9 pcs (art.no 21286) A coarse tool. A tool for levelling of uneven floors, e.g. duckboards, and removal of thick lacquer. EZ SL 50 Wood - 9 pcs (art.no 21287) Recommended starting tool for most floors when removing lacquer and oil. Flexible tool holder - 3 pcs (art.no 112794) Flexible tool holder for grinding with the diamond tools. Abrasive paper 40 / 60 / 80 / 100 / 120 (art.no 10780, 10781, 10782, 10783, 10785) 50 pcs in each package/grit...
Open the catalog to page 3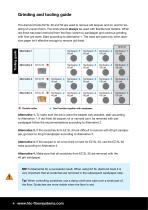
Grinding and tooling guide The diamond tools EZ SL 30 and 50 are used to remove old lacquer and oil, and for levelling of uneven floors. The tools should always be used with flexible tool holders. When old finish has been removed from the floor, switch to sandpaper and continue grinding with finer grit sizes. Start according to alternative 1. The tools are used only when abrasive paper isn’t effective enough to remove old finish. Tooling guide Flexible holder Use Foamflex together with sandpaper. Alternative 1. To make sure the job is done the easiest way possible, start according to Alternative...
Open the catalog to page 4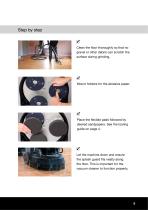
& Clean the floor thoroughly so that no gravel or other debris can scratch the surface during grinding. Mount holders for the abrasive paper. er Place the flexible pads followed by desired sandpapers. See the tooling guide on page 4. & Let the machine down and ensure the splash guard fits neatly along the floor. This is important for the vacuum cleaner to function properly.
Open the catalog to page 5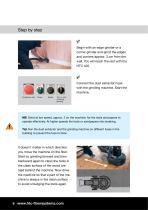
Begin with an edge grinder or a corner grinder and grind the edges and corners approx. 3 cm from the wall. You will reach the rest with the HTC 420. Connect the dust extractor hose with the grinding machine. Start the machine. Emergency stop Turn on and off during grinding NB! Grind at low speed, approx. 2 on the machine, for the tools and papers to operate effectively. At higher speeds the tools or sandpapers risk breaking. Tip! Run the dust extractor and the grinding machine on different fuses in the building to prevent the fuse to blow. It doesn’t matter in which direction you move the machine...
Open the catalog to page 6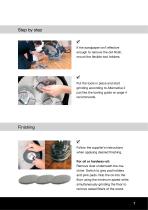
If the sandpaper isn’t effective enough to remove the old finish, mount the flexible tool holders. Put the tools in place and start grinding according to Alternative 2 just like the tooling guide on page 4 recommends. Follow the supplier’s instructions when applying desired finishing. For oil or hardwax-oil: Remove dust underneath the machine. Switch to grey pad holders and pink pads. Rub the oil into the floor using the minimum speed while simultaneously grinding the floor to remove raised fibers of the wood.
Open the catalog to page 7
HTC Head office HTC Sweden AB Box 69 SE-614 22 Soderkoping Sweden Street (delivery) address: Klevvagen 7 614 92 Soderkoping Sweden Tel: +46 (0)121-29400 Fax: +46 (0)121-15212 E-mail: [email protected] www.htc-floorsystems.com HTC Floor Systems Ltd. Unit 4 Kingston Business Park Dunfermline Court Maidstone Road Kingston Milton Keynes MK10 0BY United Kingdom Tel: +44 (0)845 460 2500 Fax: +44 (0) 845 460 1500 E-mail: [email protected] www.htc-floorsystems.com
Open the catalog to page 8All HTC Professional Floor Systems catalogs and technical brochures
 HTC AirFlow™
3 Pages
 HTC Product Catalogue 2019/2020
37 Pages
 HTC Grinding Guide
5 Pages
 HTC START & GRIND v.2
11 Pages
 HTC DURATIQ 5
2 Pages
 HTC DURATIQ - Concept brochure
11 Pages
 HTC 80 iD
8 Pages
 Protective cover
2 Pages
 HTC 950 RX
4 Pages
 HTC 1500 ixT
4 Pages


- Electric vacuum cleaner
- Industrial vacuum cleaner
- Dry vacuum cleaner
- Mobile vacuum cleaner
- Compact vacuum cleaner
- Wheel-mounted vacuum cleaner
- Single-phase vacuum cleaner
- Vacuum cleaner with HEPA filter
- Compressed air dust extractor
- Construction vacuum cleaner
- Chip vacuum cleaner
- Cyclone vacuum cleaner
- Grinding/sanding/polishing machine vacuum cleaner
- Floor grinder
- Electric floor grinder
- Planetary floor grinder