Catalog excerpts
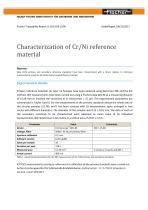
HELMUT FISCHER GMBH INSTITUT FUR ELEKTRONIK UND MESSTECHNIK Fischer Traceability Report JL-2013-06-Cr/Ni Abstract: New Cr/Ni primary and secondary reference standards have been characterized with a direct relation to reference measurements using the ICP (Inductively Coupled Plasma) method. Experimental details Primary reference materials (Cr layer on Ni base) have been analyzed using data from XRF and the ICP method. XRF measurements have been carried out using a Fischerscope XDL-M at a measuring distance of 15.08 mm to increase the sensitivity at Cr thicknesses > 15 pm. The experimental parameters are summarized in Tables I and II. For the measurement of the primary standards almost the whole area of the circular samples (51.785 mm2) has been covered with 16 measurement spots arranged in two circles with different diameters. The diameter of the samples was 8.12 ± 0.01 mm. The data of each of the secondary standards to be characterized were obtained as mean value of 16 individual measurements distributed over a 4x4 matrix in a central area of 2mm x 2 mm. Table I : experimental parameters for the XRF measurement of the Cr/Ni primary and secondary standards. ICP-OES measurements serving as reference for calibration of the primary standards were carried out by fem Foschungsinstitut fur Edelmetalle & Metallchemie, Katharinenstr. 17, D-73525 Schwabisch Gmund, report 2K13217.
Open the catalog to page 1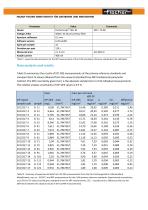
HELMUT FISCHER GMBH INSTITUT FUR ELEKTRONIK UND MESSTECHNIK Table III : Summary of experimental data from ICP-OES measurements from fem fur Foschungsinstitut, Edelmetalle & Metallchemie, rep. no. 2K13217 and XRF measurements for the Cr/Ni primary reference standards. Experimental uncertainties are 0.5% for ICP values and the given standard errors for XRF measurements. (S.E. = standard error, difference refers to the difference between the absolute values of ICP and XRF measurements)
Open the catalog to page 2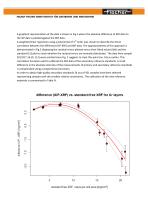
HELMUT FISCHER GMBH INSTITUT FUR ELEKTRONIK UND MESSTECHNIK A graphical representation of the data is shown in Fig. 1 where the absolute difference of XRF data to the ICP data is plotted against the XRF data. A weighted linear regression using a polynomial of 2rd order was chosen to describe the direct correlation between the difference (ICP-XRF) and XRF data. The appropriateness of this approach is demonstrated in Fig.2 displaying the residual errors plotted versus their fitted values (left) and the standard Q-Q plot to check whether the residual errors are normally distributed. The data...
Open the catalog to page 3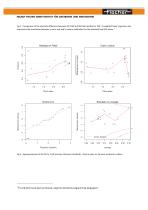
Fig 1 : Comparison of the absolute difference between ICP-OES and XRF data plotted vs. XRF. A weighted linear regression line 1 represents the correlation between y and x-axis and is used as calibration for the standard free XRF values. Fig 2 : Appropriateness of the fit for Cr/Ni primary reference standards. Data at point no 16 were treated as outliers. Fit and plots have been produced using the statistical programming language R
Open the catalog to page 4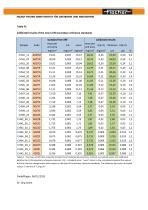
HELMUT FISCHER GMBH INSTITUT FUR ELEKTRONIK UND MESSTECHNIK Table IV : Summary of XRF data using the standard free fundamental parameter method, normalized values and calibrated data for the Cr/Ni secondary reference materials (S.E. = standard error, "norm" refers to the normalized standard free values that are intensity compensated with respect to the data of the primary reference standards. The thickness has been calculated using a Cr density of 7.19 g/cm3.
Open the catalog to page 5All HELMUT FISCHER GMBH - INSTITUT FÜR ELEKTRONIK UND catalogs and technical brochures
-
MMS® Inspection
8 Pages
-
MMS® Inspection DFT
6 Pages
-
FISCHERSCOPE ® X-RAY SERIES
48 Pages
-
PRECIOUS METALS AND JEWELERY
4 Pages
-
Automated Measurement Solutions
28 Pages
-
FISCHERSCOPE® X-RAY XAN® 500
4 Pages
-
FISCHERSCOPE® ST200
4 Pages
-
MMS-PC2
16 Pages
-
SIGMASCOPE GOLD
4 Pages
-
XAN250-252
4 Pages
-
XAN220-222
4 Pages
-
Inline Measuring Systems
8 Pages
-
XAN Series
36 Pages
-
GOLDSCOPE Series
8 Pages
-
PMP10 Duplex
4 Pages
-
FMP100/150
8 Pages
-
MP0/MP0R Series
8 Pages
-
Brochure DUALSCOPE® FMP100
8 Pages
-
FISCHERSCOPE X-RAY XDV-SDD
2 Pages
-
FISCHERSCOPE X-RAY XDAL
2 Pages
-
PHASCOPE PMP10 DUPLEX
4 Pages
-
Probe catalogue
12 Pages
-
FISCHERSCOPE MMS PC2
16 Pages
-
FISCHERSCOPE X-RAY
36 Pages
-
FISCHER Product Overview
24 Pages


