Catalog excerpts

FISCHERSCOPE® MMS® PC2 The Universal Multi-Measuring System for Coating Thickness Measurement and Material Testing Coating Thickness Material Analysis
Open the catalog to page 1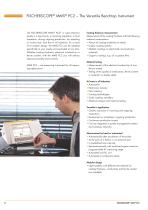
The FISCHERSCOPE MMS® PC2® is used wherever quality is a top priority: in incoming inspection, in final inspection, during ongoing production, for sampling or routine tests. And that in all industries. As a result of its modern design, the MMS PC2 can be adapted specifically to your needs and expanded at any time. Whether coating thickness, electrical conductivity or ferrite content, with the MMS PC2 you will always measure precisely and correctly. MMS PC2 - one measuring instrument for all measuring applications. Coating thickness measurement Measurement of the coating thickness with the...
Open the catalog to page 2
A Wide Variety of Applications Measurement of thin organic coatings, e.g. oils, with the hand probe Z15NG-TC Hand probe with beta emitter for measurements according to the radiometric beta-backscatter method, an integrated temperature sensor serves to automatically compensate for the beta radiation damping through the air at different temperatures. Measurement of the chrome coating on pistons with the measurement probe V2EGA06H in the motorised support stand Incoming inspection Measuring station with several module boards and probes for incoming inspection, mounted on a transport trolley...
Open the catalog to page 3
Anodising measuring station Measuring station with several probes for testing various parts with different geometries without having to reinsert the probes. The correct probe is automatically activated when the application is selected. Measurement of the coating thickness and conductivity of anodised aluminum parts, search for causes in the case of colour differences. Measuring station lacquer laboratory Measuring station for determining the coating thickness of: • Lacquer coatings on nonferrous metals • Lacquer coatings on iron or steel • Duplex measurements, i.e. lacquer on zinc on...
Open the catalog to page 4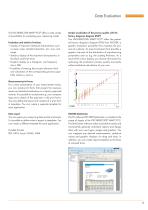
The FISCHERSCOPE MMS® PC2® offers a wide variety of possibilities for evaluating your measuring results. Evaluation and statistics functions • Display of important statistical characteristics such as mean value, standard deviation, min, max, and range • Statistics display of the important characteristics in the block and final result • Graphic display as a histogram, sum frequency chart, FDD • Possibility of entering the process tolerance limits and calculation of the corresponding process capability indices cp and cpk Measurement print forms For a clear presentation of your measurement...
Open the catalog to page 5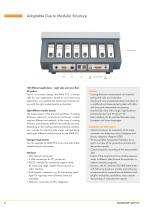
100 different applications - eight slots and more than 60 probes Due to its modular design, the MMS PC2 is always right for your applications. Based on your measuring application, we assemble the measuring instrument for you with the right module boards and probes. Eight different module boards The measurement of the physical quantities of coating thickness, electrical conductivity and ferrite content requires different test methods. In the case of coating thickness measurement, different test methods are used, depending on the coating/substrate material combination. In order to cover this...
Open the catalog to page 6
Hardware concept Housing with 8 slots for module boards with different test methods. Test method • Magnetic method (DIN EN ISO 2178) • Magnetic induction method (DIN EN ISO 2178, ASTM D7091) • Amplitude sensitive eddy current test method • (DIN EN ISO 2360, ASTM D7091) • Phase sensitive eddy current test method • (DIN EN ISO 21968) • Micro-resistance method (DIN EN 14571) • Beta-backscatter method (DIN EN ISO 3543, ASTM B567a) Measured quantities Coating thickness, electrical conductivity, ferrite content, temperature Measurement probes Connection sockets on the module boards for all...
Open the catalog to page 7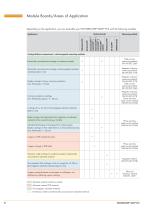
Substrate material nonferrous metals Substrate material PCB material Ferromagnetic substrate materials Nonferrous metals and electrically nonconductive substrate materials
Open the catalog to page 8
Measuring Methods Phase sensitive eddy current measuring method Standard: DIN EN ISO 21968 Micro-resistance measuring method Standard: DIN EN 14571 Eddy currents Current source Copper coating d Epoxy basic material Lamination and intermediate layers Electr. separated copper coatings Functional principle The high-frequency magnetic field generated in the probe induces eddy currents in the copper sleeve whose magnetic field weakens the primary magnetic field. The thicker the copper sleeve, the stronger the weakening is. A specially patented probe design results in an expansion of the eddy...
Open the catalog to page 10
Beta-backscatter measuring method Standard: DIN EN ISO 3543, ASTM B567a Measurement signal for MMS® PC2 Beta transmission method Standard: DIN EN ISO 3543, ASTM B567a Radiation detector (Geiger-Müller tubes) Radiation detector (Geiger-Müller tubes) Thin material (absorber) Backscattered beta particles (secondary radiation) Beta emitter (primary radiation) d Isotope Beta particles Measuring stage housing Isotope holder Juwelring® cover Substrate material Functional principle An isotope source emits beta radiation (electrons). These penetrate the surface of the coated workpiece and interact...
Open the catalog to page 11
Support stand V12 BASE Support stand with manual probe lowering. The support stand has a special lever mechanism that decelerates the lowering speed shortly before touching down, which causes the probe to touch down gently on the specimen surface. Support stand V12 MOT Support stand with motorised probe lowering for maximum repeatability. Control directly on the support stand or via the measuring instrument FISCHERSCOPE MMS PC2. The teach-in function guarantees a gentle touchdown of the probe on the specimen surface. Screw measuring device For precise measurement of coating thicknesses on...
Open the catalog to page 12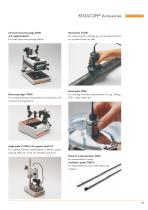
BETASCOPE® Accessories Universal measuring stage Z6NG and supplemental kit For small parts with pressing device. Measuring stage Z14NG For coating thickness measurement on small parts with universal pressing device. Hand probe Z15NG For measuring thin coatings (e.g. oil and grease films), on cylindrical parts as well. Hand probe Z9NG For coating thickness measurement on e.g. fittings, PCB's, metal sheets etc. Angle probe Z11NG in the support stand V12 For coating thickness measurement in sleeves, pipes, bearing shells etc. of 32 mm diameter and more. Probe for inside diameters Z3NG for...
Open the catalog to page 13All HELMUT FISCHER GMBH - INSTITUT FÜR ELEKTRONIK UND catalogs and technical brochures
-
MMS® Inspection
8 Pages
-
MMS® Inspection DFT
6 Pages
-
FISCHERSCOPE ® X-RAY SERIES
48 Pages
-
PRECIOUS METALS AND JEWELERY
4 Pages
-
Automated Measurement Solutions
28 Pages
-
FISCHERSCOPE® X-RAY XAN® 500
4 Pages
-
FISCHERSCOPE® ST200
4 Pages
-
SIGMASCOPE GOLD
4 Pages
-
XAN250-252
4 Pages
-
XAN220-222
4 Pages
-
Inline Measuring Systems
8 Pages
-
XAN Series
36 Pages
-
GOLDSCOPE Series
8 Pages
-
PMP10 Duplex
4 Pages
-
FMP100/150
8 Pages
-
MP0/MP0R Series
8 Pages
-
Brochure DUALSCOPE® FMP100
8 Pages
-
FISCHERSCOPE X-RAY XDV-SDD
2 Pages
-
FISCHERSCOPE X-RAY XDAL
2 Pages
-
PHASCOPE PMP10 DUPLEX
4 Pages
-
Probe catalogue
12 Pages
-
FISCHERSCOPE MMS PC2
16 Pages
-
FISCHERSCOPE X-RAY
36 Pages
-
FISCHER Product Overview
24 Pages


