Catalog excerpts
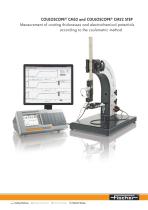
COULOSCOPE® CMS and COULOSCOPE@CMS STEP. Simultaneous Measurement of Coating Thickness and Electrochemical Potentials according to the Coulometric Method. __ Coating Thickness jjj Material Analysis [S| Microhardness [Q] Material Testing
Open the catalog to page 1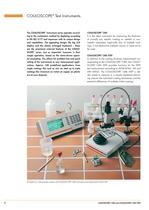
COULOSCOPE® Test Instruments. The COULOSCOPE® instrument series operates according to the coulometric method by deplating according to EN ISO 2177 and impresses with its unique design and capabilities. The appealing design, the big LCD display and the clearly arranged keyboard – these are the prominent external features of the COULOSCOPE® series. Just as important, however, is their simple operation, based on the menu-driven operator prompting. This allows for problem-free and quick setting of the instruments to new measurement applications. Approx. 100 predefined applications, from single...
Open the catalog to page 2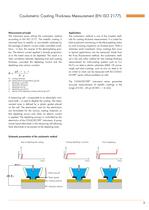
Coulometric Coating Thickness Measurement (EN ISO 2177). Applications The coulometric method is one of the simplest methods for coating thickness measurement. It is suited for both production monitoring in the electroplating industry and incoming inspection on finished parts. With a relatively small investment, many coatings that occur in typical applications can be measured. Aside from the X-ray fluorescence method, the coulometric method is the only other method for fast coating thickness measurement for multi-coating systems such as Cr/ Ni/Cu on steel or plastic substrates (ABS). Of...
Open the catalog to page 3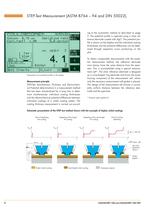
STEP-Test Measurement (ASTM B764 - 94 and DIN 50022). ing to the coulometric method as described on page 3. The potential profile is captured using a silver ref- erence electrode coated with AgCI. The potential pro- file is shown on the display and the individual coating thicknesses and the potential differences can be deter- mned through respective cursor positioning on the To obtain comparable measurements with the poten- tial measurement method, the reference electrode must always have the same distance from the speci- men. This is accomplished using a special measure- ment cell*. The...
Open the catalog to page 4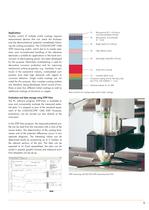
Quality control of multiple nickel coatings requires measurement devices that can check the thickness and the electrochemical potential immediately follow- ing the coating procedure. The COULOSCOPE® CMS STEP measuring system, which due to its simple oper- ation and uncomplicated handling of the reference electrode is suitable for applications in the harsh envi- ronment of electroplating plants, has been developed for this purpose. Electrolytic nickel-plating is used for decorative corrosion protection and for improving mechanical surface properties, e.g., hardness. In par- ticular in the...
Open the catalog to page 5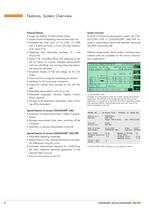
Features, System Overview. General features • Large size display of measurement values • Simple choice of deplating rate and test area size and 1.5 (60) mm (mils). 0.6 mm (24 mils) addition- • Deplating rate adjustable between 0.1 and • Stand VI 8: controlled filling and emptying of the cell by means of a pump. Multiple measurements with one cell filling and warning when the electro- lyte becomes saturated • Graphical display of the cell voltage on the LCD • Zoom function to magnify interesting plot sections • Interfaces for PC and printer connection • Output for analog chart recorder for...
Open the catalog to page 6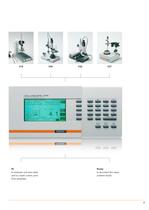
V18 PC to evaluate and store data and to create custom printform templates. V24 V26 V27 Printer to document the measurement results. 7
Open the catalog to page 7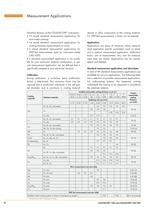
Measurement Applications. Standard features of the COULOSCOPE® instruments: • 73 stored standard measurement applications for most metal coatings • 14 stored standard measurement applications for coating thickness measurements on wires • 2 stored standard measurement applications for STEP-Test measurements (only for instrument model If a standard measurement application is not availa- ble for your particular material combination, a spe- cial measurement application can be defined that is specifically adapted to your particular situation. During calibration, a correction factor (calibration...
Open the catalog to page 8
Technical Data. Supply voltage: Power consumption: Operating temperature: Measurement methods: Coulometric method according to EN ISO STEP-Test-method according to ASTM B764 - 94 Available memory: distributed over a maximum of 50 applications Statistical: mean value, standard deviation, coef- ficient of variation, range, lowest and highest Graphical evaluation: histogram (30 measure- ments minimum), normal probability chart, SPC control chart with control limits, specification limits, process capability indices, expected values of the standard deviation (a) and stand- Measurement stand...
Open the catalog to page 9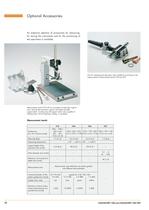
Optional Accessories. An extensive selection of accessories for measuring, for storing the instruments and for the positioning of Measurement stand VI8 with an assortment of specimen support arms, ball jointed specimen support with freely movable support plate. A measuring cell support stand, also capable of holding three 100 ml laboratory bottles, is available Measurement stands COULOSCOPE® CMS and COULOSCOPE® CMS STEP
Open the catalog to page 10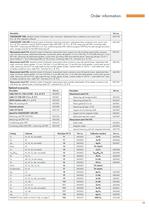
Order information. Optional accessories
Open the catalog to page 11
Active Around the World. Helmut Fischer GmbH Institut für Elektronik und Messtechnik in Sindelfingen/Germany is an innovative leader in the field of coating thickness measurement, material analysis, microhardness testing, electrical conductivity- and ferrite content measurement as well as for density and porosity testing. The company is able to recommend the best solution for any application. A comprehensive range of products is offered using X-ray fluorescence; Beta-backscatter; Magnetic; Magnetic induction; Electric resistance; Eddy current and Coulometric techniques. Helmut Fischer has...
Open the catalog to page 12All HELMUT FISCHER GMBH - INSTITUT FÜR ELEKTRONIK UND catalogs and technical brochures
-
MMS® Inspection
8 Pages
-
MMS® Inspection DFT
6 Pages
-
FISCHERSCOPE ® X-RAY SERIES
48 Pages
-
PRECIOUS METALS AND JEWELERY
4 Pages
-
Automated Measurement Solutions
28 Pages
-
FISCHERSCOPE® X-RAY XAN® 500
4 Pages
-
FISCHERSCOPE® ST200
4 Pages
-
MMS-PC2
16 Pages
-
SIGMASCOPE GOLD
4 Pages
-
XAN250-252
4 Pages
-
XAN220-222
4 Pages
-
Inline Measuring Systems
8 Pages
-
XAN Series
36 Pages
-
GOLDSCOPE Series
8 Pages
-
PMP10 Duplex
4 Pages
-
FMP100/150
8 Pages
-
MP0/MP0R Series
8 Pages
-
Brochure DUALSCOPE® FMP100
8 Pages
-
FISCHERSCOPE X-RAY XDV-SDD
2 Pages
-
FISCHERSCOPE X-RAY XDAL
2 Pages
-
PHASCOPE PMP10 DUPLEX
4 Pages
-
Probe catalogue
12 Pages
-
FISCHERSCOPE MMS PC2
16 Pages
-
FISCHERSCOPE X-RAY
36 Pages
-
FISCHER Product Overview
24 Pages


