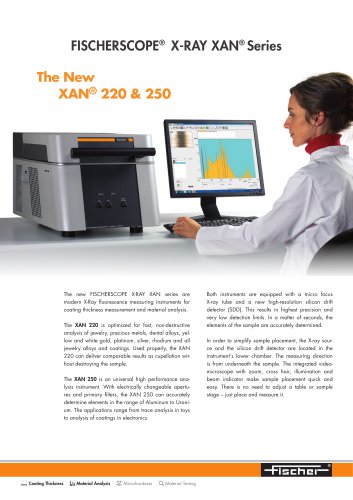
Catalog excerpts
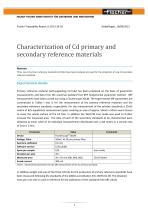
HELMUT FISCHER GMBH INSTITUT FUR ELEKTRONIK UND MESSTECHNIK Fischer Traceability Report JL-2013-10-Cd Abstract: Three new Cd primary reference standards (Cd foils) have been produced and used for the production of new Cd secondary reference standards. Experimental details Primary reference material (self-supporting Cd foils) has been produced on the basis of gravimetric measurements and data from the universal standard free XRF fundamental parameter method. XRF measurements have been carried out using a Fischerscope XDLM. The experimental XRF parameters are summarized in Tables I and II, for the measurement of the primary reference materials and the secondary reference standards, respectively. For the measurement of the primary standards a 25x25 matrix of 625 equidistant measurement spots covering an area of approx. 50mm x 50mm were chosen to cover the whole surface of the Cd foils. In addition the WinFTM scan mode was used to further increase the measured area. The data of each of the secondary standards to be characterized were obtained as mean value of 16 individual measurements distributed over a 4x4 matrix in a central area of 2mm x 2 mm. Table I : experimental parameters for the XRF measurement of the Cu primary standards. In addition weight and area of the three Cd foils for the production of primary reference standards have been measured following the standards of the DAkkS accreditation D-K-15076-01-00. The obtained mass per unit area is used as reference for the calibration of the standards free XRF values.
Open the catalog to page 1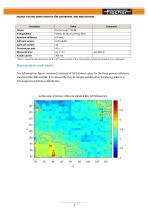
HELMUT FISCHER GMBH INSTITUT FUR ELEKTRONIK UND MESSTECHNIK Table II : experimental parameters for the XRF measurement of the Cd secondary reference standards to be calibrated. The following four figures represent heatmaps of Cd thickness values for the three primary reference standards BBJ, BBK and BBL. It is noteworthy that all samples exhibit either thickness gradients or inhomogeneous thickness distribution.
Open the catalog to page 2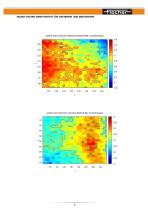
HELMUT FISCHER GMBH INSTITUT FUR ELEKTRONIK UND MESSTECHNIK surface scan of primary reference standard BBK, Cd thickness/pm surface scan of primary reference standard BBL, Cd thickness/pm
Open the catalog to page 3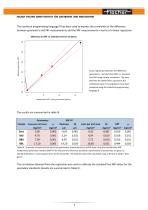
HELMUT FISCHER GMBH INSTITUT FUR ELEKTRONIK UND MESSTECHNIK The statistical programming language R has been used to express the correlation of the difference between gravimetric and XRF measurements and the XRF measurements in terms of a linear regression. Linear regression between the difference (gravimetry - standard free XRF) vs. standard free XRF using a linear correlation. The area between the dotted lines represents the confidence band. Fit and graphics have been produced using the statistical programming language R. The results are summarized in table III. Table III : Summary of...
Open the catalog to page 4
HELMUT FISCHER GMBH INSTITUT FUR ELEKTRONIK UND MESSTECHNIK Table IV : Summary of experimental data from XRF measurements for the secondary Cd reference standards. Calibrated values ("cal") have been calculated using the correlation between XRF and gravimetric measurements for the primary reference standards (see Table III). Sindelfingen, 10/09/2013 Dr. Jorg Leske
Open the catalog to page 5All HELMUT FISCHER GMBH - INSTITUT FÜR ELEKTRONIK UND catalogs and technical brochures
-
MMS® Inspection
8 Pages
-
MMS® Inspection DFT
6 Pages
-
FISCHERSCOPE ® X-RAY SERIES
48 Pages
-
PRECIOUS METALS AND JEWELERY
4 Pages
-
Automated Measurement Solutions
28 Pages
-
FISCHERSCOPE® X-RAY XAN® 500
4 Pages
-
FISCHERSCOPE® ST200
4 Pages
-
MMS-PC2
16 Pages
-
SIGMASCOPE GOLD
4 Pages
-
XAN250-252
4 Pages
-
XAN220-222
4 Pages
-
Inline Measuring Systems
8 Pages
-
XAN Series
36 Pages
-
GOLDSCOPE Series
8 Pages
-
PMP10 Duplex
4 Pages
-
FMP100/150
8 Pages
-
MP0/MP0R Series
8 Pages
-
Brochure DUALSCOPE® FMP100
8 Pages
-
FISCHERSCOPE X-RAY XDV-SDD
2 Pages
-
FISCHERSCOPE X-RAY XDAL
2 Pages
-
PHASCOPE PMP10 DUPLEX
4 Pages
-
Probe catalogue
12 Pages
-
FISCHERSCOPE MMS PC2
16 Pages
-
FISCHERSCOPE X-RAY
36 Pages
-
FISCHER Product Overview
24 Pages


