Catalog excerpts

IPlyCut User Manual IPlyCut User Manual Hangzhou IECHO Science & Technology Co., Ltd.
Open the catalog to page 1
IPlyCut User Manual
Open the catalog to page 2
IPlyCut User Manual
Open the catalog to page 3
IPlyCut User Manual Chapter 1 Software Introduction This manual is mainly for the use of IPlyCut software in automotive interior, home, textile and garment industries. 1.2 Software Installation and Running Environment 1.2.1 Hardware Minimum Configuration Requirements CPU: 2.0GHz above Memory: 2GB Hard disk: 3GB above 1.2.2 System and Software Environment Operation system: Windows 7Windows10 (32bit / 64bit) IPlyCut Program version number: V1.0.0.3 IPlyCut Document version number: 2019.1.24.1 1.2.3 Software Installation Note: WIN7 and WIN10 need to run the application as administr
Open the catalog to page 4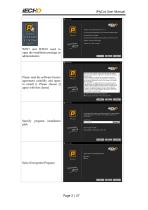
IPlyCut User Manual WIN7 and WIN10 need to open the installation package as administrators Please read the software license agreement carefully and agree to install it. Please choose [I agree with this clause] Specify program installation path Select Encryption Program
Open the catalog to page 5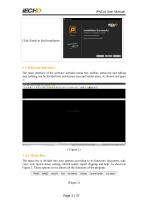
IPlyCut User Manual Click Finish to End Installation 1.3 Software Interface The main interface of the software includes menu bar, toolbar, status bar and editing area (editing can be divided into non-layout area and layout area). As shown in Figure 1: 1.3.1 Menu Bar The menu bar is divided into nine options according to its functions: document, edit, view, tool, layout sheet, setting, control center, report clipping and help. As shown in Figure 2. These options cover almost all the functions of the program.
Open the catalog to page 6
IPlyCut User Manual 1.3.2 Tool Bar Simple and intuitive image buttons, including all the commonly used functions. As shown in Figure 3 The status bar can intuitively see the size, utilization rate and shrinkage of the layout sheet in the layout area. As shown in Figure 4.
Open the catalog to page 7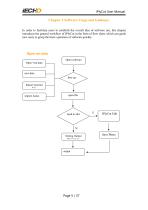
IPlyCut User Manual Chapter 2 Software Usage and Guidance In order to facilitate users to establish the overall idea of software use, this chapter introduces the general workflow of IPlyCut in the form of flow chart, which can guide new users to grasp the basic operation of software quickly. Open cut data Open *cut data Open software new data first use Import external data import Aama open file IPlyCut Edit N Setting Output Parameters Save Photo
Open the catalog to page 8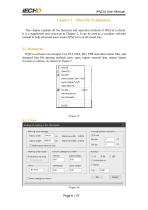
IPlyCut User Manual Chapter 3 Menu Bar Explanation This chapter explains all the functions and operation methods of IPlyCut in detail. It is a supplement and extension to Chapter 2. It can be used as a complete software manual to help advanced users master IPlyCut in an all-round way. 3.1 Document IPlyCut software can interpret Cut, PLT, DXF, ISO, PDF and other format files, and designed four file opening methods (new, open, import external data, import Aama) for users to choose. As shown in Figure 5
Open the catalog to page 9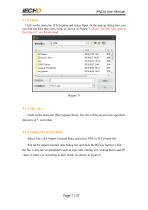
IPlyCut User Manual 3.1.2 Open Click on the menu bar [File] option and select Open. In the pop-up dialog box, you can find the files that users need, as shown in Figure 7. (Note: The file type open at this time is *. cut format data) 3.1.3 File Save Click on the menu bar [File] option [Save]. The file will be saved to the specified directory in *. cut format 3.1.4 Import External Data Select File, click Import External Data, and select DXF or PLT format file Pop up the import external data dialog box and click the Browse button to find the file. Users can set parameters such as style unit,...
Open the catalog to page 10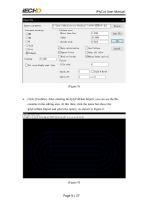
IPlyCut User Manual Click [Confirm]. After entering the IplyCutData Import, you can see the file contents in the editing area. At this time, click the menu bar above the IplyCutData Import and select the option. As shown in Figure 9.
Open the catalog to page 11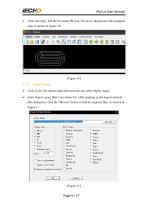
IPlyCut User Manual Click [Overlay], and the file enters IPlyCut. The text is displayed in the untapped area, as shown in Figure 10 3.1.5 Imput Aama Click on the File option under the menu bar and select Import Aama Enter Super Layout Data Conversion 8.0, while popping up the import external data dialog box, click the "Browse" button to find the required files. As shown in Figure 11
Open the catalog to page 12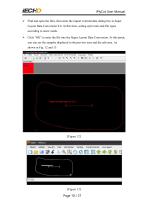
IPlyCut User Manual Find and open the files, then enter the import external data dialog box in Super Layout Data Conversion 8.0. At this time, setting style units and file types according to users' needs Click "OK" to enter the file into the Super Layout Data Conversion. At this point, you can see the samples displayed in the preview area and the edit area. As shown in Fig. 12 and 13
Open the catalog to page 13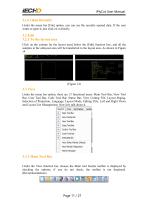
IPlyCut User Manual 3.1.6 Open Recently Under the menu bar [File] option, you can see the recently opened data. If the user wants to open it, just click on it directly. 3.2 Edit 3.2.1 To the layout area Click on the column [to the layout area] below the [Edit] function box, and all the samples in the unlayout area will be transferred to the layout area. As shown in Figure 14 3.3 View Under the menu bar option, there are 13 functional areas: Main Tool Bar, View Tool Bar, Case Tool Bar, Code Tool Bar, Status Bar, View Cutting File, Layout Paging, Selection of Projection, Language, Layout...
Open the catalog to page 14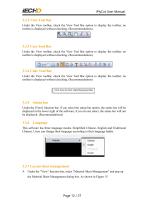
IPlyCut User Manual 3.3.2 View Tool Bar Under the View toolbar, check the View Tool Bar option to display the toolbar; no toolbar is displayed without checking. (Recommendations) 3.3.3 Case Tool Bar Under the View toolbar, check the View Tool Bar option to display the toolbar; no toolbar is displayed without checking. (Recommendations) 3.3.4 Code Tool Bar Under the View toolbar, check the View Tool Bar option to display the toolbar; no toolbar is displayed without checking. (Recommendations) 3.3.5 Status bar Under the [View] function bar, if you select the status bar option, the status bar...
Open the catalog to page 15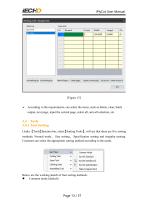
IPlyCut User Manual (Figure 15) According to the requirements, can select the items, such as delete, clear, batch output, next page, input the current page, select all, anti-all selection, etc. 3.4 Tools 3.4.1 Tool Sorting Under 【Tools】 function bar, select Sorting Tools】 will see that there are five sorting 【 , methods: Normal mode 、 Size sorting 、 Specification sorting and irregular nesting. Customer can select the appropriate sorting method according to the needs. Below are the working sketch of four sorting methods: Common mode (defau
Open the catalog to page 16All Hangzhou IECHO Science & Technology Company catalogs and technical brochures
-
iBrightCut Manual
78 Pages
-
IMulCut V1 User Manual
27 Pages
-
CutterServer User Manual
42 Pages
-
ISO
1 Pages
-
CE
1 Pages
-
Textile and apparel industry
2 Pages
-
TECHNICAL CONSTRUCTION FILE (TCF)
190 Pages
-
LCKS
4 Pages
-
PK1209 PRO & PK1209 PRO MAX
2 Pages


