- Catalogs
- GURLEY Precision Instruments
- Operation and Maintenance Guide of Hydrological Equipment
Operation and Maintenance Guide of Hydrological Equipment
1 /35Pages

Operation and Maintenance Guide of Hydrological Equipment
1 /35Pages
Catalog excerpts

The Company Gurley Precision Instruments was founded in 1845, and has sustained continuous operation to date at its original production facilities. Since its inception as a manufacturer of compasses, surveying instruments and brass castings, the company has become a leader in the field of precision measuring instruments. In April of 1968, the company became a division of Teledyne Incorporated, resulting in its ability to offer extensive experi-ence and unusual depth of resources. Today, Gurley continues to uphold its long stood reputation for quality and progress in precision instruments. Company History 1845 1968 W & L.E. Gurley 1968 ֖ 1993 Teledyne Gurley 1993 present Gurley Precision Instruments Genuine Gurley > TM Precision Instruments since 1845 514 Fulton Street Troy, NY 12181-0088 Tel: (518) 272-6300 Fax: (518) 274-0336 Toll Free: (800) 759-1844 www.gurley.com [email protected] > 1 2 size="-1">
Open the catalog to page 1
Contents Page Page5 Pygmy Meter Cleaning and lubricating the meter Adjusting the pivot (Model 625A pygmy meter, headphone style) Adjusting the pivot (Model 625D pygmy meter, digital style) Adjusting the contact wire (Model 625A pygmy meter, headphone style) Disassembling the meter (Model 625A pygmy meter, headphone style) Disassembling the meter (Model 625D pygmy meter, digital style) Headphones 38 38 40 42 44 46 48 50 Overview of this Guide How to use this guideMeasurement procedures 5 6 Part 1 Assembling the Complete Measuring System 8 Cable System Assembling the cable system (Model 622A or...
Open the catalog to page 2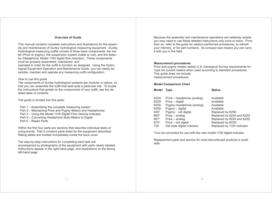
Overview of Guide Because the assembly and maintenance operations are relatively simple, you may need to use these detailed instructions only once or twice. From then on, refer to the guide for seldom-performed procedures, to refresh your memory, or for part numbers. Its compact size means you can carry it with you in the field. This manual contains complete instructions and illustrations for the assem-bly and maintenance of Gurley hydrological measuring equipment. Gurley Hydrological measuring outfits consist of three basic components: the me-ter (Price or pygmy), the suspension system (cable...
Open the catalog to page 3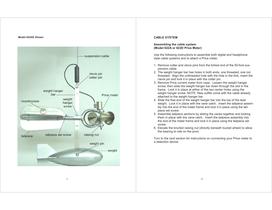
Model 622AE Shown CABLE SYSTEM Assembling the cable system (Model 622A or 622D Price Meter) Use the following instructions to assemble both digital and headphone style cable systems and to attach a Price meter. 1.Remove cotter and clevis pins from the forked end of the 50-foot sus-pension cable. 2.The weight hanger bar has holes in both ends, one threaded, one not threaded. Align the unthreaded hole with the hole in the fork, insert the clevis pin and lock it in place with the cotter pin. 3.Remove Price current meter from case. Loosen the weight hanger screw, then slide the weight hanger bar...
Open the catalog to page 5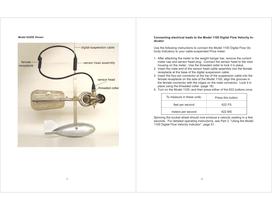
Model 622DE Shown Connecting electrical leads to the Model 1100 Digital Flow Velocity In-dicator Use the following instructions to connect the Model 1100 Digital Flow Ve-locity Indicatory to your cable-suspended Price meter. 1.After attaching the meter to the weight hanger bar, remove the current meter cap and sensor head plug. Connect the sensor head to the rotor housing on the meter. Use the threaded collar to lock it in place. 2.Insert the male end of the sensor head cable assembly into the female receptacle at the base of the digital suspension cable. 3.Insert the four-pin connector at the...
Open the catalog to page 7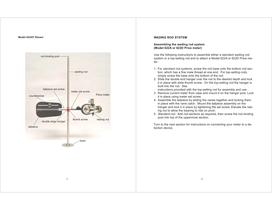
Model 622AF Shown WADING ROD SYSTEM Assembling the wading rod system (Model 622A or 622D Price meter) Use the following instructions to assemble either a standard wading rod system or a top-setting rod and to attach a Model 622A or 622D Price me-ter. 1.For standard rod systems , screw the rod base onto the bottom rod sec-tion, which has a fine male thread at one end. For top-setting rods , simply screw the base onto the bottom of the rod. 2.Slide the double end hanger over the rod to the desired depth and lock it in place with slide thumb screw. On the top-setting rod the hanger is built into...
Open the catalog to page 8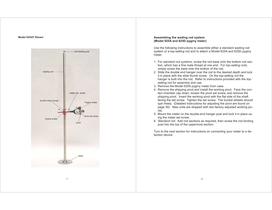
Model 625AF Shown Assembling the wading rod system (Model 625A and 625D pygmy meter) Use the following instructions to assemble either a standard wading rod system or a top-setting rod and to attach a Model 625A and 625D pygmy meter. 1.For standard rod systems , screw the rod base onto the bottom rod sec-tion, which has a fine male thread at one end. For top-setting rods , simply screw the base onto the bottom of the rod. 2.Slide the double end hanger over the rod to the desired depth and lock it in place with the slide thumb screw. On the top-setting rod the hanger is built into the rod. Refer...
Open the catalog to page 9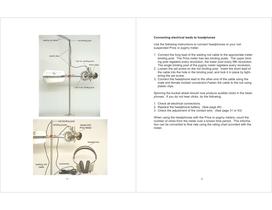
Connecting electrical leads to headphones Use the following instructions to connect headphones to your rod-suspended Price or pygmy meter. 1.Connect the long lead of the wading rod cable to the appropriate meter binding post. The Price meter has two binding posts. The upper bind-ing post registers every revolution, the lower post every fifth revolution. The single binding post of the pygmy meter registers every revolution. 2.Loosen the set screw on the rod binding post. Insert the short lead of the cable into the hole in the binding post, and lock it in place by tight-ening the set screw. 3.Connect...
Open the catalog to page 10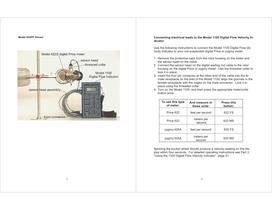
Model 622DF Shown Connecting electrical leads to the Model 1100 Digital Flow Velocity In-dicator Use the following instructions to connect the Model 1100 Digital Flow Ve-locity Indicator to your rod-suspended digital Price or pygmy meter. 1.Remove the protective caps from the rotor housing on the meter and the sensor head on the cable. 2.Connect the sensor head on the digital wading rod cable to the rotor housing on the digital Price or pygmy meter. Use the threaded collar to lock it in place. 3.Insert the four-pin connector at the other end of the cable into the fe-male receptacle on the side...
Open the catalog to page 11
PRICE METER Cleaning and lubricating the meter To ensure proper operation, the current meter must be cleaned and lubri-cated at the end of each days use. Complete the following instructions to clean and lubricate your Price meter. 1.Remove the contact chamber map. 2.Loosen the pivot set screw and remove the pivot,. 3.Clean and dry the pivot with a soft cloth. Set it aside. 4.Clean the lower bearing with a small pointed stick or a cotton swab. 5.Hold the current meter with the contact chamber up. Place a small drop of oil in the bearing, insert the pivot with the flat side of the shaft toward...
Open the catalog to page 13All GURLEY Precision Instruments catalogs and technical brochures
 8460 Angle Encoder
5 Pages
 EncoderLine
2 Pages
 Pointfinder Catalog
8 Pages
 GPI/CURRENT METER OUTFITS
2 Pages
 VG Virtual Absolute Decoder
7 Pages
 VA Virtual Absolute Decoder
8 Pages
 A25S Absolute Rotary Encoder
8 Pages
 M122 Magnetic Rotary Encoder
4 Pages


Archived catalogs

- Display module
- Angular encoder
- Incremental encoder
- Incremental rotary encoder
- LED display panel
- Absolute rotary encoder
- Solid-shaft rotary encoder
- Optical rotary encoder
- Hollow-shaft rotary encoder
- Magnetic rotary encoder
- Industrial rotary encoder
- IP65 rotary encoder
- Compact rotary encoder
- Manual test equipment
- RS-232 display panel
- Aluminum rotary encoder
- Stainless steel rotary encoder
- Linear encoder
- Single-turn rotary encoder
- Glass lens element