


G3 Max

G3 Max
- Disconnect the power source and relieve pressure if the unit has been in service.
- Mount the vent valve block near the G3 pump using the provided socket screws.
- Connect the cable to the G3 and the solenoid valve.
- For BSPP kits, install the adapter before the pump element fitting.
- Connect the inlet tube to the pump element fitting and manifold port.
- Connect the main tube to the manifold outlet and injector inlet.
- Loosen the plug from the return location and apply thread sealant to the tube fitting.
- Install and tighten the tube fitting, then connect the vent tube between the vent port and fitting.
Catalog excerpts

G3 Vent Valve Kit Instructions for installing vent valve. For professional use only. Part No.: 12 VDC, NPT- 571061; 24 VDC, NPT - 571029 12 VDC, BSPP - 24F537; 24 VDC, BSPP - 24F536 Maximum Working Pressure: 3500 psi (241 bar, 24 MPa) Important Safety Instructions Read all warnings and instructions in this manual and the G3 Pump instruction manual included with your unit. Save these instructions. All user supplied tubing must be rated for the same pressure or equipment could be damaged. PROVEN QUALITY. LEADING TECHNOLOGY
Open the catalog to page 1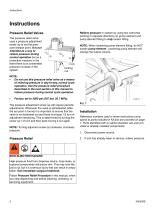
Instructions Pressure Relief Valves The pressure relief valve uses a pressure adjustment screw (a) to set the pressure release point. It is not intended as a way to relieve pressure during normal operation but as a protective measure in the event there is an unintended pressure increase in the system. Relieve pressure in system by using two wrenches working in opposite directions on pump element and pump element fitting to only loosen fitting. NOTE: When loosening pump element fitting, do NOT loosen pump element. Loosening pump element will change the output volume. NOTE: • Do not use this pressure...
Open the catalog to page 2
3. Mount vent valve block (1) to a fixed surface near the G3 pump using mounting holes (b) and two socket screws (5). 1 NOTE: If using one of the BSPP Vent Valve Kits, install adapter (7) into pump element prior to installing pump element fitting (c) then continue installation, Step 6. 6. Connect inlet tube (c) to pump element fitting (d) and inlet fitting (e) to manifold port (stamped with an “I”) (FIG. 5). Wrench tighten only. FIG. 2: Mounting Dimension a = 3.25 inches (8.255 cm). Thread 1/4 - 20 UNC-2A 4. Connect end of cable (2) to the G3 (FIG. 3). FIG. 5 7. Connect main tube (f) to any manifold...
Open the catalog to page 3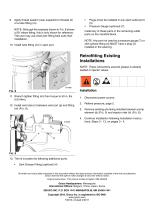
9. Apply thread sealant (user supplied) to threads (k) of a tube fitting (m). NOTE: Although the example shown in FIG. 8 shows a 90° elbow fitting, this is only shown for reference. The user may use what ever fitting best suits their installation. 10. Install tube fitting (m) in open port. Plugs (must be installed in any open outlet port) (5) Pressure Gauge (optional) (7) Install any of these parts in the remaining outlet ports on the manifold block. NOTE: Any port not used by a pressure gauge (7) or zerk grease fitting (4) MUST have a plug (5) installed in the opening. Retrofitting Existing...
Open the catalog to page 4All GRACO catalogs and technical brochures
 Pro Xp® Electrostatic Spray Guns
12 Pages
 Supply Pumps
8 Pages
 XP™ and XM Series Sprayers
28 Pages
 Triton™
8 Pages
 Fusion® CS
6 Pages
 AA G40 Automatic
4 Pages
 ToughTek® Mortar Equipment
22 Pages
 FRP Systems
16 Pages
 SaniSpray HP™
20 Pages
 PFP Sprayers
8 Pages
 Hoses, Guns and Accessories
24 Pages
 Automatic Lubrication Equipment
158 Pages
 Petroleum Handling Equipment
3 Pages
 AutoPlus™Valve
2 Pages
 Reactor
20 Pages
 FUSION™
24 Pages
 T-MAX™
3 Pages
 SDV15
SDV1512 Pages
 GL-11 Grease Injectors
2 Pages
 GL-1 Series Grease Injectors
6 Pages
 G1 Standard
26 Pages
 SDSLBFENEU-A, Lubri-Film
7 Pages
 SDSGBLENEU-A, Box Lubricant
7 Pages
 SDSHUGENEU-A Husky Grease
9 Pages
 G1 Plus
34 Pages
 E-Series Pneumatic Pumps
2 Pages
 Manzel Model 25 Lubricator
14 Pages
 Manzel MBL Box Lubricator
18 Pages
 Air/Oil AO Series Valves
8 Pages
 M2K
M2K3 Pages
 Meter-Flo Pumps
4 Pages
 E-Series Lube Packages
2 Pages
 Manzel HP Lubricator
2 Pages
 Manzel® Model 25 Lubricator
8 Pages
 Force Feed Box Lubricators
16 Pages
 Manzel GBL 7500
2 Pages
 Manzel® DSL Lubricators
4 Pages
 Balancing Valve
2 Pages
 Dyna-Star 10:1
4 Pages
 GLC 4400 Multi-Purpose
2 Pages
 GLC 2200 Controller
2 Pages
 G3 Electric Lubrication Pump
8 Pages
 G1 Series Lubrication Pumps
8 Pages
 High Speed Spindl-Gard
4 Pages
 InvisiPac
8 Pages
 SaniForce Equipment Catalog
32 Pages
 Fine Finish Sprayers Brochure
13 Pages
 Graco ILE Buyer's Guide
136 Pages
 AirPro Brochure
12 Pages
 Electric Sprayers Brochure
24 Pages
 RS Resin Spray Guns
8 Pages


Archived catalogs
 High-Flo
2 Pages
 Triton 3D
2 Pages
 Reactor IP
8 Pages
 Gelcoat
8 Pages
 E-Flo
E-Flo2 Pages
 Chopper
8 Pages
 PD44 Dispensing System
8 Pages
 Style your process
2 Pages
 PCF Metering System
8 Pages
 PR70
PR7012 Pages
 MD2 Dispense Valve
2 Pages
 XTREME-DUTY™
2 Pages
 XM Plural-Component Sprayers
8 Pages
 Reactor®
12 Pages
 Process Equipment
12 Pages
 Graco’s new Hydra-CleanTM
2 Pages
 Fusion®
16 Pages
 Xtreme® Airless Sprayers
3 Pages
 Wood Finishing
140 Pages
 Paint finishing spray packages
16 Pages


- GRACO industrial pump
- Pump with electric motor
- GRACO stationary pump
- Seawater pump
- GRACO self-priming pump
- Chemical pump
- Stainless steel pump
- Lubricant pump
- Dynamic agitator
- Submersible pump
- Oil pump
- Transfer pump
- Diaphragm pump
- GRACO pneumatic pump
- High-speed pump
- GRACO piston pump
- Pressure limiter
- Metering pump
- Food product pump