
- Catalogs
- GEUTEBRÜCK
- Weather and Dustproof Housings WSG-302


Weather and Dustproof Housings WSG-302

Weather and Dustproof Housings WSG-302
- Opening the Housing: Instructions for opening the housing and detaching the body from the middle section.
- Installing Power Boards: Details on installing the power distribution board or power supply, including securing with screws and connecting the thermostat switch.
- Mounting the Heating Element: Steps for mounting the heating element in the housing front, if not pre-installed.
- Camera Installation: Guidelines for positioning and securing the camera and lens on the mounting sled.
- Electrical Connections: Instructions for connecting power and signal cables on various boards, ensuring proper grounding and voltage matching.
- Ensure all electrical connections are made by qualified personnel.
- Use components that comply with VDE standards.
- Install a readily accessible disconnection device near the equipment.
- Secure cables to prevent damage and moisture ingress.
Catalog excerpts

WSG Serie 300 Wetter-/Staubschutzgehäuse und Zubehör Weather/Dustproof Housings and Accessories Installationsanleitung Installation manual
Open the catalog to page 1
untitled tr.row {} td.cell {} div.block {} div.paragraph {}
Open the catalog to page 2
3/24 2 Sicherheitshinweise ! Bevor Sie die Komponenten in Betrieb nehmen, lesen Sie bitte sorgfältig diese Sicherheitshinweise sowie die Bedienanleitung. Bewahren Sie die Bedienanleitung für eventuelle spätere Verwendung auf. ! Die Gehäuse dürfen nur durch qualifiziertes Fachpersonal geöffnet werden. Anschlußarbeiten sind von einer Elektrofachkraft nach VBG 4 (Unfallverhütungsvorschrift der Verwaltungs- Berufsgenossenschaft für elektrische Anlagen und Betriebsmittel) durchzuführen. ! Die Gehäuse, Netzgeräte und Netzverteiler-Platinen sind nur zum Festanschluß an den Versorgungsstromkreis vorgesehen....
Open the catalog to page 4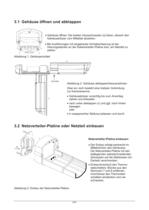
4/24 3.1 Gehäuse öffnen und abklappen • Gehäuse öffnen: Die beiden Inbusschrauben (a) lösen; danach den Gehäusekörper vom Mittelteil abziehen. • Bei Ausführungen mit eingebauter Scheibenheizung ist der Heizungsstecker an der Kabelverteiler-Platine bzw. am Netzteil zu ziehen. Abbildung 1: Gehäuserückteil 3.2 Netzverteiler-Platine oder Netzteil einbauen Netzverteiler-Platine einbauen: • Der Einbau erfolgt senkrecht im Mittelrahmen des Gehäuses. Die Netzverteiler-Platine mit den beiliegenden selbstschneidenden Schrauben auf die Stehbolzen (im Deckel) verschrauben. • Einbau/Anschluß des Thermostatschalters:...
Open the catalog to page 5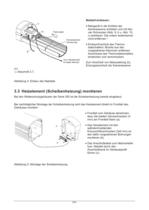
5/24 Netzteil einbauen: • Netzgerät in die Schlitze der Kamerawanne schieben und mit den vier Schrauben (Abb. 9, b u. Abb. 10, c) arretieren. Die untere Isolierwanne nicht entfernen ! • Einbau/Anschluß des Thermostatschalters: Brücke aus den vorgesehenen Klemmen entfernen. Anschlüsse des Thermostatschalters einstecken und verschrauben. Zum Anschluß von Netzzuleitung (b), Erdungsanschluß der Kamerawanne (c): Ë Abschnitt 3.7. Abbildung 4: Einbau des Netzteils 3.3 Heizelement (Scheibenheizung) montieren Bei den Wetterschutzgehäusen der Serie 300 ist die Scheibenheizung bereits eingebaut. Bei nachträglicher...
Open the catalog to page 6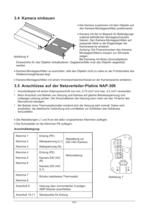
6/24 3.4 Kamera einbauen • Die Kamera zusammen mit dem Objektiv auf den Kamera-Montageschlitten positionieren. • Kamera mit der im Beipack für Befestigungsmaterial befindlichen Montageschrauben fixieren. Den Kamera-Montageschlitten auf passende Höhe in die Etagenträger der Kamerawanne schieben. Achtung: Die Fixierschrauben des Kamera- Montageschlittens müssen zur Stirnseite zeigen. Bei Kameras mit Motor-Zoomobjektiven Einbauhöhe für das Objektiv einkalkulieren. Gegebenenfalls muß das Objektiv abgestützt werden. • Kamera-Montageschlitten so ausrichten, daß das Objektiv nicht zu nahe an der Frontscheibe...
Open the catalog to page 7
7/24 3.6 Anschlüsse auf der Kabelverteiler-Platine von WSG-304X Das Schutzgehäuse WSG-304X verfügt über eine eingebaute Kabelverteiler-Platine. Auf der Steckverbindung im Inneren des Gehäuserückteils werden die ankommenden Netz-, Video- und Steuerleitungen aufgelegt. Die Verteiler-Platine im Gehäusemittelteil enthält in der oberen Reihe Stiftkontakte: Beim Zusammenbauen des Gehäuses wird somit die Verbindung zur Steckverbindung im Gehäuserückteil hergestellt. ! Video- und Steuerleitungen so fixieren, daß keine Teile des Primärkreises berührt werden können. Bei Verwenden von Kameras mit Motor-Zoomobjektiven...
Open the catalog to page 8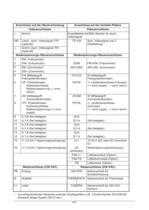
8/24 Anschlüsse auf der Steckverbindung Anschlüsse auf der Verteiler-Platine Videoanschlüsse Videoanschlüsse Û Schirm Koaxialkabel mit BNC-Stecker für asym. Videosignal VID Leiter (sym. Videosignal (TP) (optional) TP A-B Sym. Videosignal (via 2- Drahtleitung) Û Schirm (sym. Videosignal (TP) (optional) Niederspannungs-/Steueranschlüsse Niederspannungs-/Steueranschlüsse 1 FM- (Fokusmotor) 2 FM+ (Fokusmotor) LENS FM+/FM- (Fokusmotor) 3 ZM- (Zoommotor) MOTORS ZM+/ZM- (Zoommotor) 4 ZM+ (Zoommotor) 5 FW (Mittelabgriff Fokuspotentiometer) FOCUS W (Mittelabgriff Fokuspotentiometer) 6 VP- (Potentiometer-...
Open the catalog to page 9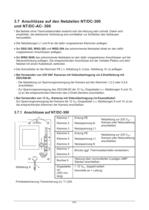
9/24 3.7 Anschlüsse auf den Netzteilen NT/DC-300 und NT/DC-AC- 300 ! Bei Betrieb ohne Thermostatschalter erwärmt sich die Heizung sehr schnell. Daher wird empfohlen, die elektrische Verbindung erst unmittelbar vor Schließen des Gehäuses herzustellen. • Die Netzleitungen L1 und N an die dafür vorgesehenen Klemmen auflegen. • Bei SSG-302, WSG-302 und WSG-304 das ankommende Netzkabel direkt an den dafür vorgesehenen Anschlüssen auflegen. • Bei WSG-304X das ankommende Netzkabel an den dafür vorgesehenen Anschlüssen auf der Steckverbindung auflegen. Die entsprechenden Anschlüsse auf der Verteiler-Platine...
Open the catalog to page 10
10/24 3.7.2 Anschlüsse auf NT/DC-AC-300 Klemme 1 Klemme 2 Klemme 3 Erdung PE Netzspannung N Netzspannung L1 Netzleitung zur 230 VAC-Kamera oder Netzzuleitung anschließen Klemme 4 Klemme 5 Klemme 6 Erdung PE Netzspannung L1 Netzspannung N Netzleitung zur 230 VAC-Kamera oder Netzzuleitung anschließen Klemme 7 Klemme 8 Brücke (ggf. Thermostatschalter einstecken) Buchse 9 Heizung über vormontierten 2- poligen AMP-Stecker anschließen Doppelader (a) (200 mm lang) + 12 VDC, doppelt isoliert Kennriefe an + Leitung Doppelader (b) (200 mm lang) 24 VAC z.B. zur Spannungsversorgung des Schwenk- Neige-Systems...
Open the catalog to page 11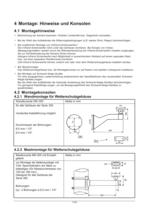
11/24 4 Montage: Hinweise und Konsolen 4.1 Montagehinweise .. Blickrichtung der Kamera beachten. Direkten Lichteinfall bzw. Gegenlicht vermeiden. .. Bei der Wahl des Aufstellortes die Witterungsbedingungen (z.B. starker Wind, Regen) berücksichtigen. .. Bei zusätzlicher Montage von (Infrarot-)Scheinwerfern: Den Infrarot-Scheinwerfer nicht unter das Gehäuse montieren. Bei Einsatz von (Video- )Bewegungsmeldern werden durch die Wärmeentwicklung der Infrarot-Scheinwerfer Insekten angezogen, die zur Sichtbehinderung der Kamera führen können. Halogen-Infrarot-Scheinwerfer nach Möglichkeit in ausreichendem...
Open the catalog to page 12All GEUTEBRÜCK catalogs and technical brochures
 GEUTEBRÜCK Product Overview 2011
59 Pages
 Day / Night Domes GSD-671
2 Pages
 Motorzoom MZ8,0-48,0AI-DC-PT
2 Pages
 Monochrome Cameras GVK-310
2 Pages
 Color Cameras GFD-611
2 Pages


- Digital imager
- Visible imager
- CMOS camera module
- Infrared imager
- Full-color camera system
- Monitoring camera system
- Industrial keyboard
- Panel-mount keyboard
- Keyboard with mechanical keys
- Image processing camera module
- PS2 keyboard
- Compact imager
- HD camera module
- Signal amplifying integrated circuit
- Rack-mount server
- High-speed camera module
- Desktop keyboard
- LED floodlight
- Storage server
- CCD video camera