
- Catalogs
- GeoSIG Ltd
- VE-13 / VE-12 / VE-11-V / VE-11-H Velocity Sensor

VE-13 / VE-12 / VE-11-V / VE-11-H Velocity Sensor
VE-13 / VE-12 / VE-11-V / VE-11-H Velocity Sensor
The GeoSIG VE-1x/2x series velocity sensors are available in uniaxial, biaxial, and triaxial models, with frequency responses ranging from 1 Hz to 315 Hz and 4.5 Hz to 315 Hz. These sensors are encased in waterproof cast aluminium, designed for easy installation with a compact size and single bolt fixation.
The sensors support various connection configurations, including cables with or without connectors. The document specifies pin assignments for Binder Serie 623 and 423 connectors, highlighting the importance of correct cable configuration for maintaining signal quality and system reliability.
Proper sensor placement and cable management are crucial to minimize noise and ensure reliable operation. The document recommends shielded twisted pair cables for optimal performance and provides specifications for cable types and lengths.
Procedures for configuring axis orientation, scale factor, and gain are outlined. Instructions for performing self-tests and confirming sensor operation are included.
Technical specifications detail the electrical and mechanical characteristics of the VE-1x/2x series sensors.
Basic maintenance guidelines are provided to ensure long-term sensor performance, with recommendations for periodic self-tests and annual calibration audits.
This section explains the sensor's operation principles, focusing on the integration of geophones and signal processing components to enhance low-frequency response.
Safety warnings are included, particularly regarding the sensor's lack of protection against explosive atmospheres.
Thoroughly review the manual before installation. Test the sensor and cable assembly for output signal and pulse response. Install the sensor on a level, smooth foundation, preferably concrete or rock, and close to the recorder. Special installations, such as vertical mounting, require compatibility and proper orientation.
Mount the VE velocity sensor using a center pivot bolt and three-point leveling screws. Use a bubble level for precise alignment and avoid excessive force when tightening screws.
Ensure the sensor is aligned to produce the desired output signals, following the right-hand rule for axis orientations. Contact GeoSIG for changes in axis orientation.
Consider the output range for voltage (2.5 VDC to ±2.5 V) and current (10 mA to ±10 mA). Proper cable configuration and installation are crucial for signal quality and system reliability. Use shielded twisted pair cables to minimize electromagnetic interference.
The cable must withstand environmental conditions and meet regulatory requirements. Connect the cable shield to the local ground at the recorder. Cable resistance affects maximum length, with a recommended maximum total resistance of 100 Ω.
The axis orientation is specified on the sensor label. Do not change the orientation without consulting GeoSIG. The scale factor is typically 100 mm/s, with gain options available. The self-test function verifies sensor integrity.
VE velocity sensors are sealed and require no routine maintenance. For critical applications, periodic self-tests are recommended. A calibration audit is suggested annually.
The VE-1x/2x includes a geophone, signal conditioner, gain selection, geophone integrator, and optional voltage to current converter. The system improves low-frequency response and provides a final frequency response from 1 Hz to 315 Hz.
Catalog excerpts

GeoSIG Ltd, Wiesenstrasse 39, 8952 Schlieren, Switzerland Phone: + 41 44 810 2150, Fax: + 41 44 810 2350 [email protected], www.geosig.com
Open the catalog to page 1
VE-1x/2x Series Velocity Sensor Installation and Operation Manual 03.03.2023 / V12 Document Revision Version Disclaimer GeoSIG Ltd reserves the right to change the information contained in this document without notice. While the information contained herein is assumed to be accurate, GeoSIG Ltd assumes no responsibility for any errors or omissions. Copyright Notice No part of this document may be reproduced without the prior written consent of GeoSIG Ltd. The software described in this document is furnished under license and may only be used or copied in accordance with the terms of such a license....
Open the catalog to page 2
VE-1x/2x Series Velocity Sensor Installation and Operation Manual 03.03.2023 / V12 The sensor housing provides no protection against explosive atmosphere. It must not be directly operated in area where explosive gases are present.
Open the catalog to page 3
VE-1x/2x Series Velocity Sensor Installation and Operation Manual 03.03.2023 / V12 1. Introduction The GeoSIG VE-1x/2x series velocity sensors consist of the following sensor types: Frequency response 1 Hz to 315 Hz: • VE-11 uniaxial • VE-12 biaxial • VE-13 triaxial Frequency response 4.5 Hz to 315 Hz: • VE-21 uniaxial • VE-22 biaxial • VE-23 triaxial All sensor types are implemented in the same waterproof, 195 x 112 x 95 mm cast aluminium housing. The modules inside the VE velocity sensors are 1 to 3 high-quality geophones, geophone signal amplifier, gain ranger, geophone integrator (VE-1x only)...
Open the catalog to page 4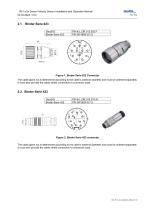
VE-1x/2x Series Velocity Sensor Installation and Operation Manual 03.03.2023 / V12 2.1. Binder Serie 623 GeoSIG Binder Serie 623 Figure 1, Binder Serie 623 Connector The cable gland nut is determined according to the cable’s external diameter and must be ordered separately. It must also provide the cable shield connection to connector case. 2.2. Binder Serie 423 GeoSIG Binder Serie 423 Figure 2, Binder Serie 423 connector The cable gland nut is determined according to the cable’s external diameter and must be ordered separately. It must also provide the cable shield connection to connector case....
Open the catalog to page 5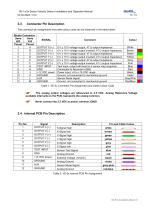
VE-1x/2x Series Velocity Sensor Installation and Operation Manual 03.03.2023 / V12 2.3. Connector Pin Description The connector pin assignment and cable colour code can be observed in the table below: Table 2. VE-3x Internal PCB Pin Assignment
Open the catalog to page 6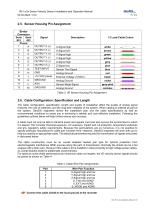
VE-1x/2x Series Velocity Sensor Installation and Operation Manual 03.03.2023 / V12 2.5. Sensor Housing Pin Assignment Binder Connector Table 3. VE Sensor Housing Pin Assignment 2.6. Cable Configuration, Specification and Length The cable configuration, specification, length and quality of installation affect the quality of analog signal received, the cost of materials, and the long-term reliability of the system. When cabling is ordered as part of the system, GeoSIG engineers review the installation plan and the cable specifications as well as environmental conditions to assist you in achieving...
Open the catalog to page 7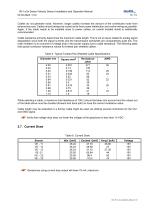
VE-1x/2x Series Velocity Sensor Installation and Operation Manual 03.03.2023 / V12 Cables do not generate noise. However, longer cables increase the amount of the contributed noise from external sources. Cables should always be routed as far from power distribution and control wiring as possible. Again, if the cable needs to be installed close to power cables, an overall braided shield is additionally recommended. Cable resistance primarily determines the maximum cable length. This is not an issue related to analog signal degradation since both the signal currents and the transmission bandwidth...
Open the catalog to page 8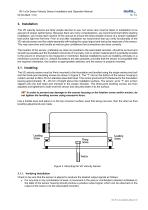
VE-1x/2x Series Velocity Sensor Installation and Operation Manual 03.03.2023 / V12 3. Installation The VE velocity sensors are fairly simple devices to use, but some care must be taken in installation to be assured of proper performance. Because there are many considerations, we recommend that before starting installation, you review each section of this manual to ensure the best possible chance of a simple installation that works right the first time. Prior to and after installation we recommend that you verify functionality of the VE velocity sensor and the cable assembly with testing the output...
Open the catalog to page 9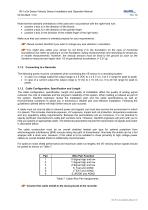
VE-1x/2x Series Velocity Sensor Installation and Operation Manual 03.03.2023 / V12 Note that the standard orientations of the axes are in accordance with the right-hand rule: • positive x-axis is in the direction of the thumb, • positive y-axis is in the direction of the pointer finger • positive z-axis in the direction of the middle finger of the right hand. Make sure that your sensor is oriented properly for your requirements. u2Sr° Please contact GeoSIG if you wish to change any axis direction /orientation. You might also utilise your sensor by not fixing it to the foundation (in the case...
Open the catalog to page 10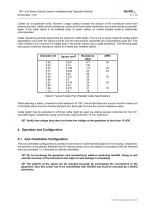
VE-1x/2x Series Velocity Sensor Installation and Operation Manual 03.03.2023 / V12 Cables do not generate noise. However, longer cables increase the amount of the contributed noise from external sources. Cables should always be routed as far from power distribution and control wiring as possible. Again, if the cable needs to be installed close to power cables, an overall braided shield is additionally recommended. Cable resistance primarily determines the maximum cable length. This is not an issue related to analog signal degradation since both the signal currents and the transmission bandwidth...
Open the catalog to page 11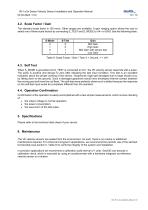
VE-1x/2x Series Velocity Sensor Installation and Operation Manual 03.03.2023 / V12 4.2. Scale Factor / Gain The standard scale factor is 100 mm/s. Other ranges are available. A gain ranging option allows the user to select one of three scale factors by connecting S_TEST and S_MODE to VA+ or GND. See the following table. Table 9. Scale Factor / Gain / Test; 0 = Ground, 1 = VA+ 4.3. Self Test When S_MODE is grounded and S_TEST is connected to VA+, the VE velocity sensor responds with a pulse. The pulse is positive and decays to zero after releasing the test input condition. This test is an excellent...
Open the catalog to page 12All GeoSIG Ltd catalogs and technical brochures
 GeoSwitch - Seismic Switch
2 Pages
 GMSplus - GMSplus6
2 Pages
 AC-4x Accelerometer
2 Pages
 AC-2x Accelerometer
2 Pages
 GeoDAS
1 Page
 SMS / SAS
2 Pages
 Digital Sensor System
4 Pages
 VE-5x-DH Seismometer
2 Pages
 GMS NetQuakes Recorder
2 Pages
 ETH-FLAN Ethernet Module
1 Page
 GeoSIG Company Brochure
1 Page


Archived catalogs
 AC-4x-DH Accelerometer
2 Pages
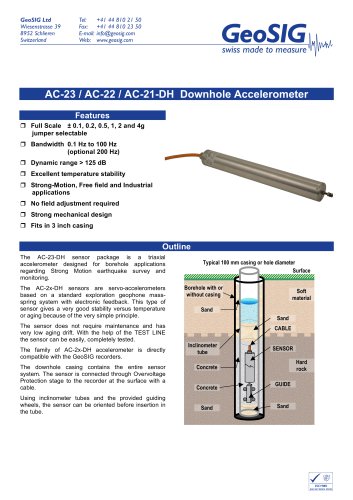 AC-2x-DH Accelerometer
2 Pages
 ETH-LLAN Ethernet Module
1 Page
 GXX-3GUX Series 3G Modem
1 Page
 AC-7x Accelerometer
2 Pages
 VE-1x Velocity Sensor
2 Pages
 AC-7x-DH Accelerometer
2 Pages
 VE-3x Velocity Sensor
2 Pages
 VE-5x Seismometer
2 Pages


- Analysis software solution
- Windows software
- Cloud-based software
- Acceleration sensor
- Monitoring software solution
- 3D software solution
- Measurement software
- Single-axis accelerometer
- Triaxial acceleration sensor
- Engineering software
- 2D software
- Modeling software
- Data acquisition software
- Acceleration sensor with analog output
- Communication module
- Data acquisition unit
- Industrial accelerometer
- Calculation software
- Data analysis software
- MEMS accelerometer