
Catalog excerpts

Double Flank Gear Roll Inspection Machines The simple functional inspection
Open the catalog to page 1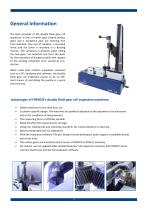
General Information The basic principle of the double flank gear roll inspection is that a master gear (nearly perfect gear) and a workpiece gear are meshing free from backlash. One axis of rotation is mounted firmly and the other is mounted in a floating manner. The variations in distance when rolling the two gears are detected and form the basis for the evaluation of the gear profile with respect to the existing composite error caused by production. When used with modern evaluation solutions such as a PC, hardware and software, the double flank gear roll inspection proves to be an...
Open the catalog to page 2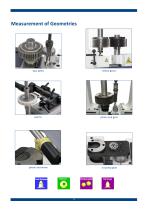
spur gears helical gears Tooth Thickness Running quality
Open the catalog to page 3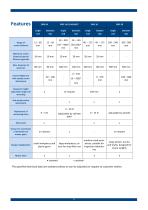
between tips Range of centre distance Minimum centre distance (special fixtures reguired) Centre height size with steady centre attachment between tips betwen tips between tips Range for height adjustable single end mounting 2nd steady centre attachment Adjustment of measuring force Glass scale Sensor for corrections of deviations of master gears small workpieces and plastic gears large workpieces; robust for shop floor use medium-sized workpieces; suitable for inspection laboratories large wheels, worms and shafts, designed for heavy weights Motor drive The specified technical data are...
Open the catalog to page 5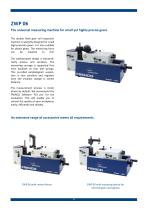
ZWP 06 The universal measuring machine for small yet highly precise gears The double flank gear roll inspection machine is specially designed for small high-precision gears. It is also suitable for plastic gears. The measuring force can be lowered to 0 N. The sophisticated design is extraordinarily precise and sensitive. The measuring carriage is supported free from backlash on four leaf springs. This so-called parallelogram suspension is very sensitive and registers even the smallest change in centre distance. The measurement process is motor driven by default. We recommend the FRENCO...
Open the catalog to page 6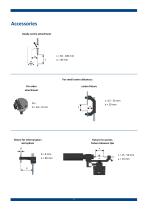
Accessories steady centre attachment For small centre distances: centre fixture fixture for internal gears and splines fixture for worms, fixture between tips
Open the catalog to page 7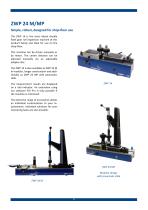
ZWP 24 M/MP Simple, robust, designed for shop-floor use The ZWP 14 is the most robust double flank gear roll inspection machine of this product family and ideal for use on the shop-floor. This machine can be driven manually or by motor. The centre distance can be adjusted manually via an adjustable adapter disc. The ZWP 14 is also available as ZWP 24 M in modular, longer construction and additionally as ZWP 24 MP with pneumatic slide. ZWP 14 The measurement results are displayed on a dial indicator. An evaluation using our software FGI Pro is only possible if the machine is motorised. The...
Open the catalog to page 8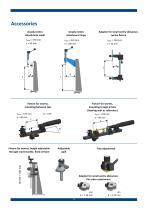
Accessories steady centre attachment small steady centre attachment large Adapter for small centre distances: centre fixture Fixture for worms, mounting between tips sMAX = 150 mm a = 40 mm Fixture for worms, mounting trough prisms (bearing seat as reference) Adjustable quill Fine adjustment Fixture for worms, height adjustable through crank handle, fixed version Adapter for small centre distances: Pin arbor attachment
Open the catalog to page 9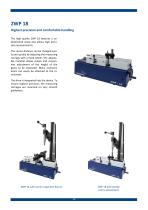
ZWP 18 Highest precision and comfortable handling The high quality ZWP 18 features a sophisticated setup and allows high precision measurements. The centre distance can be changed easily and quickly by adjusting the measuring carriage with a hand-wheel. The adjustable mandrel allows simple and convenient adjustment of the height of the gears to be inspected. Many accessory items can easily be attached to the instrument. The drive is integrated into the device. To ensure highest precision, the measuring carriages are mounted on very smooth guideways. ZWP 18 with steady centre attachment ZWP...
Open the catalog to page 10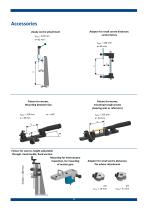
Accessories Adapter for small centre distances: centre fixture steady centre attachment sMAX = 370 mm a= 82 mm Fixture for worms, Mounting between tips Fixture for worms, mounting trough prisms (bearing seat as reference) Fixture for worms, height adjustable through crank handle, fixed version Mounting for internal gear inspection, for mounting of master gear Adapter for small centre distances: Pin arbour attachment
Open the catalog to page 11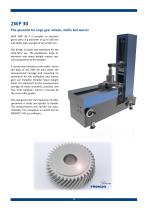
ZWP 30 The specialist for large gear wheels, shafts and worms With ZWP 30 it is possible to measure gears with a tip diameter of up to 500 mm and shafts with a length of up to 650 mm. The design is stable and optimized for the shop-floor use. The workpieces large dimensions and heavy weight require special components to be installed. A sturdy steel welded construction forms the base of the ZWP 30 onto which the measurement carriage and mounting attachments for the workpiece and master gear are installed. Despite heavy weight loads, it is important for the measurement carriage to move...
Open the catalog to page 12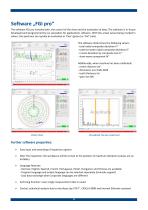
Software „FGI pro“ The software FGI pro includes both, the control of the drive and the evaluation of data. The software is in-house developed and programmed by our specialists for applications software. With the actual values being marked in colour, the specimen can quickly be evaluated as ‘Pass’ (green) or ’Fail’ (red). The software determines the following values: - total radial composite deviation Fi'' - tooth-to-tooth radial composite deviation fi'' - runout deviation by composite test Fr'' - short-wave component fk'' Additionally, when machine has been calibrated: - centre distance...
Open the catalog to page 13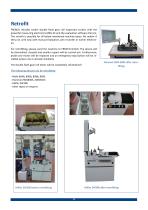
Retrofit FRENCO retrofits earlier double flank gear roll inspection testers with the powerful measuring electronics MEG 32 and the evaluation software FGI pro. The retrofit is possible for all below mentioned machine types. No matter if they ran until now with manual evaluation, pen recorder or earlier electronics. For retrofitting, please send the machine to FRENCO GmbH. The device will be dismantled, cleaned and smaller repairs will be carried out. Furthermore, probe and motor will be replaced and an emergency-stop button will be installed (unless one is already installed). The double...
Open the catalog to page 14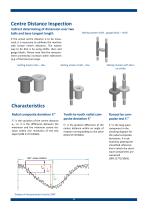
Centre Distance Inspection Indirect determining of dimension over two balls and base tangent length Setting master shaft - gauge block – shaft If the actual centre distance is to be measured, it is necessary to calibrate the machine with known centre distances. The easiest way to do that is by using shafts, discs and gauge blocks. Please note that the measurement uncertainty increases when tolerances (e.g. of the bore) are large. Setting master disc – disc Setting master shaft – disc Setting master with discs on shafts Characteristics Radial composite deviation Fi“ Fi“ is the variation of...
Open the catalog to page 15All Frenco GmbH catalogs and technical brochures
-
OF-Documents
8 Pages
-
Gear and Spline Manufacture
8 Pages
-
frenco english
92 Pages
-
Multiple inspector
8 Pages
-
Gear Flank Analyser
15 Pages
-
Spline Gages (HPL)
12 Pages
-
Overview Product Lines
92 Pages
-
Master Gears (HPR)
12 Pages


