PLGA MICROPARTICLE PRODUCTION STATION
1 /16Pages

PLGA MICROPARTICLE PRODUCTION STATION
1 /16Pages
Catalog excerpts
GOOD PRACTICE GUIDE PLGA MICROPARTICLE PRODUCTION STATION The following document presents all the basic steps to follow to start and stop your experiments cleanly with the RayDrop. CONTENTS - Starting an Experiment - PLGA Microparticle Production - Stopping your Experiment - Possible Issues - Complete Cleaning of the RayDrop
Open the catalog to page 1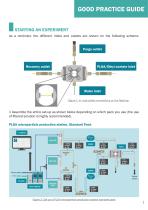
GOOD PRACTICE GUIDE STARTING AN EXPERIMENT As a reminder, the different inlets and outlets are shown on the following scheme: Purge outlet Recovery outlet PLGA/Ethyl acetate inlet Water inlet Figure 1: In- and outlets connections on the RayDrop 1 Assemble the entire set-up as shown below depending on which pack you use (the use of filtered solution is highly recommended). PLGA microparticle production station, Standard Pack Figure 2: Set-up of PLGA microparticle production station standard pack
Open the catalog to page 2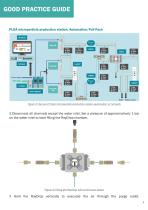
GOOD PRACTICE GUIDE PLGA microparticle production station, Automation/Full Pack Figure 3: Set-up of PLGA microparticle production station automation or full pack 2 Disconnect all channels except the water inlet. Set a pressure of approximatively 1 bar on the water inlet to start filling the RayDrop chamber. Figure 4: Filling the RayDrop with continuous phase 3 Hold the RayDrop vertically to evacuate the air through the purge outlet. 3
Open the catalog to page 3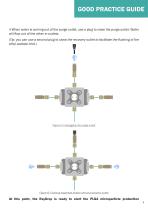
GOOD PRACTICE GUIDE 4 When water is coming out of the purge outlet, use a plug to close the purge outlet. Water will flow out of the other in-outlets. (Tip: you can use a second plug to close the recovery outlet to facilitate the flushing of the ethyl acetate inlet.) Figure 5: Unplugging the purge outlet Figure 6: Flushing dispersed phase inlet and recovery outlet At this point, the RayDrop is ready to start the PLGA microparticle production
Open the catalog to page 4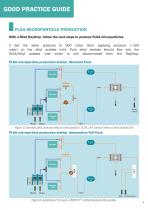
GOOD PRACTICE GUIDE PLGA MICROPARTICLE PRODUCTION With a filled RayDrop, follow the next steps to produce PLGA microparticles 5 Set the water pressure to 900 mbar. Start applying pressure (~100 mbar) on the ethyl acetate inlet. Pure ethyl acetate should flow into the PLGA/Ethyl acetate inlet which is still disconnected from the RayDrop. PLGA microparticle production station, Standard Pack Figure 7: Standard pack, manual valve on ethyl acetate + PLGA OFF, manual valve on ethyl acetate ON PLGA microparticle production station, Automation/Full Pack Figure 8: Automation/Full pack, 2-SWITCHTM redirecting...
Open the catalog to page 5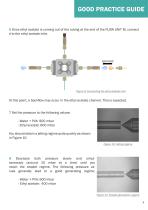
GOOD PRACTICE GUIDE 6 Once ethyl acetate is coming out of the tubing at the end of the FLOW UNIT M, connect it to the ethyl acetate inlet. Figure 9: Connecting the ethyl acetate inlet At this point, a backflow may occur in the ethyl acetate channel. This is expected. 7 Set the pressure to the following values: - Water + PVA: 900 mbar - Ethyl acetate: 600 mbar You should obtain a jetting regime quite quickly as shown in Figure 10. Figure 10: Jetting regime 8 Decrease both pressure slowly and simultaneously (around 10 mbar at a time) until you reach the droplet regime. The following pressure values...
Open the catalog to page 6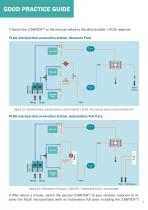
GOOD PRACTICE GUIDE 9 Switch the 2-SWITCHTM or the manual valves to the ethyl acetate + PLGA reservoir. PLGA microparticle production station, Standard Pack Figure 12: Standard pack, manual valve on ethyl acetate + PLGA ON, manual valve on ethyl acetate OFF PLGA microparticle production station, Automation/Full Pack Figure 13: Automation/Full pack, 2-SWITCHTM redirecting PLGA + ethyl acetate 9 After about a minute, switch the second 2-SWITCHTM to your recovery reservoir to recover the PLGA microparticles (with an automation/full pack including the 2-SWITCHTM)
Open the catalog to page 7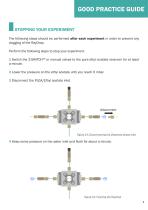
GOOD PRACTICE GUIDE STOPPING YOUR EXPERIMENT The following steps should be performed after each experiment in order to prevent any clogging of the RayDrop. Perform the following steps to stop your experiment. 1 Switch the 2-SWITCHTM or manual valves to the pure ethyl acetate reservoir for at least a minute. 2 Lower the pressure on the ethyl acetate until you reach 0 mbar. 3 Disconnect the PLGA/Ethyl acetate inlet. Figure 14: Disconnecting the dispersed phase inlet 4 Keep some pressure on the water inlet and flush for about a minute. Figure 15: Flushing the RayDrop
Open the catalog to page 8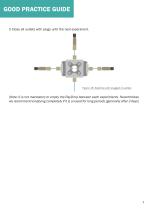
GOOD PRACTICE GUIDE 5 Close all outlets with plugs until the next experiment. Figure 16: RayDrop with plugged in-outlets (Note: it is not mandatory to empty the RayDrop between each experiments. Nevertheless we recommend emptying completely if it is unused for long periods (generally after 3 days)
Open the catalog to page 9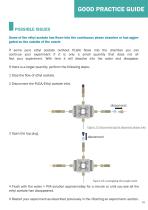
GOOD PRACTICE GUIDE POSSIBLE ISSUES Some of the ethyl acetate has flown into the continuous phase chamber or has aggregated on the outside of the nozzle If some pure ethyl acetate (without PLGA) flows into the chamber you can continue your experiment if it is only a small quantity that does not affect your experiment. With time it will dissolve into the water and disappear. If there is a larger quantity, perform the following steps: 1 Stop the flow of ethyl acetate. 2 Disconnect the PLGA/Ethyl acetate inlet. Figure 17: Disconnecting the dispersed phase inlet Figure 18: Unplugging the purge outlet...
Open the catalog to page 10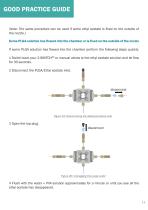
GOOD PRACTICE GUIDE (Note: The same procedure can be used if some ethyl acetate is fixed on the outside of the nozzle.) Some PLGA solution has flowed into the chamber or is fixed on the outside of the nozzle If some PLGA solution has flowed into the chamber perform the following steps quickly: 1 Switch back your 2-SWITCHTM or manual valves to the ethyl acetate solution and let flow for 30 seconds. 2 Disconnect the PLGA/Ethyl acetate inlet. Figure 19: Disconnectng the dispersed phase inlet Figure 20: Unplugging the purge outlet 4 Flush with the water + PVA solution approximately for a minute or...
Open the catalog to page 11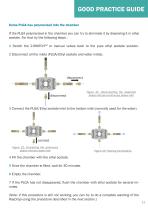
GOOD PRACTICE GUIDE Some PLGA has polymerized into the chamber If the PLGA polymerized in the chamber you can try to eliminate it by dissolving it in ethyl acetate. For that try the following steps : 1 Switch the 2-SWITCHTM or manual valves back to the pure ethyl acetate solution. 2 Disconnect all the inlets (PLGA/Ethyl acetate and water inlets). Figure 21: Disconnecting the dispersed phase inlet and continuous phase inlet 3 Connect the PLGA/Ethyl acetate inlet to the bottom inlet (normally used for the water). connect Figure 22: Connecting the continuous phase inlet and water inlet Figure 23:...
Open the catalog to page 12All FLUIGENT catalogs and technical brochures
 FLPG Plus
12 Pages
 ARIA
ARIA29 Pages
 PRODUCT CATALOG 2019
47 Pages


- Pump
- Pump with electric motor
- Control valve
- Threaded valve
- Regulating valve
- Automation software solution
- Electric valve
- Analysis software solution
- Gas valve
- Real-time software
- Microscope
- Standard valve
- Piston actuator valve
- Valve for the chemical industry
- Pressure probe
- Monitoring software solution
- 2-channel valve
- Air pump