- Catalogs
- Flashforge
- FlashForge Creator Pro
FlashForge Creator Pro
1 /40Pages

FlashForge Creator Pro
1 /40Pages
Catalog excerpts

User Guide This user guide is only applicable to FLASHFORGE Creator Pro 3D printer
Open the catalog to page 1
Preface Note: Each device must be tested before leaving factory. If there are some residues in extruder or some tiny scratches on the build tape, it is normal and won’t affect the printing quality. On the completion of this User Guide, thanks all Flashforge engineers and the Flashforge 3D printer users for their unremitting efforts and sincere assistance. The Flashforge Creator Pro User Guide is designed for the Creator Pro users to start their printing journey with Flashforge Creator Pro. Even if you are familiar with earlier Flashforge machines or 3D printing technology, we still recommend...
Open the catalog to page 3
Notices: Read all the instructions in the manual and familiarize yourself with the Flashforge Creator Pro User Guide before setting-up and using. Failure to comply with the warning and instructions may result in individual injury, fire, equipment damage or property damage. PLEASE STRICTLY FOLLOW ALL THE SAFETY WARNINGS AND NOTICE BELOW ALL THE TIME. Work Environment Safety ♦ Keep your work place tidy. ♦ Do not operate Creator Pro in the presence of flammable liquids, gases or dust. ♦ Creator Pro should be placed out of children and untrained people's reach. Electricity Safety ♦Always use the...
Open the catalog to page 4
Legal Notice All the information in this document is subject to any amendment or change without the official authorization from Flashforge. FLASHFORGE CORPORATION MAKES NO WARRANTY OF ANY KIND WITH REGARD TO THIS DOCUMENT, INCLUDING, BUT NOT LIMITED TO, THE IMPLIED WARRATIES OF MERCHANTABILITY AND FITNESS FOR A PARTICULAR PURPOSE. Flashforge shall not be liable for errors contained herein for incidental consequential damages in connection with furnishing, performance or use of this material. This document contains proprietary information protected by copyright. Copyright © 2017 Flashforge Corp....
Open the catalog to page 5
Chapter 1: 3D Printing Technology 3D printing refers to transforming three-dimensional models into physical objects that you can hold and touch. It is also called additive manufacturing because the 3D model is created by “adding” layers upon layers of material until the object is fully formed. Fused Filament Fabrication(FFF) is the most common method of 3D printing. It is also the method that the Creator Pro uses. It works by melting plastic material called filament onto a print surface in high temperature. The filament solidifies after it cools down, which happens instantaneously after it is...
Open the catalog to page 6
Chapter 2: About Creator Pro About Your Creator Pro 2. Extruder Cable Bunch 18. Filament Guide Tube Buckle 20. Power Input 24. Spool Holder Slot 19. Spool Holder 23. USB Input
Open the catalog to page 7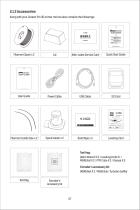
2.1.2 Accessories Along with your Creator Pro 3D printer, the box also contains the followings: After-sales Service Card Quick Start Guide Power Cable User Guide This user guideis only applicableto FLASHFORGECreatorPro 3D printer User Guide 打印平台调节专用 扫描二维码观看调平指导视频 调整平台支架下方的螺母直至纸片在喷嘴与平台间的 运动感受到轻微的阻力。 CAUTION 注意 Do Not Touch 请勿触摸 1.Extruder hot during operation. 使用过程中喷头会发热。 2.Heating plate hot during operation. Allow surface to cool before servicing. 使用过程中加热平台会发热待平台表面冷却后再操作。 顺时针旋转螺母 升高打印平台。 即减少平台与喷嘴之间 的距离。 Filament Guide Tube x 2
Open the catalog to page 8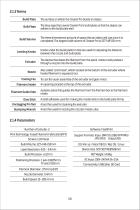
2.1.3 Terms Build Plate The surface on which the Creator Pro builds an object. Build Tape The blue tape that covers Creator Pro’s build plate so that the object can adhere to the build plate well. Build Volume Leveling Knobs Nozzle Cooling Fan Filament Intake Filament Guide Tube Glue Stick Unclogging Pin Tool Stamping Wrench The three dimensional amount of space that an object will use once it is completed. The largest build volume of Creator Pro is 227*148*150 mm. Knobs under the build platform that are used for adjusting the distance between the nozzle and build plate. The device that draws...
Open the catalog to page 9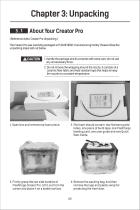
About Your Creator Pro ( Reference video: Creator Pro Unpacking ) The Creator Pro was carefully packaged at FLASHFORGE manufacturing facility. Please follow the unpacking steps laid out below. 1. Handle the package and its contents with extra care; do not use any unnecessary force. 2. Do not remove the wrapping around the nozzle. It consists of a ceramic fiber fabric and heat resistant tape that helps to keep the nozzle at a constant temperature. 1. Open box and remove top foam piece. 2. The foam should contain: two filament guide tubes, one piece of build tape, one Flashforge leveling card,...
Open the catalog to page 10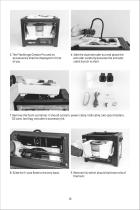
5. The Flashforge Creator Pro and its accessories shall be displayed in front of you. 6. Take the dual extruder out and place the extruder carefully because the extruder cable bunch is short. 7. Remove the foam container. It should contain: power cable, USB cable, two spool holders, SD card, tool bag, extruder's accessory kit. 8. Slide the X-axis Rods to the very back. 9. Remove lid, which should hold two rolls of filament.
Open the catalog to page 11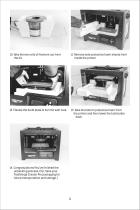
10. Take the two rolls of filamentout from the lid. 11. Remove side protective foam sheets from inside the printer. 12. Elevate the build plate to its limit with care. 13. Take the bottom protective foam from the printer and then lower the build plate back. 14. Congratulations! You’ve finished the unpacking process. (Tip: Save your Flashforge Creator Pro packaging for future transportation and storage. )
Open the catalog to page 12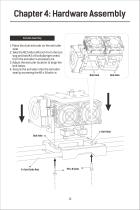
Chapter 4: Hardware Assembly Extruder Assembly 1. Place the dual extruder on the extruder seat. 2. Take the M2.5 Allen Wrench from the tool bag and two M3 x 8 bolts(longer ones) from the extruder’s accessory kit. 3. Adjust the extruder location to align the bolt holes. 4. Secure the extruder onto the extruder seat by screwing the M3 x 8 bolts in. Bolt Hole Bolt Hole Bolt Hole Bolt Hole
Open the catalog to page 13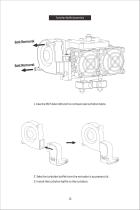
Turbofan Baffle Assembly Bolt Removal Bolt Removal 1. Use the M2.5 Allen Wrench to remove two turbofan bolts. 2. Take the turbofan baffle from the extruder’s accessory kit. 3. Install the turbofan baffle to the turbofan.
Open the catalog to page 14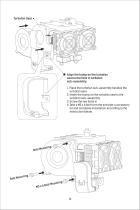
Turbofan Seat Align the bump on the turbofan seat to the hole in turbofan sub-assembly. 1. Place the turbofan sub-assembly besides the turbofan seat. 2. Insert the bump on the turbofan seat to the turbofan sub-assembly. 3. Screw the two bolts in. 4. Take a M3 x 6 bolt from the extruder’s accessory kit and complete installation according to the instruction below.
Open the catalog to page 15All Flashforge catalogs and technical brochures
 Finder
74 Pages
 FlashForge-Inventor
68 Pages
 FlashForge-Inventor-II
74 Pages
 Adventurer-3
44 Pages
- 3D printer filament
- Industrial 3D printer
- Plastic additive manufacturing machine
- High-performance 3D printer
- FDM 3D printer
- Prototyping 3D printing machine
- High-speed 3D printer
- Metal 3D printing machine
- Large-format 3D printer
- ABS 3D printer
- PLA filament
- PLA 3D printer
- 3D printer PLA filament
- Desktop 3D printer
- Dental additive manufacturing machine
- Resin 3D printer
- TPU 3D printer
- PETG 3D printer
- 3-axis 3D printer