
- Catalogs
- Flashforge
- Finder

Finder

Finder
This guide is designed for users of the FlashForge Finder 3D printer, providing essential setup and operational information. It is recommended for all users, including those familiar with 3D printing, to ensure a successful experience. Additional resources include a Quick Start Guide and the FlashForge website for updates and support.
The guide covers the setup and use of the FlashForge Finder, including unpacking, installation, and software usage, specifically for Windows 7 OS and the latest FlashPrint software.
Users must follow safety instructions to prevent injury or damage, including maintaining a tidy workspace, avoiding hazardous environments, ensuring electrical safety, and following personal safety guidelines. The device should be used in a well-ventilated area and not left unattended.
3D printing, or additive manufacturing, involves creating objects by adding material layer by layer. The Finder uses Fused Filament Fabrication (FFF), where filament is melted and extruded to form objects. The process includes making or downloading a 3D model, slicing it into printable instructions, and building the model.
The Finder features a touch screen, nozzle, build plate, and filament cartridge. It supports a build volume of 140x140x140mm and uses a 1.75mm filament. The device is compatible with FlashPrint and Simplify3D software and offers connectivity via USB, WiFi, and cloud services.
Instructions for filament installation, printer start-up, and filament loading/unloading are provided. Proper leveling of the build plate is crucial for successful printing.
FlashPrint is the primary software for slicing 3D models for the Finder. It converts STL files into Gcode for printing. The software supports various operating systems and offers features for adjusting print settings.
Users can generate Gcode and choose print methods. The guide provides detailed instructions for managing print files and adjusting settings during printing.
Information on obtaining support and service is included, emphasizing the importance of using authorized resources and contacting FlashForge for assistance.
Instructions for moving the extruder and build plate along the X, Y, and Z axes are provided.
Options include language, WiFi, Wlan hotspot, Polar Cloud Connection, FlashForge Cloud Connection, extruder calibration, startup sound, power saving mode, light bar control, factory reset, and updates.
Options to turn on/off and set up SSID and password.
Polar Cloud and FlashForge Cloud connections can be toggled on/off.
Adjust Z-axis and save settings.
Automatically shuts down after 30 minutes of inactivity unless printing.
Displays real-time status and basic device information.
Includes filament, power cable, USB cable, filament guide tube, quick start guide, grease, screwdriver, Allen wrench, glue stick, stamping wrench, unclogging pin tool, power adapter, after-sales card, and PTFE tube.
Detailed steps for unpacking the Finder 3D printer.
Three-point intelligent leveling system with feedback.
FlashPrint software installation and basic functions, including loading files, generating rilievo, and changing views.
This document is a user guide for the Flashforge Finder 3D printer, detailing various functionalities and operations within the FlashPrint software. It covers viewing options, model manipulation, support structures, printing settings, and connectivity.
Users can reset viewing options, show model outlines, and highlight steep overhangs. The overhang threshold is adjustable, with a default of 45 degrees.
Models can be moved, rotated, scaled, and cut along various axes.
Users can choose between treelike and linear support structures, add or delete supports, and use auto-supports to generate necessary structures.
Includes previewing, printing upon slicing completion, and selecting material types. Supports and raft are necessary for suspended structures and to ensure model adhesion to the platform. High resolution corresponds to slower printing speeds.
Users can create new projects, save models in various formats, and set preferences such as language and font size. Edit options include undo, redo, select all, duplicate, delete, auto layout, and repair models.
The Finder can connect to a PC via USB or WiFi. The connection status is indicated by an icon, and specific steps are provided for each connection method.
Includes control over jog movements, stepper motors, LED colors, and extruder settings.
Users are advised to set the continuous time to 60 seconds for optimal performance. Ensure the filament is loaded before starting the motor, and do not initiate rotation until the extruder reaches the filament's printing temperature. For PLA, this is 200℃.
FlashPrint automatically detects and downloads firmware updates. To update, disconnect the printer, select the printer type and firmware version, and confirm the printer is idle. Reboot the Finder to complete the update and verify the version.
Access these via [Tools] to view printer name, type, and firmware details when connected to a computer.
Includes a First Run Wizard, Help Contents, Update Checks, and software information under [Help].
This section guides users through converting a 3D model into a physical object. It covers loading a .stl file, positioning the model, and setting print parameters such as supports, raft, and resolution.
Gcode files can be transferred to the Finder via USB cable, WiFi, USB stick, FlashForge Cloud, or Polar Cloud. Each method involves connecting the printer, leveling the build plate, loading filament, and initiating the print job.
FlashForge offers support via their website, email, and phone. Common issues are addressed in their knowledge base. The support team is available Monday through Saturday, 8:00 a.m. to 5:00 p.m. PST. Users should have their serial number ready when contacting support.
Catalog excerpts

FlashForge Corporation FlashForge Finder 3D Printer User Guide Note! The Quick Start Guide and the User Guide may change over time. You can check the latest version online at www.flashforge.com Finder User Guide | www.flashforge.com
Open the catalog to page 1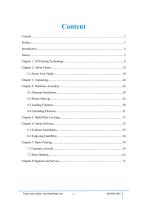
Finder User Guide | www.flashforge.com
Open the catalog to page 2
Preface Note: Each device must be tested before leaving factory. If there are some residues in extruder or some tiny scratches on the build tape, it is normal and won’t affect the printing quality. On the completion of this User Guide, thanks all FlashForge engineers and the FlashForge 3D printer users for their unremitting efforts and sincere assistance. The FlashForge Finder User Guide is designed for the Finder users to start their printing journey with FlashForge Finder. Even if you are familiar with earlier FlashForge machines or 3D printing technology, we still recommend that please read...
Open the catalog to page 3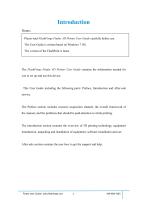
Introduction Notes: ·Please read FlashForge Finder 3D Printer User Guide carefully before use. ·The User Guide is written based on Windows 7 OS. ·The version of the FlashPrint is latest. The FlashForge Finder 3D Printer User Guide contains the information needed for you to set up and use this device. This User Guide including the following parts: Preface, Introduction and After-sale service. The Preface section includes resource acquisition channel, the overall framework of the manual, and the problems that should be paid attention to while printing. The introduction section contains the overview...
Open the catalog to page 4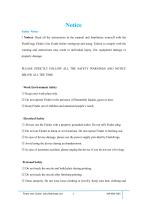
Safety Notice ! Notices: Read all the instructions in the manual and familiarize yourself with the FlashForge Finder User Guide before setting-up and using. Failure to comply with the warning and instructions may result in individual injury, fire, equipment damage or property damage. PLEASE STRICTLY FOLLOW ALL THE SAFETY WARNINGS AND NOTICE BELOW ALL THE TIME. • Work Environment Safety ® Keep your work place tidy. © Do not operate Finder in the presence of flammable liquids, gases or dust. © Keep Finder out of children and untrained people’s reach. • Electrical Safety © Always use the Finder...
Open the catalog to page 5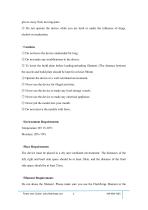
gloves away from moving parts. ® Do not operate the device while you are tired or under the influence of drugs, alcohol or medication. • Cautions ® Do not leave the device unattended for long. © Do not make any modifications to the device. © To lower the build plate before loading/unloading filament. (The distance between the nozzle and build plate should be kept for at least 50mm) ® Operate the device in a well-ventilated environment. © Never use the device for illegal activities. © Never use the device to make any food storage vessels. © Never use the device to make any electrical appliance. ©...
Open the catalog to page 6
filament from the brands accepted by FlashForge. · Filament Storage All polymers degrade with time. Do not unpack filament until necessary. Filament should be stored at clean and dry conditions. Legal Notice All the information in this document is subject to any amendment or change without the official authorization from FlashForge. FLASHFORGE CORPORATION MAKES NO WARRANTY OF ANY KIND WITH REGARD TO THIS DOCUMENT, INCLUDING, BUT NOT LIMITED TO, THE IMPLIED WARRATIES OF MERCHANTABILITY AND FITNESS FOR A PARTICULAR PURPOSE. FCC Notice This device complies with part 15 of the FCC Rules. Operation...
Open the catalog to page 7
Chapter 1: 3D Printing Technology 3D printing refers to transforming three-dimensional models into physical objects that you can hold and touch. It is also called additive manufacturing because the 3D model is created by “adding” layers upon layers of material until the object is fully formed. Fused Filament Fabrication(FFF) is the most common method of 3D printing. It is also the method that the Finder uses. It works by melting plastic material called filament onto a print surface in high temperature. The filament solidifies after it cools down, which happens instantaneously after it is extruded...
Open the catalog to page 8
scanner. ·From the Cloud The most popular way of obtaining a 3D model is to download it from websites that allow users to upload 3D models that they designed. FlashCloud: 1.1.2 Slice and Export the 3D Model: Slice software is the software that prepares 3D models for printing and turns them into instructions for the 3D printers. FlashPrint is the slicing software used for the FlashForge Finder. Using FlashPrint, you can turn stl. files into g. or gx. files for printing. Then the files can be transferred to your Finder via USB cable, USB stick or WiFi. Finder support Simplify3D software, software...
Open the catalog to page 9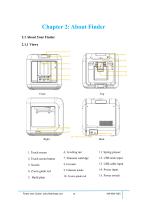
Chapter 2: About Finder 2.1 About Your Finder 2.1.1 Views 2. Touch screen button Finder User Guide | www.flashforge.com
Open the catalog to page 10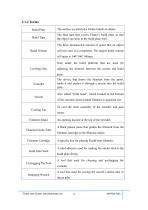
Finder User Guide | www.flashforge.com 11 400-699-1063
Open the catalog to page 11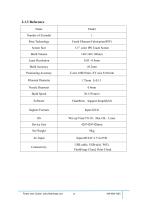
Finder User Guide | www.flashforge.com 12 400-699-1063
Open the catalog to page 12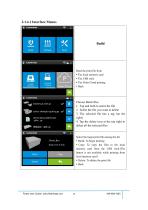
Build Read the print file from • The local memory card • The USB stick • The Polar Cloud printing • Back Choose Batch files 1. Tap and hold to select the file 2. Select the file you want to delete 3. The selected file has a tag (on the right) 4. Tap the delete icon at the top right to delete all the selected files Select the target print file among the list • Build: To begin printing • Copy: To copy the files to the local memory card from the USB stick.(The button is not available while printing from local memory card) • Delete: To delete the print file • Back Finder User Guide | www.flashforge.com...
Open the catalog to page 13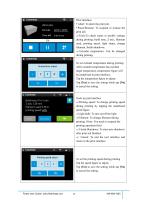
Print interface Abort: To abort the print job. Pause/Resume: To suspend or resume the print job. Tools:To check status or modify settings during printing: build time, Z axis, filament used, printing speed, light status, change filament, finish-shutdown. Extruder temperature: Can be changed during printing. To set extruder temperature during printing: After extruder temperature has reached target temperature, temperature figure will be underlined in print interface, Tap the temperature figure to adjust; Tap [Yes] to save the setting while tap [No] to cancel the setting. Tools in print...
Open the catalog to page 14All Flashforge catalogs and technical brochures
 FlashForge Creator Pro
40 Pages
 FlashForge-Inventor
68 Pages
 FlashForge-Inventor-II
74 Pages
 Adventurer-3
44 Pages
- 3D printer filament
- Industrial 3D printer
- Plastic additive manufacturing machine
- Prototyping 3D printing machine
- FDM 3D printer
- High-performance 3D printer
- Large-format 3D printer
- High-speed 3D printer
- Metal 3D printing machine
- ABS 3D printer
- PLA filament
- 3D printer PLA filament
- PLA 3D printer
- Desktop 3D printer
- Resin 3D printer
- Dental additive manufacturing machine
- TPU 3D printer
- PETG 3D printer
- ABS filament