- Catalogs
- Flashforge
- Adventurer-3
Adventurer-3
1 /44Pages

Adventurer-3
1 /44Pages
Catalog excerpts

This guide is only applicable to FLASHFORGE Adventurer3 3D printer
Open the catalog to page 1
Preface Notice Terms Chapter 1: About Adventurer 3-06 Chapter 4: Supports and Service- 40
Open the catalog to page 3
Preface Note: Each device must be tested before leaving factory. If there are some residues in extruder or some tiny scratches on the build tape, it is normal and won’t affect the printing quality. On the completion of this User Guide, thanks all FlashForge engineers and the FlashForge 3D printer users for their unremitting efforts and sincere assistance. The FlashForge Adventurer 3 User Guide is designed for the Adventurer 3 users to start their printing journey with FlashForge Adventurer 3. Even if you are familiar with earlier FlashForge machines or 3D printing technology, we still recommend...
Open the catalog to page 4
Work Environment Safety ♦ Keep your work place tidy. ♦ Do not operate Adventurer 3 in the presence of flammable liquids, gases or dust. ♦ Keep Adventurer 3 out of children and untrained people's reach. Electrical Safety ♦ Always use the Adventurer 3 with a properly grounded outlet. Do not refit Adventurer 3 plug. ♦ Do not use Adventurer 3 in damp or wet locations. Do not expose Adventurer 3 to burning sun. ♦ In case of device damage, please use the power supply provided by FlashForge. ♦ Avoid using the device during an thunderstorm. ♦ In case of uncertain accident, please unplug the device if...
Open the catalog to page 5
Environment Requirements Place Requirements ♦ The device must be placed in a dry and ventilated environment. The distances of the left, right and back side space should be at least 20cm, and the distance of the front side space should be at least 35cm. Device storage temperature: RT 0-40C Filament Requirements ♦ Do not abuse the filament. Please make sure you use the FlashForge filament or the filament from the brands accepted by FlashForge. Nozzle clogging and damage may be caused by non-FlashForge filament due to inappropriate material properties. Filament Storage ♦ All polymers degrade with...
Open the catalog to page 6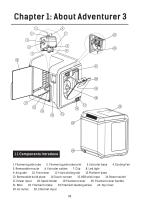
Chapter 1: About Adventurer 3 6 1. Filament guide tube 2. Filament guide tube joint 3. Extruder base 4.Cooling Fan 5. Removable nozzle 6. Extruder cables 7. Clip 8. Led light 9. Air guide 10. Front door 11.Y-Axis sliding slot 12.Platform base 13. Removable build plate 14.Touch-screen 15.USB stick input 16.Power switch 17. Power input 18. Spool holder 19.Filament cover 20. Filament cover handle 21. Moto 22. Filament intake 23.Filament feeding wheel 24. Top cover 25. Air outlet 26. Ethernet input 06
Open the catalog to page 8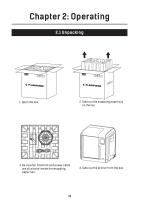
Chapter 2: Operating 2.1 Unpacking Insurance Company HANDLE WITH CARE Insurance Company HANDLE WITH CARE ILE FRAG LE HAND CARE WITH 2. Take out the wrapping paper box on the top. 3 . Be careful! Filament and power cable are all placed inside the wrapping paper box. 4 . Take out the printer from the box.
Open the catalog to page 10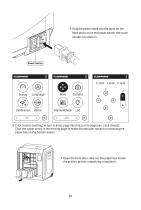
5. Plug the power cable into the input on the back and turn on the power switch, the touch screen is turned on. Power Switch 6. Click [tools]-[setting] in turn to enter page like this, turn to page two, click [move]. Click the upper arrow in the moving page to make the extruder raises for removing the paper box on the bottom easier. 7. Open the front door, take out the paper box inside the printer, printer unpacking completed.
Open the catalog to page 11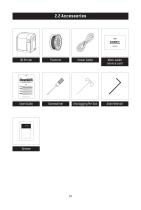
Power Cable After-sales service card Allen Wrench Quick Start Guide 9 前往闪铸科技官方网站 www.sz3dp.com ,可以在[ 技术支持 ] 页面下载用户使 用手册、切片软件等资料,或查看相关操作视频。 Please refer to FlashForge official website www.flashforge.com to download the newest User's Guide, Software and Instruction Videos. (Support-Support Center-Select a Product) 1. Hot! Avoid touching the heating nozzle and heating build plate in operation. 2. Mo
Open the catalog to page 12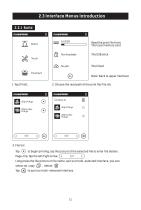
2.3 Interface Menus Introduction 2.3.1 Build Read the print file from: The local memory card Back: Back to upper interface 2 . Choose the read path of the print file File list. to begin printing; tap the picture of the selected file to enter file details. Page-flip: Tap the left/right arrow. Long press the file picture or file name, quit out multi-selected interface, you can select all, copy Tap to quit out multi-selected interface.
Open the catalog to page 13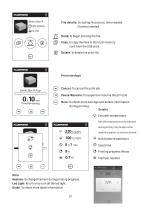
File details: Including file picture, time needed, filament needed. 0.7 m Build: To begin printing the file. Copy: To copy the files to the local memory card from the USB stick. Delete: To delete the print file. Print interface Cancel: To cancel the print job. Pause/Resume: To suspend or resume the print job. More: To check more settings and details information during printing. Details Extruder temperature Extruder temperature can be adjusted during printing (Tap to adjust after underline appears as pictures showed. ) Build plate temperature Used time Printing progress Whole filament needed ......
Open the catalog to page 14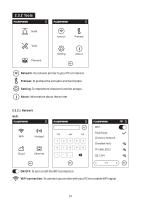
Build Network Network: To connect printer to your PC or internet. Preheat: To preheat the extruder and build plate. Setting: To implement relevant function setups. About: Information about the printer. ON/OFF: To turn on/off the WIFI connection. WiFi connection: To connect your printer with your PC via a stable WIFI signal.
Open the catalog to page 15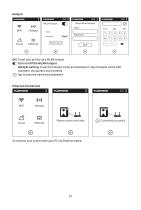
Hotspot Setup WLan hotspot WLan hotspot Setup hotspot To set your printer as a WLAN hotspot. Turn on/off the WLAN hotspot. Hotspot setting: To set the hotspot name and password. Input hotspot name with numbers, characters and symbols. Tap to save the name and password. Ethernet Connection Please connect the cable To connect your printer with your PC via Ethernet cable. Connected successful
Open the catalog to page 16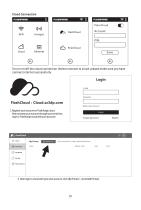
Cloud Connection To turn on/off the cloud connection. Before connect to cloud, please make sure you have connect internet successfully. Login E-mail 1. Register your account on Flashforge cloud: After activate your account through your email box, login in Flashforge cloud with your account. Login Forgot password The current printer is empty. Please add a printer Register Code Model Library 2. After login in cloud with your own account, click [My Printer] - click [Add Printer].
Open the catalog to page 17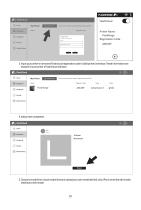
The current printer is empty. Please add a printer Register Code Printer Name: Flashforge Registration Code: All fields must be filled in Registration Code 3. Input your printer’s name and Flashcloud registration code in [Add printer] interface. These information are showed in your printer’s FlashCloud interface. FlashCloud The current printer is empty. Please add a printer Register Code Model Library 4. Add printer completed. FlashCloud Home 3D Model Model Detail Model Library 5. Choose a model from cloud model library or upload your own model (stl file), click [Print], enter the edit model...
Open the catalog to page 18All Flashforge catalogs and technical brochures
 Finder
74 Pages
 FlashForge Creator Pro
40 Pages
 FlashForge-Inventor
68 Pages
 FlashForge-Inventor-II
74 Pages
- 3D printer filament
- Industrial 3D printer
- Plastic additive manufacturing machine
- High-performance 3D printer
- FDM 3D printer
- Prototyping 3D printing machine
- High-speed 3D printer
- Metal 3D printing machine
- Large-format 3D printer
- ABS 3D printer
- PLA filament
- PLA 3D printer
- 3D printer PLA filament
- Desktop 3D printer
- Dental additive manufacturing machine
- Resin 3D printer
- TPU 3D printer
- PETG 3D printer
- 3-axis 3D printer