- Catalogs
- Fairlane Products
- GRIPSERT TYPE TG
- Products
- Catalogs
- News & Trends
- Exhibitions
GRIPSERT TYPE TG
1 /2Pages

GRIPSERT TYPE TG
1 /2Pages
Catalog excerpts

Fairlane Products TG GripSert Workholding Grippers Intended Use TG GripSert workholding grippers and jaws are suitable for clamping castings, unmachined parts and parallel-milled workpieces. Safety Precautions • TG GripSert grippers and jaws can be used with all TriMax Series vises. For all other clamping systems, please ensure compatibility with the TG GripSert grippers. • Read the operating instructions before commencing any work. • Clamping presents a danger to persons and surroundings. • Clamp the workpiece securely. The workpiece will not be held safely if insufficient clamping force is supplied. • Follow all accident prevention instructions applicable to your machine. • Avoid all hazardous working practices. Fairlane Products 33792 Doreka Drive Fraser MI 48026 Phone: 586-294-6100 Fax: 586-294-6822 www.fairlaneproducts.com Technical Features Special features of TG GripSert workholding grippers: 1. TG GripSert triangular shape • Creates a coupling without any clearance. • Divides the clamping forces. • Absorbs vibrations, allowing high stability 2. TG GripSert 5-degree taper • Creates a pull-down effect onto the gripper which is transferred to the workpiece and prevents lifting. 3. Special sharpened teeth (with a larger angle on lower portion of gripper than on upper portion) • Creates pull-down effect on the workpiece. • Permits clamping with a lower clamping force after the engraving, preventing excessive deformation of the workpiece. 1. Screw the TG GripSert jaws to the vise (TriMax, Kurt or other). Suggested clamping force = 30 ft-lb. For correct clamping, make sure to use the proper screw length for your specific vise. Proper length is determined by adding the thickness of the TG GripSert jaws and the depth of the thread of your own vise. Example: 12 mm jaw thickness + 10 mm vise thread depth = 22 mm screw thread length needed. 2. Tighten the TG GripSert grippers at the jaw using the screws to 1.5 ft-lb with a TORX T9 screwdriver (F658-450310) or TORX T9 wrench (F658-450320). Make sure to place the grippers in parallel to the dovetail seat. 3. Select suitable clamping points on the workpiece. Make sure that the teeth of the gripper are positioned to penetrate the surface of the workpiece evenly. If the workpiece is irregular in shape, it is best to use a floating jaw. Notes: • Do not clamp in the vicinity of any mold joints or dressed areas. • Grind flame cut contours with hard regions with an angle grind. • Do not hit the workpiece with a hammer after the clamping. This may break the grippers. Use of Snap-in Parallels Some TG GripSert jaws are designed for use with our exclusive Snap-in parallels, available in various heights and sold in pairs. The self-locking design of the parallels allows for the quick and easy installation on the TG GripSert jaws with no additional tools. This allows for reduced downtimes, the elimination of clamps and locks, and increased accuracy of the finished parts. Used with Snap-in parallels, TG GripSert grippers can clamp workpiece surfaces from .080”-.200” (depending on the parallel height and the model of jaws). Min. = .080” Max. = .200 Protection of TG GripSert Pockets on Jaws When TG GripSert grippers are not installed on your jaws, install the aluminum protective covers (TG-PRO) in the empty pockets to keep out dirt and debris.
Open the catalog to page 1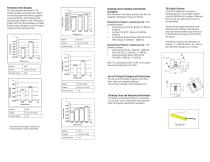
Penetration of the Grippers The ratio between the number of TG GripSert grippers and penetration depth is inversely proportional (fewer grippers= more penetration). Charts below show the penetration depth of each TG GripSert gripper tooth into the workpiece in relation to the number of grippers used, the type of material and the clamping force. * Steel with tensile strength = 980 N/mm2 ** Hardened Steel / Titanium HRC 50-54 Clamping Force in Relation to the Number of Grippers With reference to the charts shown to the left, the suggested clamping forces are as follows: Clamping Force Range 1-3...
Open the catalog to page 2All Fairlane Products catalogs and technical brochures
 fairlane_workholding
79 Pages
 Quick Release Ball Lock Pins
46 Pages
 Rollers & Bumpers
50 Pages
 Workholding & Positioning
77 Pages
