- Catalogs
- Elettronica Todescato
- QUICK START UP GUIDE FOR WELDER Model L_45
QUICK START UP GUIDE FOR WELDER Model L_45
1 /18Pages

QUICK START UP GUIDE FOR WELDER Model L_45
1 /18Pages
Catalog excerpts
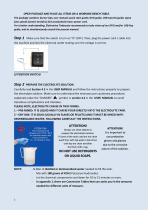
OPEN PACKAGE AND PLACE ALL ITEMS ON A WORKING BENCH TABLE. The package contains: burner tips; user manual; quick start guide; DVD guide; USB tutorial guide; spare fuse; plastic funnel; torch(es); fire proof plastic hose; power cord. For a better understanding, Elettronica Todescato recommends to take vision of our DVD and/or USB Key guide, and to simultaneously consult the present manual. Make sure that the switch is turn on “O” (OFF). Then, plug the power cord / cable into the machine and into the electrical outlet making sure the voltage is correct. PREPARE THE ELECTROLYTE SOLUTION Carefully...
Open the catalog to page 2
UNSCREW THE SAFETY CAP ON TOP OF THE MACHINE. Step 4 Turn the switch into the down position ( “=” ) to refill, this will enable the operator to check the level of demineralized water. Green light is “on”, indicating the machine is connected to the electricity. (pic 1) Yellow light is “on”, initially indicating the internal tank level is empty and needs to be filled, or the water level is below normal during daily usage and there is need to add more water. (see picture below) Red light is, “off”, indicating that the internal tank needs to
Open the catalog to page 3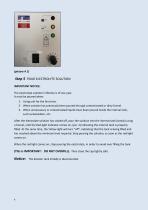
Step 5 POUR ELECTROLYTE SOLUTION IMPORTANT NOTICE: The electrolyte solution’s lifetime is of one year. It must be poured when: 1- Using unit for the first time. 2- When solution has previously been poured through contaminated or dirty funnel. 3- When unnecessary or contaminated liquids have been poured inside the internal tank, such as deoxidizer, etc. After the electrolyte solution has cooled off, pour the solution into the internal tank (slowly) using a funnel, until the Red-light indicator comes on, (pic. 2) indicating the internal tank is properly filled. At the same time, the Yellow light...
Open the catalog to page 4
FLUX (deoxidizer) Methyl Alcohol ( 1 liter ) + Boric Acid ( 15 – 20 grams ) sec . 4.5 in the USER MANUAL), contains the procedure and safety precautions to follow. EXAMPLE OF HERMETIC SEAL Step 7 BOOSTER TANK FILLING Take the un-attached booster tank in hand, start pouring the deoxidizer in the booster tank by placing your index on the hole in the center of the booster tank to avoid filing the interior chamber.
Open the catalog to page 5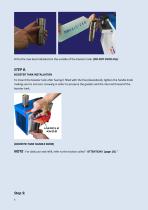
Fill to the max level indicated on the outside of the booster tank. (DO NOT OVER-FILL) STEP 8. BOOSTER TANK INSTALLATION To mount the booster tank after having it filled with the flux (deoxidized), tighten the handle knob making sure to not over screwing in order to preserve the gaskets and the internal thread of the booster tank. (BOOSTER TANK HANDLE KNOB) NOTE : For daily use and refill, refer to the section called “ ATTENTION ! (page 10). “
Open the catalog to page 6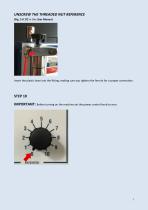
UNSCREW THE THREADED NUT REFERENCE (Fig. 5 # 17) in the User Manual. Insert the plastic hose into the fitting, making sure you tighten the ferrule for a proper connection. STEP 10 IMPORTANT: Before turning on the machine set the power control knob to zero.
Open the catalog to page 7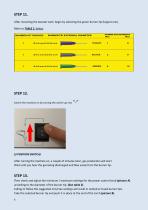
STEP 11. After mounting the booster tank, begin by selecting the green burner tip (largest one). Refer to TABLE 2, below. STEP 12. Switch the machine on by turning the switch up into (3 POSITION SWITCH) After turning the machine on, a couple of minutes later, gas production will start. Wait until you hear the gas being discharged and flow easily from the burner tip. STEP 13. Then check and adjust the minimum / maximum settings for the power control knob (picture A) according to the diameter of the burner tip. (See table 2). Failing to follow the suggested min/max settings will result in melted...
Open the catalog to page 8
NOTE: Make sure the power control knob is in the proper position BEFORE lighting the flame. STEP 14. Wait to the gas to exit from the burner tip (approximately two/three minutes or more), then light the flame with a lighter or electronic igniter. If the flame is too weak move on to the next burner tip on table two (2). STEP 15. To turn off the machine switch the flame off by pushing the base of the torch (as you do with a pen), then ultimate the procedure by turning the switch to “0”. Always shut the flame OFF, before turning machine off. Do not turn the machine “off” while the flame is l
Open the catalog to page 9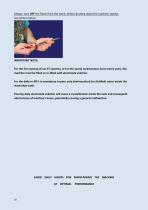
Always, turn OFF the flame from the torch, before shutting down the machine, always. See picture below. IMPORTANT NOTE: For the first startup of our ET systems, or for the yearly maintenance (once every year), the machine must be filled or re-filled with electrolyte solution. For the daily re-fill it is mandatory to pour only demineralized (or distilled) water inside the electrolyte tank. Pouring daily electrolyte solution will cause a crystallization inside the tank and consequent obstructions of machine’s hoses, potentially causing a general malfunction. GOOD DAILY HABITS FOR MAINTAINING THE...
Open the catalog to page 10
1. Do not unscrew the “booster tank” nor the “safety cap”, while the flame is on. 2. Do not leave the machine on for more than 30 minutes, while the flame is “off”. 3. Refill the internal tank with WATER by depressurizing the booster tank first. Whenever water or electrolyte solution need to be added to the internal tank it is IMPORTANT to depressurize the booster tank first by simply unscrewing the handle-knob (see photo in Step # 8). This will prevent the flux (deoxidizer) from contaminating the electrolyte solution. A) unscrew safety cap and add water or electrolyte solution until the Red...
Open the catalog to page 11
b. If the yellow light indicator is “on”, then it’s below the acceptable usage level and water must be added. c. If both the (Red & Yellow) lights are off, then the water level is somewhere in the middle of the tank. 10. If the machine is not used for 15 - 20 days, turn ON the welder for at least 3 minutes to max power without lighting the flame, to avoid that the check valve does not become blocked. After that, turn, OFF the machine. DO NOT DEPRESSURIZE THE INTERNAL TANK BY UNSCREWING THE SAFETY CAP. 11. Do not let gas out of the torch for more than fifteen (15) to twenty (20) minutes without...
Open the catalog to page 12All Elettronica Todescato catalogs and technical brochures
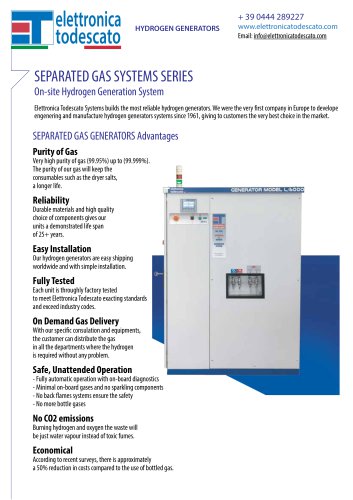
 SEPARATED GAS SYSTEMS SERIES
2 Pages
 HYDROGEN & OXYGEN GENERATORS
2 Pages

- Storage vessel
- Pressure limiter
- Single-stage pressure regulator
- Industrial tank container
- Liquid tank
- Gas pressure limiter
- Pressure regulator with pressure gauge
- Gas tank
- Brazing alloy
- Regulating tank
- Solder flux
- Oxygen and hydrogen generator
- Generator tank
- Brazing torch
- Silver based brazing alloy
- Paste brazing alloy
- Wire brazing alloy