
- Catalogs
- EKO Instruments
- MS-093


MS-093
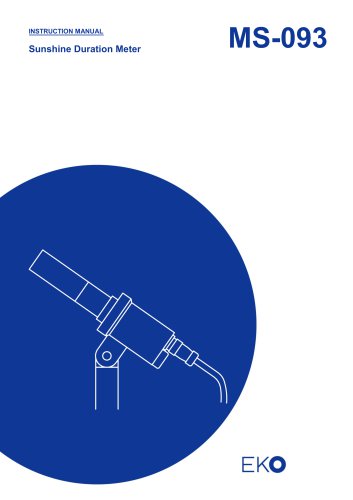
MS-093
- Users must read and understand the manual before using the instrument. Warranty is void if the product is not used according to the manual or if unauthorized modifications are made.
- Contact information for EKO Instruments is available for Asia, Europe, and North America.
- The manual complies with WEEE and RoHS Directives and was issued on 2019/02/13.
- Ensure secure installation to prevent accidents from environmental factors like wind or earthquakes.
- Proper grounding is essential to avoid electrical hazards, and power supply compatibility must be checked before use.
- The MS-093 Sunshine Duration Meter measures direct solar irradiance using a rotating mirror and pyroelectric sensor, suitable for global systems like NOAA's ASOS.
- Features precise measurement with a pyroelectric sensor and a rotating mirror for consistent readings without declination adjustments. Includes lightning protection and optional reset functionality.
- Includes the main unit, optional reset and power boxes, and various cables and accessories.
- Details on configuring the Sunshine Duration Meter, including sensor head and electric circuit parts. Installation requires a clear field-of-view and proper orientation based on hemisphere location.
- Guidelines for site selection and base preparation are provided. Orientation should be checked using maps or solar position at meridian.
- Secure the mounting stage with M5 screws. Align the base plate and meter in the North/South orientation, adjusting the Latitude Scale Plate as needed. Optional blower fan installation is based on latitude.
- Ensure secure connections for the sensor cable, reset box, and power/data logging cables.
- Sunshine duration is measured when irradiance exceeds 120W/m², with the meter sampling every 36 seconds. The mirror rotates every 36 seconds, and the sensor outputs a pulse when sunshine is detected.
- The rotating mirror reflects solar radiation onto a pyroelectric sensor, with the electric circuit comparing sensor output against a threshold. The reset box monitors mirror rotation and resets power if necessary.
- Regular cleaning and checks are necessary for accurate measurements, with calibration recommended every two years. Troubleshooting involves checking connections, power supply, and replacing silica gel if condensation occurs.
- The main unit measures wavelengths from 300 to 2,500nm with a threshold of 120W/m². The reset box detects stopped mirror and resets power, while the power box provides DC12V output from AC power. The blower fan unit prevents snow accumulation.
- Details on the sensor cable and optional pulse output cable, including dimensions for the meter, reset box, and power box.
- Includes optional items like a reset box, power supply box, various cables, and a blower fan unit. A base plate and fixing bolts and nuts are also provided.
- Lists consumable parts such as silicon O-rings, connector packing, and a silica gel drying cartridge.
- Defines key radiometric terms and standards, including Global Solar Irradiance, Pyranometer, Direct Solar Irradiance, and more. Also explains astronomical terms and describes the Pyroelectric Element and Sensor.
- Contact details for EKO Instruments in Asia, Oceania, North America, and Europe, including addresses, phone numbers, and email addresses.
Catalog excerpts
INSTRUCTION MANUAL Sunshine Duration Meter
Open the catalog to page 1
2. Important User Information 2 2-3. About Instruction Manual 3 5- 1. Sunshine Duration Meter Configuration 8 5-2. Parts Name and Descriptions 9 EKO INSTRUMENTS CO., LTD. Sunshine Duration Meter MS-093 Instruction Manual Ver. 5
Open the catalog to page 2
2. Important User Information Thank you for using EKO Products Make sure to read this instruction manual thoroughly and to understand the contents before starting to operate the instrument. Keep this manual at safe and handy place for whenever it is needed. For any questions, please contact us at one of the EKO offices given below: 2- 1. C on tac t I nfo r mati on EKO INSTRUMENTS CO., LTD. Asia, Oceania Region www.eko.co.jp [email protected] EKO INSTRUMETNS Co., Ltd. 1-21-8 Hatagaya, Shibuya-ku 111 North Market Street, Suite 300 Europe, Middle East, Africa, South America Region www.eko-eu.com [email protected]...
Open the catalog to page 3
2- 3. A bo ut I ns tr uc ti o n Ma nu al Copy Rights Reserved by EKO INSTRUMENTS CO., LTD. Making copies of whole or parts of this document without permission from EKO is prohibited. This manual was issued: Version Number: 2- 4. Env i ro nm ent 1. WEEE Directive 2002/96/EC (Waste Electrical and Electronic Equipment) This product is not subjected to WEEE Directive 2002/96/EC however it should not be mixed with general household waste. For proper treatment, recovery and recycling, please take this product(s) to designated collection points. Disposing of this product correctly will help save valuable...
Open the catalog to page 4
IMPORTANT USER INFORMATION Declare under our sole responsibility that the product: Product Name: Sunshine Duration Meter Model No.: MS-093 To which this declaration relates is in conformity with the following harmonized standards of other normative documents: Harmonized standards: EN 61326:1997+A1+A2 Class A (Emission) EN 61326:1997+A1+A2 (Immunity) Following the provisions of the directive: Amendment to the above directive: 93/68/EEC Position of Authorized Signatory: Deputy General Manager of Quality Assurance Dept. Name of Authorized Signatory: Shuji Yoshida_ Signature of Authorized Signatory:...
Open the catalog to page 5
3. Safety Information EKO Products are designed and manufactured with consideration for safety; however, please make sure to read and understand this instruction manual thoroughly to be able to operate the instrument safely in the correct manner. WARNING CAUTION Attention to user; pay attention to the instructions given on the instruction manual with this sign. Fasten this product securely on a stage with bolts and nuts to prevent from falling due to strong wind, earth quake and so on and causing unexpected accidents. Do not give an impact on exposed glass tube. Do not hold the glass tube part...
Open the catalog to page 6
4. Introduction EKO Sunshine Duration Meter MS-093 has a specially designed and rotating mirror, which reflects the direct solar radiation onto an especially flat pyroelectric sensor. This sensor outputs a differential coefficient as voltage, which is proportional to the direct solar irradiance. 2 WMO defines the sunshine duration as time amount of direct solar irradiance which exceeds 120W/m . measures the direct solar irradiance that exceeds the threshold of 120w/m , assuring reliable sunshine duration data can be obtained. Internal CPU processes the signal sent by the sensor then outputs a...
Open the catalog to page 7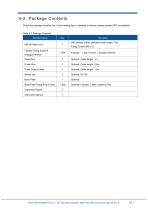
Check the package contents first; if any missing item or damage is noticed, please contact EKO immediately. Table 4-1 Package Contents EKO INSTRUMENTS CO., LTD. Sunshine Duration Meter MS-093 Instruction Manual Ver. 5
Open the catalog to page 8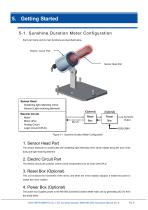
5. Getting Started 5- 1. Su ns hi ne D ur ati on Me t er C on fi g ur ati on Each part name and its main functions are described below. Electric Circuit Part Sensor Head Part Sensor Head Scattering light reflecting mirror Sensor (Light receiving element) Electric Circuit Motor Motor drive Analog Circuit Logic Circuit (CPLD) Sunshine Output AC85-264V Figure 5-1. Sunshine Duration Meter Configuration 1. Sensor Head Part The sensor head part is constructed with scattering light reflecting mirror which rotates along the axis of the body and light receiving element. 2. Electric Circuit Part The electric...
Open the catalog to page 9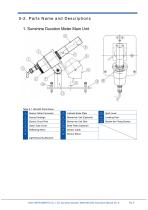
Table 5-1. MS-093 Parts Name EKO INSTRUMENTS CO., LTD. Sunshine Duration Meter MS-093 Instruction Manual Ver. 5
Open the catalog to page 10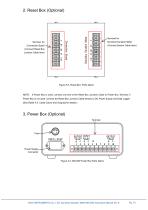
Terminal for Sunshine Duration Meter (Connect Sensor Cable here) Connection Board (Connect Reset Box Junction Cable here) Figure 5-3. Reset Box: Parts Name If Power Box is used, connect one end of the Reset Box Junction Cable to Power Box Terminal; if Power Box is not used, connect the Reset Box Junction Cable directly to DC Power Supply and Data Logger. (See [Table 5-3. Cable Colors and Outputs] for details.) 3. Power Box (Optional) Terminal Power Supply Connector Figure 5-4. MS-093 Power Box Parts Name EKO INSTRUMENTS CO., LTD. Sunshine Duration Meter MS-093 Instruction Manual Ver.5
Open the catalog to page 11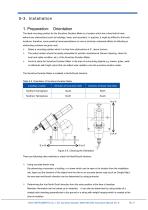
The ideal mounting position for the Sunshine Duration Meter is a location which has a free field-of-view without any obstructions (such as buildings, trees, and mountain). In practice, it might be difficult to find such locations; therefore, some practical recommendations on how to minimize undesired effects of reflecting or obstructing surfaces are given next: > Select a mounting position which it is free from obstructions at 5° above horizon. > The setup location should be easily accessible for periodic maintenance (Sensor cleaning, check for level and cable condition, etc.) of the Sunshine...
Open the catalog to page 12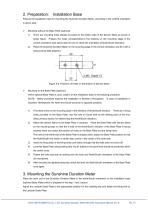
Installation Base Prepare the installation base for mounting the Sunshine Duration Meter, according to the verified orientation in above step. Mounting without the Base Plate (optional) 1) There are mounting holes already provided on the bottom side of the Sensor Stand as shown in below figure. Prepare the holes corresponding to the drawing on the mounting stage in the correct orientation (see above step for how to check the orientation of North/South direction). 2) Place the Sunshine Duration Meter on the mounting stage in the correct orientation and fix it with 2 fixing screws (M5) attached....
Open the catalog to page 13All EKO Instruments catalogs and technical brochures
 MS-80SH Plus+
2 Pages
 HF-01S
2 Pages
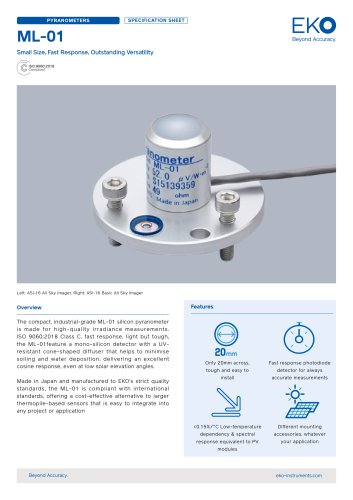 ML-01
2 Pages
 MS-321LR
32 Pages
 MS-56
2 Pages
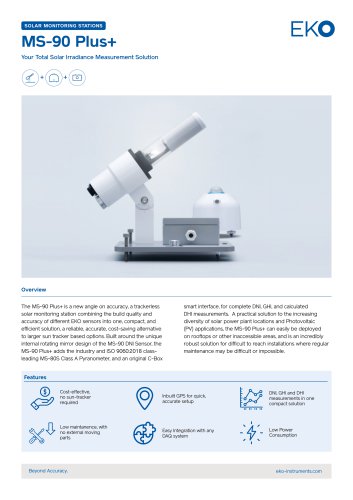 MS-90 Plus+
4 Pages
 PVmet™ 500 Series
29 Pages
 MS-60A Pyranometer
4 Pages
 MS-80M Pyranometer
3 Pages
 MS-80A Pyranometer
3 Pages
 MS-80S Pyranometer
4 Pages


Archived catalogs
 MS-80U Pyranomete
3 Pages
 PYRANOMETERS ML-01, ML-02
2 Pages

- Temperature probe
- Measuring device
- CMOS camera module
- Resistance temperature sensor
- Data logger
- Monitoring camera system
- Temperature datalogger
- Portable tester
- Pt100 temperature transducer
- Thermocouple temperature transducer
- USB datalogger
- HD camera module
- Wireless datalogger
- Datalogger without display
- Metal stand
- RTD temperature sensor
- Monitoring datalogger
- PoE imager
- Measurement monitoring module
- Compact tester