- Catalogs
- EIT Solutions Co., Ltd
- DOG-1912YS
DOG-1912YS
1 /24Pages

DOG-1912YS
1 /24Pages
Catalog excerpts

DOG-1912YS Online Optical Dissolved Oxygen Analyzer User Manual
Open the catalog to page 1
Catalog Introduction Technical Features Technical Specification Setting menu Factory data reset Operation Interface Measurement Interface Setting Parameter Calibration Saturated Calibration Factory data reset History
Open the catalog to page 3
Introduction DOG-1912YS Industrial Online Optical Dissolved Oxygen Analyzer is a brand-new online intelligent digital instrument independently developed and manufactured by Boqu EIT. This dissolved oxygen analyzer communicates with the sensor through communication and accurate data. Complete functions, stable performance, easy operation, low power consumption, safety and reliability are the outstanding advantages of this ODO analyzer. The dissolved oxygen analyzer works with digital and optical dissolved oxygen sensor ,which can be widely used in industrial application such as thermal power generation,...
Open the catalog to page 5
Installation and Wiring SIZE
Open the catalog to page 7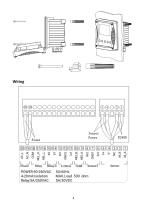
Power Relay Relay-C 4-20mA COM Sensor-1
Open the catalog to page 8
Operation Interface There are 2 modules in the main panel of the dissolved oxygen measuring instrument, LED LCD display module and button module. Users can set and adjust the parameters of the instrument through the 5 buttons on the panel. Picture 1 Operation Interface Set/Exit button Select/Shift button Down button Confirm button
Open the catalog to page 9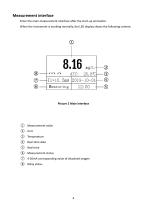
Measurement interface Enter the main measurement interface after the start-up animation. When the instrument is working normally, the LED display shows the following content. Picture 2 Main interface ① Measurement value ② Unit ③ Temperature ④ Real-time date ⑤ Real time ⑥ Measurement status ⑦ 4-20mA corresponding value of dissolved oxygen ⑧ Re
Open the catalog to page 10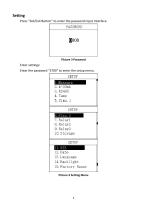
Setting Press “Set/Exit Button” to enter the password input interface. Enter settings: Enter the password "3700" to enter the setup menu. Picture 4 Setting Menu
Open the catalog to page 11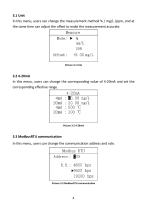
3.1 Unit In this menu, users can change the measurement method % / mg/L /ppm, and at the same time can adjust the offset to make the measurement accurate. 3.2 4-20mA In this menu, users can change the corresponding value of 4-20mA and set the corresponding effective range. 3.3 ModbusRTU communication In this menu, users can change the communication address and rate.
Open the catalog to page 12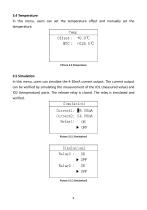
3.4 Temperature In this menu, users can set the temperature offset and manually set the temperature. 3.5 Simulation In this menu, users can simulate the 4-20mA current output. The current output can be verified by simulating the measurement of the IO1 (measured value) and IO2 (temperature) ports. The release relay is closed. The relay is simulated and verified.
Open the catalog to page 13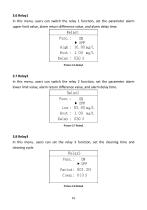
3.6 Relayl In this menu, users can switch the relay 1 function, set the parameter alarm upper limit value, alarm return difference value, and alarm delay time. 3.8 Relay3 In this menu, users can set the relay 3 function, set the cleaning time and cleaning cycle.
Open the catalog to page 14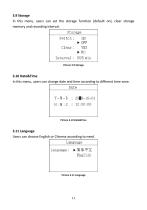
3.9 Storage In this menu, users can set the storage function (default on), clear storage memory and recording interval. 3.10 Date&Time In this menu, users can change date and time according to different time zone. 3.11 Language Users can choose English or Chinese according to need.
Open the catalog to page 15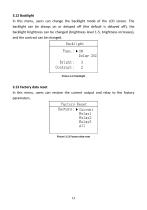
3.12 Backlight In this menu, users can change the backlight mode of the LCD screen. The backlight can be always on or delayed off (the default is delayed off), the backlight brightness can be changed (brightness level 1-5, brightness increases), and the contrast can be changed. 3.13 Factory data reset In this menu, users can restore the current output and relay to the factory parameters. Picture 3.13 Factory data reset
Open the catalog to page 16
Calibration Press "ESC" to enter the password input interface. Enter calibration menu: Enter the password "3900" to enter the calibration menu. Picture 6 Calibration menu 4.1 Parameter Calibration In this menu, users can manually change the parameters of atmospheric pressure and salinity. Picture 4.1 Parameter Calibration
Open the catalog to page 17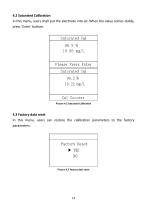
4.2 Saturated Calibration In this menu, users shall put the electrode into air. When the value comes stable, press ‘Enter’ buttom. Picture 4.2 Saturated Calibration 4.3 Factory data reset In this menu, users can restore the calibration parameters to the factory parameters. Picture 4.3 Factory data reset
Open the catalog to page 18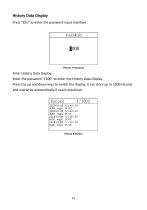
History Data Display Press "ESC" to enter the password input interface. Enter History Data Display: Enter the password "1300" to enter the History Data Display. Press the up and down keys to switch the display. It can store up to 1000 records and overwrite automatically if reach maximum.
Open the catalog to page 19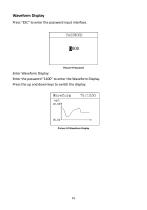
Waveform Display Press "ESC" to enter the password input interface. Enter Waveform Display: Enter the password "1400" to enter the Waveform Display. Press the up and down keys to switch the display. Picture 10 Waveform Display
Open the catalog to page 20
Appendix Communication protocol Communication parameters: Baudrate:4800, 9600, 19200(9600default) Serial data format: 8N1(8 data bits, No parity, 1 stop bit) Function code: 03 Device address: Optical Dissolved oxygen analyzer defaults to 6 Register definition:
Open the catalog to page 21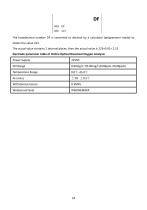
DF HEX DF DEC 223 The hexadecimal number DF is converted to decimal by a calculator (programmer mode) to obtain the value 223. The actual value contains 2 decimal places, then the actual value is 223x0.01= 2.23 Electrode parameter table of Online Optical Dissolved Oxygen Analyzer
Open the catalog to page 22
Postcode: 201306 Website: www.sh-ei t.com E-mail: [email protected] Address: No. 333, Haiyang 1st Road, Pudong New District, Shanghai #5
Open the catalog to page 24All EIT Solutions Co., Ltd catalogs and technical brochures


- Flowmeter
- Volume flow monitor
- Liquid flow monitor
- Gas analyzer
- Concentration analyzer
- Monitoring analyzer
- Liquids analyzer
- Automatic analyser
- Level probe
- Solids analyser
- Liquid level sensor
- Gas detector
- Process analyzer
- Precision flow meter
- Continuous analyzer
- Water flow monitor
- Analog level sensor
- Water analyzer
- Gas sensor
- Integration analyzer