- Catalogs
- EHD imaging
- EHDView Image Analysing Software
EHDView Image Analysing Software
1 /200Pages

EHDView Image Analysing Software
1 /200Pages
Catalog excerpts
EHDView Contents
Open the catalog to page 2
EHDView Contents 7.2 Copy
Open the catalog to page 4
EHDView Contents 9.2.1 Icon>Large Icons 11.2 Start Time-lapse (Auto Capture)••• 11.3 Start Record•••
Open the catalog to page 6
12.3.6 Flip Vertical 12.4 Crop 12.5 Image Scale••• 12.6 Histogram•••
Open the catalog to page 7
EHDView Contents 13.1 Stitch•••
Open the catalog to page 8
EHDView Contents 14.10 Rename••• 14.12 Export to Microsoft Excel 15 15.1 Object Select 15.2 Angle 15.4.2 Line> Horizontal Line 15.4.3 Line> Vertical Line 15.5 Parallel
Open the catalog to page 10
EHDView Contents 15.8 Rectangle 15.10.3 Circle>Three Points 15.11 Annulus
Open the catalog to page 11
EHDView Contents 16.1 Preferences•••
Open the catalog to page 12
1.1 How to Start EHDView? 1. Invoke the Windows metro start screen with keyboard button EHDView and click it to start the application. 2. Click the Start button (At your screen bottom left corner) and a Start menu will bring up. Move your mouse over the menu and try to locate EHDView, click to start it. 1. Double click on the desktop icon “ ” (If installed) to start EHDView; 1.2 How to start the camera? EHDView will detect all of the cameras that your computer has installed (Here, it is U3CMOS03100KPA, a 3.1M pixel USB3.0 CMOS camera) and will list all the camera names under the Camera List group...
Open the catalog to page 13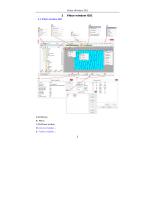
A:EHDView; B: Menu; C:EHDView toolbar D:Camera Sidebar ; E: Folders Sidebar ;
Open the catalog to page 14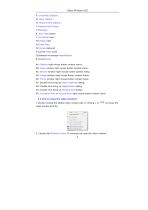
F: Undo/Redo Sidebar ; G: Layer Sidebar ; H: Measurement Sidebar ; I: Measurement Sheet; J:Statusbar; K: Auto Hide button L: Horizontal ruler; M:Vertical ruler N:Frame Rate O:Frames captured P:Current Video sizes Q:Selected microscope Magnification R:Current Unit; AA: Sidebar right mouse button context menu; AB: Video window right mouse button context menu; AC: Browse window right mouse button context menu; AD: Image window right mouse button context menu; AE: Frame window right mouse button context menu; AF: Double-click bring up Video Properties dialog; AG: Double-click bring up Magnification...
Open the catalog to page 15
Video Window GUI 3. Click the right mouse button on the video window title to invoke the context menu and choose Close to the video window. 4. Press Ctrl+W.
Open the catalog to page 16
A:EHDView; B:The opened file right mouse button context menu on status bar; C:The opened file name and directory; D:Double-click bring up opened file Properties dialog; E:Current image width and height; F:Double-click bring up Scale Image dialog; G:Image Zoom ratio, double-clicking will zoom the image to 100%; H:Zoom ratio right mouse button context menu; I:Currently selected Unit; J: Double-click bring up Measurement dialog; K:Image BPP & Resolution;
Open the catalog to page 17
Image window GUI L:Double-click bring up Resolution Setting dialog; M: Unit right mouse button context menu. 3.2 How to close the image window? 1. If you have modified an image before attempting to close it, double-clicking the tabbed image window title or clicking x on will bring up a EHDView dialog: Clicking Yes will save the changes with its old name and close the window quickly, No will close the file immediately with no changes and no warning, or Cancel will cancel the Close command and leave the window there with no changes; 2. If the Image window is snapped from the video window and with...
Open the catalog to page 18
Click No on the EHDView dialog will close the file immediately with no changes and no warning Click Cancel on the EHDView dialog will cancel the Close command and return to image window. 3. Ctrl+W; Note: Choosing the Window>Close All command can also close the tabbed image window. Please check the Window>Close All for detail.
Open the catalog to page 19
4 UI toolbar When the camera is started or the image is opened (or captured), most of the icons on the toolbar will be available for the quick operation of the video or image window. 1 3 H 7 q ti A J/ \ Pixel v NA I - 100* * 1 n|f) 1 1: Open (Ctrl + O) 2: Save (Ctrl + S) 3:Quick Save (Quick Save) 4: Browse (Ctrl + B) 5: Unit 6: Magnification 7: Zoom 8:Video/Image Select 9: Track(enabled only when the video/image size is larger than the window size) 10: Object Select(will be enabled when an object is overlaid on the background layer 11: Angle 12: Point 13: Line 14: Parallel 15:...
Open the catalog to page 20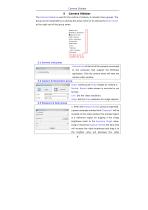
5 Camera Sidebar The Camera Sidebar is used for the control of camera, it includes many groups. The group can be expanded by a) clicking the group name or b) clicking the Down Arrow at the right end of the group name. 0Caaera List ■Capture t Resolution ^Imosure I Cain Ikfhlln Balance w Col or Adjustaent - Fraac Rate •Color/Cray A flip ’ SaapI lfix Power Frequency DUtagru The down arrow to expanded the group Camera List will list all of the cameras connected to the computer that support the EHDView application. Click the camera name will start the camera video window. Snap: Continuously Snap images...
Open the catalog to page 21
Camera Sidebar brightness; 2. Uncheck the Auto Exposure box to switch the Auto Exposure mode to the Manual Exposure. The Exposure Target slider will be disabled in this Rectangle for Auto Exposure 3. Tune the microscope light source to a bright state, and then drag the Exposure Time slider left or right until the image brightness is normal; 4. If and only if the microscope light intensity is too low to meet the Exposure Time up limit, drag the Gain slide right until the video brightness is normal; 5. The exact Exposure Time can also be entered by clicking the edit box at the right of the Exposure...
Open the catalog to page 22
Camera Sidebar 1. Hue: Adjusts the Hue of the video. Drag the slider to the right to increase or drag to the left to decrease Hue; 2. Saturation: Adjusts the Saturation of the video. Drag the slider to the right to increase or drag to the left to decrease video Saturation; 3. Brightness: Adjusts the video Brightness. Drag the slider to the right to increase or drag to the left to decrease the video Brightness; 4. Contrast: Adjusts the video Contrast. Drag the slider to the right to increase or drag to the left to decrease the video Contrast; 5. Gamma: Adjusts the video Gamma. Drag the slider...
Open the catalog to page 23
Camera Sidebar 5.9 Power Frequency group 1. A CMOS sensor captures each row of pixels (from top to bottom) in sequential order, creating a rolling effect, hence the name "Rolling Shutter". Instead of being relatively constant, so for example, as the commercial main frequency in Europe is 50Hz, fluorescent lights in Europe flicker at 100 times per second and as the main frequency in US is 60Hz, so in the USA they flicker at 120 times per second; 2. This flickering problem is solved by capture row pixels in over the duration of integer number of (n) flicker periods; 3. check 50HZ will delete the...
Open the catalog to page 24All EHD imaging catalogs and technical brochures
 UV‐Camera SCM2020‐UV
2 Pages
 EHD-0016SWIR
2 Pages
 IK1523
2 Pages
 IK1513-2.2µm
2 Pages
 IK1513
2 Pages
 INGAAS USB2.0 CAMERA
1 Page
 EHD Brochure
21 Pages
 EHD F0.85 Lenses 2020
5 Pages
 Computar
7 Pages
 MERCURY SERIES
4 Pages
 Zoom Lens Series
11 Pages
 MPZ Series
2 Pages
 NIR-Camera
2 Pages
 SIGNA Series
2 Pages
 High Speed Filter wheels
2 Pages
 MERCURY Camera Series
18 Pages
 12MP Camera
2 Pages
 Industrial Lighting 2018-19
43 Pages
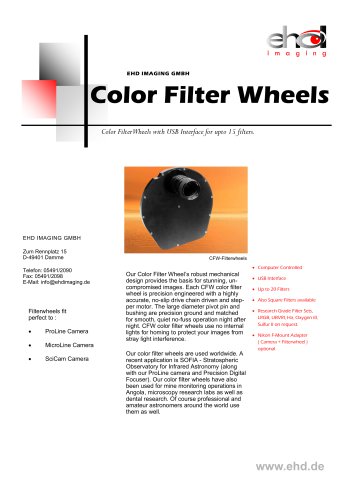 Color Filter Wheels
2 Pages
 EHD-UK39266
1 Page
 KL400
KL4005 Pages
 EHD720p/1080i
9 Pages
 EHD 2/3" SWIR Lenses
2 Pages
 EHD 1" SWIR Zoom-Lenses
1 Page
 EHD 1" SWIR Lenses
2 Pages
 Sled-1-VA
43 Pages
 SLED-2-TU-W Light tunnel series
43 Pages
 EHD UV Lens
2 Pages
 EHD SCM2020-UV
2 Pages
 EHD-704UV
2 Pages
 EHD-Zoom6.5 / 8.0 / 12.5
14 Pages
 SCM305-C
2 Pages
 Alta F Series
7 Pages
 EHD SCM-Series
9 Pages
 EHD SciCam-Series
14 Pages
 EHD Kepler-Series
4 Pages
 EHD_Ricoh_FAlenses
47 Pages
 1.1" 12 MP CBC lenses
4 Pages
 EHD FA lens overview
4 Pages
 Hummingbird USB 3.0
2 Pages
 EHD_Zoom_lenses
14 Pages
 12.5X Macro Zoom Lens system
7 Pages


- LIMING digital camera
- LIMING visible camera
- LIMING automation software
- LIMING industrial camera
- LIMING infrared camera
- LIMING monitoring camera
- LIMING full-color camera
- LIMING Windows software
- Real-time software
- USB camera module
- Detection camera system
- Image processing camera module
- Monitoring software solution
- LIMING monochrome camera
- Industrial software
- LIMING GigE camera
- HD camera module
- Inspection imager
- Automated software