
Catalog excerpts

Instruction Manual D-LAB Laboratory Vacuum Pumps 110 V versions are supplied with USA plug 220-240 V versions are supplied with I EC plug 100 V versions are supplied with a Japanese plug
Open the catalog to page 1
1,1 J Vacuum Pump with Separator, Migh Performance Condenser and one Vacuum 1. 1.4 Vacuum Pump with Separator, High Performance Condenser and two Va cu urn 3.4 Assembling a System with Baseplate, Separator, High Performance Condenser, 3.5 Assembling a System with Baseplate. Sup jr.. Lor, H i¿li Performance Condenser. 3.5.2 Existing System with Electrical Supply Unit, Support Bar and One Vacuum 4.3.3 Operation with Baseplate , Separator, High Performance Condenser, 4.3.4 Operation with Baseplate, Separator. High Performance Condenser, Electrical D-LAB ModularVacuum System - Operating Manual
Open the catalog to page 2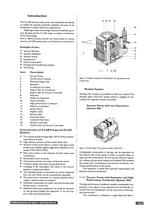
The D-LAB vacuum pump series was developed specifically to satisfy the exacting standards, reliability and ease of use demanded in today's laboratory applications. Diaphragm pump technology has proved itself during re- cent decades and the D-LAB range is a logical continuation With six different pumping capacities and having facilities for modular expansion, a D-LAB pumping system can be optimised for any application. * Vacuum filtration * Vacuum distillation * Vacuum drying * Rotary evaporation * Pumping and transferring of gases Item Description 2. On/off switch of pump 3. Electrical...
Open the catalog to page 3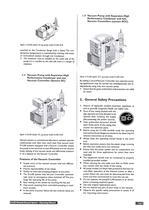
Figure 3: D-LAB system SH eg. pump model D-LAB 34-8 attached to the Condenser flange with a clamp. The con- densation temperature is maintained by running cold water or recirculated coolant through the Condenser. A The condenser must be installed on the outlet side of the pump; if it is installed on the inlet side there is a danger of . 1.3 Vacuum Pump with Separator, High Vacuum Controller (System SC) 4 Vacuum Pump with Separator, High Vacuum Controllers (system SCC) Figure 4: D-LAB System SC, eg. pump model D-LAB 34-8 Vacuum pumps in conventional laboratory systems operate continuously...
Open the catalog to page 4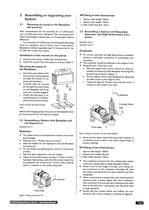
3. Assembling or Upgrading your 3.1 Mounting the pump to the Baseplate Basic requirements for the assembly of a D-LAB-system are a D-LAB pump and a Baseplate. The mounting-system allows interchange of pump types on the baseplate without For mounting a D-LAB-pump to the baseplate the pump must be equipped with a mount (two components). Baseplates ordered separately (see 9.3 Accessories for the D-LAB) will contain the mounts. Installation of the mounts on the pump: a. Unscrew the pump's rubber feet anticlockwise; b. Install the mounts onto the pump according to figure 6. a. Stand the pump...
Open the catalog to page 5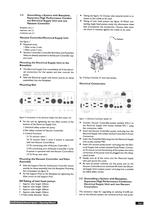
3.4 Assembling a System with Baseplate, Separator, High Performance Conden- ser, Electrical Supply Unit and one Vacuum Controller Vacuum Controller/Electrical Supply Unit * Required tools: * Vacuum Controller, ControllerVentValve and PumpVent Valve are already attached to theVacuum Controller sup- port post Mounting the Electrical Supply Unit to the * The Electrical Supply Unit consolidates all of the electri- cal connections for the system and also controls the * Slide the Electrical supply Unit (more exactly: its clamp assemblies) into the Baseplate. Mounting Slot Pump Power Controller A...
Open the catalog to page 6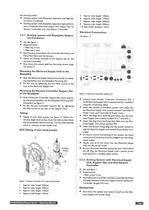
* Existing system with Baseplate, Separator and high per- formance Condenser. * Existing system with Baseplate, Separator, high perform- ance Condenser, Electrical Supply Unit, Support Bar for Vacuum Controller and one Vacuum Controller. 3.5.1 Existing system with Baseplate, Separa- * Required tools: * BothVacuum Controllers, the ControllerVentValves, the Pump Vent Valve and the Vacuum. * Valves are already attached to the Support bar for the Vacuum Controller. * Shut down the system (pull out the pump power plug). Mounting the Electrical Supply Unit to the * Slide the Electrical Supply...
Open the catalog to page 7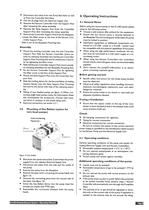
* Disconnect the tubes from the Pump Vent Valve as well as from the Controller Vent Valve. * Pull out all plugs from the Electrical Supply Unit. * Remove the Vacuum Controller from the Support Post after loosening the clamp assembly. * Remove the Valve Support Post from the Controller Support Post after loosening the clamp assembly. * Remove the Controller Support Post from the Baseplate: - Loosen the Allen screw at the foot of the Vacuum Con- troller Support Post. - Slide it out of the Baseplate Mounting Slot. * Mount the existing controller onto the new Controller Support Post: Slide the...
Open the catalog to page 8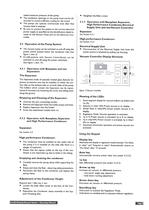
nated maximum pressure of the pump. * The ventilation openings on the pump must not be ob- structed to ensure sufficient cooling for the motor. * The pumps can operate continuously even after final vacuum level is attained. * Be sure to connect the system to the correct electrical power supply as specified on the identification labels lo- cated on the Vacuum Pump and on the Electrical Con- 4.3 Operation of the Pump System The vacuum pump can be switched on and off using the power switch located below the ventilation inlet. (See * D-LAB-systems with Vacuum Controller(s): can be switched on...
Open the catalog to page 9
4.3.3.1 Setting the vacuum level * Switch on Vacuum Controller: - "Setpoint" display element illuminates or flashes. * When the LED stops flashing, and is continuously on (after about 5 seconds) set the desired vacuum level using the up and down arrow keys. - Pump operates. * When the pump is already operating and an actual vacuum value needs to be retained: * When the required value shows on the display press down arrow key - vacuum level is memorised. * The last entered vacuum value is memorised after the 4.3.3.2 Setting the Pressure Differential The hysteresis function enables setting...
Open the catalog to page 10
Display flashes 5 seconds and indicates either the fac- tory set value of 1020 mbar or the last entered value. b. During this time the limiting values are input by the up arrow/down arrow keys (value should be approximately 5 to 8 mbar over atmospheric pressure. c. 5 seconds after the last operation with the up arrow/ down arrow keys the new limit will be memorised. 4.3.4 Operation with Baseplate,Separator, High Performance Condenser, Electrical Supply Unit andTwoVacuum Control- Warning-.Where two separate processes are in operation, ensure that the evolved gases can be safely mixed. High...
Open the catalog to page 11All EDWARDS catalogs and technical brochures
-
SPEEDIVALVE
2 Pages
-
GV
12 Pages
-
XDD1
2 Pages
-
PGC
2 Pages
-
8200
2 Pages
-
IS 320FX
2 Pages
-
RGA
8 Pages
-
EH
2 Pages
-
RV
8 Pages
-
nXDS
12 Pages
-
XDS series
4 Pages
-
EOSi ROTARY SCREW VACUUM PUMPS
12 Pages
-
EDP CHEMICAL DRY VACUUM PUMP
4 Pages
-
CXS CHEMICAL DRY VACUUM PUMPS
12 Pages
-
CXS chemical dry vacuum pump
4 Pages
-
EDC DRY CLAW VACUUM PUMPS
8 Pages
-
gxs dry screw vacuum pumps
20 Pages
-
nXLi DRY PUMPS
2 Pages
-
XDD1 DIAPHRAGM VACUUM PUMP
2 Pages
-
XDS35i DRY SCROLL PUMPS
4 Pages
-
XDS DRY SCROLL PUMPS
4 Pages
-
nXDS DRY SCROLL PUMPS
12 Pages
-
T-STATION 85
2 Pages
-
AIM
2 Pages
-
WRG
2 Pages
-
Active ion gauge (AIGX)
2 Pages
-
ASG2
2 Pages
-
ELD500
8 Pages
-
nEXT Turbo Pumps
12 Pages
-
EXT Turbo Pumps
4 Pages
-
IPUP2 Dry Pump
2 Pages
-
iXL1000 Dry Pump
2 Pages
-
iXH Dry Pumps HF
2 Pages
-
iXH Dry Pumps
2 Pages
-
iH Dry Pumps Product
12 Pages
-
RV Acoustic Enclosures
2 Pages
-
RV Pumps
8 Pages
-
ES Rotary Vane Pumps
16 Pages
-
Small EM Pumps
12 Pages
-
MAXX Dry Systems
16 Pages
-
BGV Gate Valve w/LOTO
4 Pages
-
GXS Dry Pumps
20 Pages
-
nXDS Acoustic Enclosures
2 Pages
-
nXDS Accessories
32 Pages
-
TiTan Ion Pumps
4 Pages
-
EDP Pumps
4 Pages
-
CXS Dry Pumps
12 Pages
-
Edwards_Product_Catalogue
604 Pages
-
ADC Datasheet
4 Pages
-
Acoustic enclosures
2 Pages
-
nEXT Brochure
12 Pages
-
nXDS Scroll Pumps
12 Pages
-
PRODUCT CATALOGUE 2012
470 Pages
-
CXS Dry Pump
9 Pages
-
EV Brochure
6 Pages
-
Spectra G
4 Pages
-
Atlas? Gas Abatement Systems
2 Pages
-
GX Next Generation Dry Pumps
4 Pages
-
iGX Dry Pumps
4 Pages
-
iXL120 Dry Pump
2 Pages
-
CG16K Capsule Dial Gauges
2 Pages
-
T-Station 75
2 Pages
-
EXT75-255DX
6 Pages
-
XDS Dry Scroll Pump
6 Pages
-
Barocel® 600 Datasheet
2 Pages
-
Active Ion Gauge Datasheet
4 Pages
-
Wide Range Gauge Datasheet
2 Pages
-
APGX-H Datasheet
4 Pages
-
APG100 Datasheet
2 Pages
-
Vapour Booster Pumps
60 Pages
-
RV ATEX Rotary Vane Pumps
34 Pages
-
EM18 Vacuum Pumps Datasheet
2 Pages
-
RV Rotary Vane Pumps
6 Pages
-
XDS Scroll Pumps
2 Pages
Archived catalogs
-
RV Brochure
6 Pages
-
RV Rotary vane pump manual
58 Pages
-
D-Lab Diaphragm vacuum pump
4 Pages
-
Dry pump brochure
12 Pages
-
Rotary vane datasheet
2 Pages
-
Liquid Ring Pumps
2 Pages
-
Mechanical Booster
12 Pages


