- Catalogs
- Eagle Eye Power Solutions
- LB-Series DC Load Banks Quickstart Guide
LB-Series DC Load Banks Quickstart Guide
1 /2Pages

LB-Series DC Load Banks Quickstart Guide
1 /2Pages
Catalog excerpts
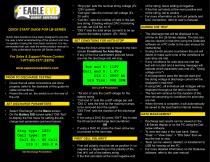
QUICK START GUIDE FOR LB-SERIES Quick start directions have been designed to provide the user a brief understanding of the product and how to operate it using the most basic functions. It is recommended that you read the entire product manual to fully understand how the LB-Series works. For Sales & Support Please Contact 1-877-805-3377 (EEPS) Select “Discharge” on the Menu screen On the Battery DIS screen select “DIS Test” to display the first menu for setting the discharge test parameters (pictured below) Strg type: Cell type: Cell No.: DIS I: Press the down arrow key to move to the next screen Conditions for Auto-Stop If any of the four parameters pictured below are met the discharge test will stop PRIOR TO DISCHARGE TESTING Check that all cable connections are done properly (refer to the backside of this guide for cable connections) Power the unit on, the switch is on the rear of the unit “Tot end U” sets the cutoff voltage for the battery string “Cell end U” sets the cutoff voltage per cell “DIS C” sets the limit for the maximum amps to be removed from the system “DIS Time” sets the duration of the discharge test If not using a DAC kit, press “ENT” key to start the 60 second discharge test countdown OR If using a DAC kit, press the down arrow key to proceed to the next step FIRST CELL POLARITY • First cell polarity must be set as positive (+) or negative (-) depending on the polarity of the first (#1) cell of the battery string If the first cell starts at the most negative end of the string, leave setting at negative If the first cell starts at the most positive end of the string, set to postive For more information on first cell polarity and DAC connection, refer to user’s manaual. “Strg type” sets the nominal string voltage (Ex. 125V system) “Cell type” sets the nominal cell voltage (Ex. 2V cells) “Cell No.” sets the number of cells in the battery string. If testing without DAC monitoring per cell, set Cell No. to “0” “DIS I” sets the total amps (current) to be applied to the battery system. (Ex. 300A) The discharge test will be displayed in real-time on the LB-Series display. The test can also be viewed in real-time using the Dataview software on a PC (refer to the user manual for instructions) During the 60 second countdown the unit will detect to make sure none of the conditions for auto-stop are met. If any conditions for auto-stop are met the test will not start and a warning message will indicate which parameter was met (Ex. “String voltage error”) If all parameters pass the test will start and the string voltage & discharge current will be displayed in real-time If using DAC, all individual cell voltages will be displayed throughout the test in real-time The test will continue for the duration of the time set assuming no conditions for auto-stop are met When the test is complete, it will automatically be saved to the load bank’s internal memory DATA MANAGEMENT • • • • Discharge test results can be viewed on the LB-Series display or on the PC using the Dataview software To view test data in the load bank: Select “Data” -> “View Data” -> “DIS Data” then select the test to view Tests can be viewed, deleted, or transferred to USB for viewing on the PC For more detailed information on the Dataview software, refer to the user manual
Open the catalog to page 1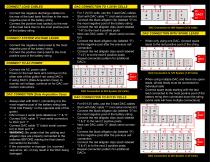
CONNECT LOAD CABLES • • Connect the negative discharge cable(s) to the rear of the load bank first then to the most negative post of the battery string Connect the positive load cable(s) to the rear of the load bank then to the most positive post of the battery string CONNECT SYSTEM VOLTAGE LEADS • • Connect the negative clamp lead to the most negative post of the battery string Connect the positive clamp lead to the most positive post of the battery string Connect the AC power cable Power on the load bank and continue on the other side of this guide if not using DAC’s If using DAC’s (Data Acquisition...
Open the catalog to page 2All Eagle Eye Power Solutions catalogs and technical brochures
 NERC PRC-005-02
2 Pages
 DCPS-Shelf-6KW
2 Pages
 DCPS-Shelf-9KW
1 Page
 SC-1000
2 Pages
 SC-1500
2 Pages
 SC-2000
2 Pages
 RM-48-2K
2 Pages
 RM-48-3K
2 Pages
 RM-48-KA
1 Page
 MIS-1000
3 Pages
 MIS-2000-series
3 Pages
 MIS-3000-series
3 Pages
 MIS-4000-series
3 Pages
 MIS-5000-series
3 Pages
 SIS-1000-series
2 Pages
 ENC-1000 Enclosure
1 Page
 ENC-2000
1 Page
 BMS-Series Catalog
19 Pages
 LB-AC-Digital
1 Page
 LB-60-30 AC Load Bank
1 Page
 BTM-Series
1 Page
 VM-100 Voltage Monitor
1 Page
 VGM-100 Voltage Monitor
1 Page
 Eagle Eye 2017 Product Catalog
51 Pages
 Eagle Eye Motive Power Catalog
12 Pages
 SLB-Series DC Load Banks
3 Pages
 LB-Series AC Load Banks
1 Page
 LB-60-100 AC Load Bank
1 Page
 BQMS
BQMS2 Pages


Archived catalogs
 IBEX-Procedures for Testing
3 Pages
 SG-Ultra Max
1 Page
 SG-1000
1 Page
 SG-100M
1 Page
 AT10.1 - AT30
1 Page
 SCR-SCRF
1 Page
 LB-1000
1 Page
 DC Load Bank
3 Pages
 Eagle Eye SG-5000BT
2 Pages
 HGD-3000
1 Page
 SG-5000BT Product Brochure
6 Pages
 DC SLB-Series
3 Pages


- LIMING power supply
- LIMING DC power supply
- LIMING AC/DC power supply
- Data logger
- LIMING gas detector
- USB datalogger
- LIMING battery charger
- Data-logger with screen
- LIMING voltage tester
- Lead battery
- LIMING lead battery charger
- Regulated power supply
- Programmable datalogger
- Resistance tester
- LIMING automatic battery charger
- Temperature monitoring module
- Lead-acid battery charger
- LIMING mobile battery charger
- LIMING battery tester
- Hydrometer