
Catalog excerpts

Band Clamp
Open the catalog to page 1
Safety Recommendations The use of band style clamps has proven to be an effective means of retaining hose couplings in industrial hose. To achieve proper retention and sealing of the hose coupling in the hose, it is imperative that these clamps be installed correctly. Please follow the manufacturer’s recommendations as to the proper selection and installation of band clamps. When installing multiple clamps, the buckles must be offset around the hose, (reference page 8), eliminating the possibility of a straight line leak under the buckle area. Improper installation of band clamps Proper...
Open the catalog to page 3
Band and Buckle Material availability: • Stainless steel • Galvanized steel Installation tools: • Roll over tools C2, 51960 (other manufacturer’s tools may be used) The band and buckle system is an economical method of securing fittings to large diameter rubber hose (2" and above). Note: Do not use strapping and buckles made of different metals. Example: Stainless steel strapping must be used with stainless steel buckles. Buckles Strapping - 100 ft. per Box Width Thick 3/8" 1/2" 5/8" 3/4" 3/8" 1/2" 5/8" 3/4" .025 .031 .031 .031 .025 .031 .031 .031 Material Part # Width Material Part #...
Open the catalog to page 7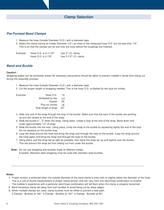
Clamp Selection Pre-Formed Band Clamps 1. Measure the hose Outside Diameter (O.D.) with a diameter tape. 2. Select the clamp having an Inside Diameter (I.D.) as close to the measured hose O.D. but not less than 1/4". This is so that the clamps can be slid onto the hose before the couplings are inserted. Example: Hose O.D. is 2-11/16" Hose O.D. is 2-7/8" Use 3" I.D. clamp Use 3-1/2" I.D. clamp Band and Buckle Caution! Strapping edges can be extremely sharp! All necessary precautions should be taken to prevent installer’s hands from being cut during the assembly process. 1. Measure the hose...
Open the catalog to page 8
Preparing the hose for assembly Cut Hose to Length. Cut Ends Square. (Lack of a square cut on the hose end can reduce coupling retention.) For hoses having a helical wire: 1. Determine the direction the helical wire is pointing in. This is necessary as proper installation of pre-formed band clamps and bands and buckles rely upon proper orientation of the clamp tail with the helical wire. See illustration below. 2. If helical wire is not used for static grounding, trim the wire back into the carcass of the hose. This is to prevent injury during use of the assembly. Clean Hose I.D. Mark the...
Open the catalog to page 9
Installation Tools Clamp Cutter Mallet • Material: malleable iron with rubber covered handles • Weight: 2.11 lbs. • Length: 14" • Material: ductile iron head, wooden handle • Weight: 2.25 lbs. • Length: 12" Part # Part # F550 F225 51960 Installation Tool Screw-action type tool for installing band and buckles. • Material: plated steel • Weight: 4.00 lbs. • Length: 12" Part # 51960 51970 Roll-Over Attachment Adapter for 51960 for installing preformed clamps. For vise applications only. • Material: plated steel • Weight: 1.15 lbs. • Length: 10-1/2" Part # 51970 10 Dixon Valve & Coupling...
Open the catalog to page 10
Operating Instructions for the 51960 Installation Tool 1 Hold the tool in the left hand so that the cutter bail is on the bottom and the pulling dog lever is on top. Slide the strap tail through the slot on the right side of the tool. 2 Press down on pulling-dog lever and rotate handle to begin tightening. Tighten strap to desired tension. Simultaneously relieve some tension while pushing the tool away as far as possible. 3 Pull the cutter bail to cut the strap tail. Tap the buckle ears down to hold the cut strap tail in place. Operating Instructions for the 51960 with 51970 Roll-Over...
Open the catalog to page 11
Part Identification for the C2 Installation Tool This lightweight, side and front entry, jack-type clamping tool is specially designed to provide easy installation of the band and buckle system. Tool adjusts tension and locks buckle in place. • Material: steel • Weight: 3.30 lbs. • Length: 14" Part # C2 For applying 3/8" and 5/8" band clamps Qty Per Tool Part Description 1 2 2 1 1 1 1 1 1 3 1 1 1 1 1 1 2 Holding dog Puller links Puller links Puller link pin Pulling dog Pulling dog spring Pulling dog pin Ball handle assembly Pusher puller assembly Retaining rings Cutter Crescent ring Cutter...
Open the catalog to page 12
Operating Instructions for the C2 Installation Tool 1 Pull strapping from carton and cut off. Slide clamp on strap and bend end under at ear side of clamp. Bring opposite end of strap around object twice, each time passing under clamp bridge. 2 Raise ball handle to forward position and insert strapping. Slide tool forward. 3 Slide cutter handle forward for alignment. Jack ball handle to reach desired tension. 4 Retract cutter handle and raise to 90-110°. To cut strapping, rotate cutter handle. Increase locking bend by rotating tool forward. Apply thumb pressure on tab as you remove tool....
Open the catalog to page 13
Part Identification for the F1 Installation Tool For applying 5/8" band clamps Qty Per Tool • Material: steel • Weight: 3.27 lbs. • Length: 12" 14 Part # F1 Part Description Part # 1 1 1 1 1 1 1 1 1 1 6 1 1 1 1 1 1 1 2 1 1 1 3 Head Spring pin Punch Retaining ball Punch holder Pusher nose Spring Holding dog Nose Holding dog pin Retaining ring Head pivot pin Set screw Tension handle assembly Handle ball Slide Pulling dog pin Pulling dog Dowel pin Link Slide bar handle Compression spring Washer 1 2 3 4 5 7 8 9 11 12 13 14 15 18 21 25 26 27 28 29 32 34 35 Dixon Valve & Coupling Company,...
Open the catalog to page 14
Operating Instruction for the F1 Installation Tool 1 Push tension handle all the way forward. Insert the clamp tail and push all the way into tool. 2 Tighten the clamp with short downward strokes. Tension handle should be in down position at completion of tightening clamp. If clamp tension needs to be released before locking, move slide back against spring. This raises the pulling dog. 3 Holding tension handle down, lock clamp by hitting punch at least twice with mallet. 4 Hold hose and raise the tool back and forth to break off clamp tail. Remove from tool by operating tension handle. when...
Open the catalog to page 15All DIXON EUROPE catalogs and technical brochures
-
 Quick Release Products 2024
4 Pages
-
 Hygienic Products Overview
4 Pages
-
 Quick Coupling Overview
6 Pages
-
 Hose Overview
4 Pages
-
 Dixon Quick Coupling Catalogue
76 Pages
-
 Rotary Coupling
4 Pages
-
 Polypropylene Valves
1 Pages
-
 Locking Handle Ball Valves
1 Pages
-
 Steam Ball Valves
1 Pages
-
 Safety Vented Ball Valves
1 Pages
-
 Hygienic Products Catalogue
124 Pages
-
 Hose & Coupling Directory
524 Pages
-
 Pneumatic Tubing Fittings
12 Pages
-
 Valves
20 Pages
-
 Outside Air Applications
52 Pages
-
 Non-Metallic Fittings
2 Pages
-
 In-Line Lubricators
2 Pages
-
 Holedall Petroleum
8 Pages
-
 Holedall Crimp System
2 Pages
-
 Gauges & Thermometers
2 Pages
-
 FRL, Wilkerson
40 Pages
-
 FRL, Norgren
36 Pages
-
 Flomax Connectors
10 Pages
-
 Dry Disconnect Brochure
20 Pages
-
 Dix-Lock
8 Pages
-
 Coupling Equipment
2 Pages
-
 Cam & Groove - Global
8 Pages
-
 Cam & Groove
2 Pages


Archived catalogs
-
 Dry Break Check Valve
1 Pages
-
 VEP Series Quick Coupling
4 Pages
-
 Worm Gear Clamps
4 Pages
-
 Air King
12 Pages