
Catalog excerpts

METAL FABRICATION EQUIPMENT #4 HAND BENDEROPERATION AND PARTS MANUAL 12430 55th St N ■ Oak Park Heights, MN 55082 Phone: 651.342.1756 ■ Fax: 651.342.1293 Email: infb@diacro.com
Open the catalog to page 1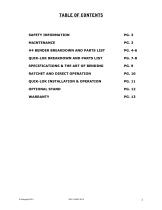
#4 BENDER BREAKDOWN AND PARTS LIST PG. 4-6 QUIK-LOK BREAKDOWN AND PARTS LIST PG. 7-8 RATCHET AND DIRECT OPERATION PG. 10 QUIK-LOK INSTALLATION & OPERATION PG. 11
Open the catalog to page 2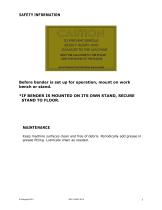
SAFETY INFORMATION Before bender is set up for operation, mount on work bench or stand. *IF BENDER IS MOUNTED ON ITS OWN STAND, SECURE STAND TO FLOOR. MAINTENANCE Keep machine surfaces clean and free of debris. Periodically add grease in grease fitting. Lubricate chain as needed.
Open the catalog to page 3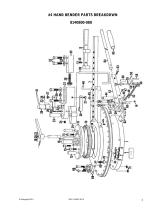
#4 HAND BENDER PARTS BREAKDOWN
Open the catalog to page 4
SPECIFICATIONS OF HAND BENDER THE ART OF BENDING FOR A COMPLETE DESCRIPTION OF 20 BENDING OPERATIONS WITH CLEAR STEP-BY-STEP ILLUSTRATIONS OF EACH, ORDER THE 20-PAGE Dl-ACRO “ART OF BENDING” CATALOG WITH OVER 90 DIAGRAMS AND CHARTS TOGETHER WITH VALUABLE TOOLING SUGGESTIONS.
Open the catalog to page 8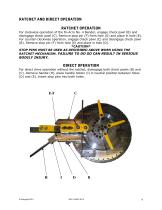
RATCHET AND DIRECT OPERATION RATCHET OPERATION For clockwise operation of the Di-Acro No. 4 Bender, engage check pawl (B) and disengage check pawl (C). Remove stop pin (F) from hole (D) and place in hole (E). For counter-clockwise operation, engage check pawl (C) and disengage check pawl (B). Remove stop pin (F) from hole (E) and place in hole (D). *CAUTION* STOP PINS MUST BE USED AS DESCRIBED ABOVE WHEN USING THE RATCHET MECHANISM. FAILURE TO DO SO CAN RESULT IN SERIOUS BODILY INJURY. DIRECT OPERATION For direct drive operation without the ratchet, disengage both check pawls (B) and (C)....
Open the catalog to page 9
To mount Quik-Lok Clamp on Di-Acro No. 4 Bender for clockwise forming, insert 3/8” dowel pins (K) and (K-1) in holes to bender base casting. Bolt in position with 1/2-20 hex screws (L) and (L-1) inserted from the bottom side of base. To adjust for material size, radius of bend and clamping pressure; loosen 1/2-20 hex screw (M) on clamp (O) and move slide assembly (R) to the correct position and then tighten 1/2-20 hex screw (M). To open Quik-Lok Clamp, move handle arm (W) to the right. To mount Quik-Lok clamp for counter-clockwise forming, remove clamp assembly from base by removing 3/8 hex...
Open the catalog to page 10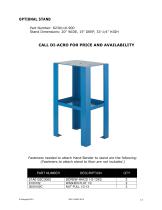
Part Number: 8230110-900 Stand Dimensions: 20" WIDE, 15" DEEP, 33-1/4" HIGH Fasteners needed to attach Hand Bender to stand are the following: (Fasteners to attach stand to floor are not included.)
Open the catalog to page 11
Defective parts, of a product manufactured by DI-ACRO, will be replaced or repaired at no charge for twelve (12) months following delivery to the original purchaser. Labor is included for the first 90 days. This warranty becomes void when products have not been used according to instructions furnished by DI-ACRO, nor does it cover any altered parts or unauthorized repairs. We cannot be responsible for the cost of repairs made or attempted outside of our factory. All other warranty claims are made FOB our plant, providing such items(s) is returned freight prepaid to our plant for...
Open the catalog to page 12All Di-Acro catalogs and technical brochures
-
 MODEL 12 HAND SHEAR
13 Pages
-
 HERCULES HYDRAULIC
27 Pages
-
 Model 2 Punch Press
12 Pages
-
 Model 24 Slip Roller
11 Pages
-
 Model 12 Slip Roller
11 Pages
-
 Model 24 Shear
13 Pages
-
 Model 12 Shear
13 Pages
-
 Model 2 Rod Parter
9 Pages
-
 Model 2 Tab Notcher
12 Pages
-
 Model 36 Finger Brake
10 Pages
-
 Model 24 Finger Brake
9 Pages
-
 Model 6 - 8 Bender
37 Pages
-
 Model 3 Bender
11 Pages
-
 Model 1A Bender
8 Pages
-
 Model 2 Bender
11 Pages
-
 Model 1 Bender
9 Pages
-
 Products Catalog
20 Pages