XT‘3000 Expandable Tool Sharpener

XT‘3000 Expandable Tool Sharpener
Darex Corporation, established in 1973, specializes in manufacturing precision cutting tool sharpeners, focusing on simplicity, accuracy, and affordability through innovative design and tested technology.
The XT-3000 Xpandable Drill Sharpener is designed for sharpening standard and split point drills at angles from 118 to 150 degrees, suitable for drill sizes from 3mm to 21mm. It features CBN wheels for HSS and cobalt drills, with optional diamond wheels for carbide drills, and allows tool-free adjustments.
Users must read the instruction manual before use. Key safety measures include using a vacuum system to reduce dust, ensuring the machine is unplugged during maintenance, and using proper eye and respiratory protection. Avoid operating in damp environments or near flammable materials.
The XT-3000 requires proper grounding to prevent electric shock, using a grounding plug with a matching outlet and 3-wire extension cords.
Available in 115V and 230V models, featuring 180 grit CBN and diamond wheels, a maximum wheel diameter of 6.45 inches, and motor speeds of 2850 rpm for 115V and 3450 rpm for 230V. Operates within a temperature range of 40° to 95°F.
The XT-3000 sharpens two-fluted HSS, cobalt, or carbide twist drills with point angles between 118° and 150°, meeting ANSI B94.11, NAS 907, and ISO 10899 standards for lip height accuracy.
Remove all packaging materials and ensure proper plugging. Includes grinding wheels, a sharpening fixture, and two chucks. A vacuum system is recommended to manage dust.
Align the drill using the Darex easy align system, set the material removal amount, and adjust the alignment tube for desired relief.
Optional attachments are available for sharpening various cutting tools, including step drills, brad points, and countersinks.
Adjust material removal by rotating the knob; clockwise decreases, counterclockwise increases. For longer wheel life, use Minimum MTO.
Adjust heel relief by changing the alignment tube position; counterclockwise increases, clockwise decreases. Secure with the locking lever.
Insert the drill into the appropriate chuck size, align in the alignment tube, and secure by tightening the chuck knob.
Align the sharpening fixture with dowel pins and secure with the locking lever. Adjust the point angle by sliding the base casting.
Ensure the split port cover and eye shield are in place, power up the machine, and rotate the chuck 360 degrees with slight pressure until grinding noise minimizes.
Insert the chuck into the point splitting port, align cam dogs, apply slight pressure, and rotate 180 degrees to split the opposite side.
Regular maintenance involves disassembling and cleaning the chuck, using a dust extraction system to reduce maintenance needs.
The XT-3000 uses maintenance-free electroplated CBN or Diamond wheels, requiring periodic cleaning and replacement when performance drops.
Detailed instructions for various attachments, including Brad Point, Step Drill, and 90°-120° drills, and the Auto Sharpening Attachment.
Models LEX400, LEX450, and LEX500 offer different chuck sizes and voltage options.
Steps include unpacking, attaching fixtures, connecting cables, and ensuring all components are secure.
Includes starting procedures, split point drill usage, and system features like Auto/Manual select and grind sensitivity adjustment.
Regularly check and empty the grit tray, calibrate the Drill Stick Out, and adjust the Swing Bearing assembly.
Ensure secure connections, use a vacuum system, and follow detailed instructions to avoid operational issues.
Lists components for geared chucks and auto controllers/displays, including jaw sets, chuck bodies, and interface harness assemblies.
Includes powering off the machine, vacuuming grit, and cleaning with a dry cloth followed by a lubricated cloth.
Steps for common issues like power or display problems, with solutions including checking connections and contacting customer service if needed.
Use a dust extraction system and perform routine maintenance every 100 sharpenings to extend component life.
Provides Darex customer support contact details for further assistance.
Catalog excerpts

Operating Instructions CAUTION: To reduce the risk of injury, the user must read and understand this instruction manual before using this product. Save these instructions for future reference. 1
Open the catalog to page 1
Or contact your Darex Distributor
Open the catalog to page 3
The Darex Story Darex Corporation began in 1973 in Beecher, Illinois. The D, A and R of Darex are the initials of three generations of the Bernard family; David, Arthur and Richard Bernard. David and his father Richard founded Darex. Grandfather Arthur Bernard, who earlier founded the Bernard Welding Company, contributed his energy and guidance to Darex. Art’s inventions revolutionized the welding industry. In 1978, Darex relocated to Ashland, Oregon. Grandson Dave and son Dick carry on Arthur’s legacy of inventiveness. Darex grew to become the most recognized name in the cutting tool sharpening...
Open the catalog to page 4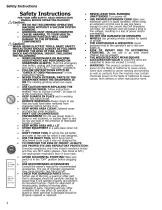
Safety Instructions Safety Instructions FOR YOUR OWN SAFETY, READ INSTRUCTION MANUAL BEFORE OPERATING MACHINE! WE DO NOT RECOMMEND OPERATING MACHINE WITHOUT A VACUUM SYSTEM RUNNING GRINDING DUST INHALED/INGESTED CAN BE HARMFUL TO YOUR HEALTH. GRINDING PARTIALS WILL CAUSE DAMAGE TO THE INTERNAL COMPONENTS • WHEN USING ELECTRIC TOOLS, BASIC SAFETY PRECAUTIONS SHOULD ALWAYS BE FOLLOWED • TO PREVENT THE RISK OF FIRE, ELECTRIC SHOCK AND PERSONAL INJURY, INCLUDING THE FOLLOWING: • • WHEN MAINTENANCE OR MACHINE ADJUSTMENTS ARE PERFORMED ON SHARPENER ALWAYS: Push the emergency • stop button, unplug unit...
Open the catalog to page 5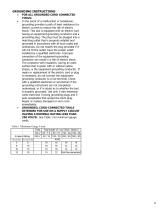
GROUNDING INSTRUCTIONS • FOR ALL GROUNDED CORD CONNECTED TOOLS: In the event of a malfunction or breakdown, grounding provides a path of least resistance for electric current to reduce the risk of electric shock. This tool is equipped with an electric cord having an equipment-grounding conductor and a grounding plug. The plug must be plugged into a matching outlet that is properly installed and grounded in accordance with all local codes and ordinances. Do not modify the plug provided if it will not fit the outlet, have the proper outlet installed by a qualified electrician. Improper connection...
Open the catalog to page 6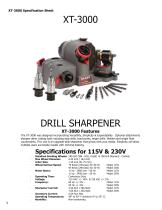
DRILL SHARPENER XT-3000 Features The XT-3000 was designed incorporating Versatility, Simplicity & Expandability. Optional attachments sharpen other cutting tools including step drills, brad points, larger drills, Weldon and single flute countersinks. This unit is an upgrade-able sharpener that grows with your needs. Simplicity will allow multiple users successful results with minimal training. Standard Grinding Wheels: Max Wheel Diameter: Arbor Size: Wheel Surface Speed: Motor Specs: Operating Time: Voltage: Frequency: Sharpener Current: Accessory Current: Operating Temperature: Humidity: 180...
Open the catalog to page 7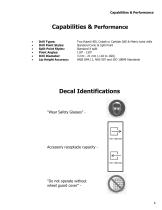
Capabilities & Performance Capabilities & Performance • • • • • • Drill Types: Drill Point Styles: Split Point Styles: Point Angles: Drill Diameter: Lip Height Accuracy: Two fluted HSS, Cobalt or Carbide SAE & Metric twist drills Standard Conic & Split Point Standard X split 118° - 150° 3 mm - 21 mm (.118 to .826) ANSI B94.11, NAS 907 and ISO 10899 Standards Decal Identifications “Wear Safety Glasses” - Accessory receptacle capacity - “Do not operate without wheel
Open the catalog to page 8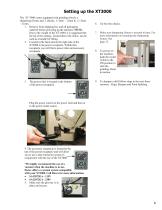
Setting up the XT3000 The XT-3000 comes equipped with grinding wheels, a sharpening fixture and 2 chucks, 1; 3mm – 12mm & 1; 12mm – 21mm. 1. Remove from shipping box and all packaging material before powering up the machine. NOTE: Due to the weight of the XT-3000, it is suggested that the lip of the casting, located above the motor, can be used as a handle for lifting. 2. Located at the back and on the right side of the XT3000 is the power receptacle. Within that receptacle you will find a power inlet and accessory receptacle. The power inlet is located at the bottom of the power receptacle....
Open the catalog to page 10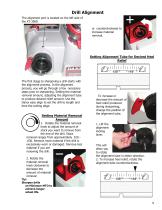
Drill Alignment The alignment port is located on the left side of the XT-3000. or counterclockwise to increase material removal. Setting Alignment Tube for Desired Heel Relief 135° The first stage to sharpening a drill starts with the alignment process. In the alignment process, you will go through a few necessary steps prior to sharpening. Setting the material removal amount, adjusting the alignment tube to produce desired relief amount. Use the Darex easy align to set the drill to length and time the cutting edge. Setting Material Removal Amount 1. Rotate the material removal knob to adjust...
Open the catalog to page 11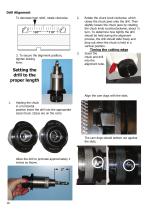
Drill Alignment To decrease heel relief, rotate clockwise. 3. To secure the alignment position, tighten locking lever. Rotate the chuck knob clockwise, which closes the chuck jaws onto the drill. Then slightly loosen the chuck jaws by rotating the chuck knob counterclockwise, about ½ turn. To determine how tightly the drill should be held during the alignment process, the drill should slide freely and drop out when the chuck is held in a vertical position. Timing the cutting edge Insert the chuck and drill into the alignment tube. Setting the drill to the proper length Align the cam dogs with...
Open the catalog to page 12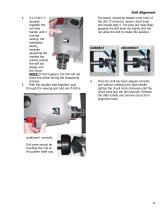
S-L-O-W-L-Y squeeze together the red slide handle until it touches casting. We emphasize slowly, because squeezing the handles too quickly pushes the drill too deeply into the chuck. NOTE: If this happens, the drill will not touch the wheel during the sharpening process. 5. With the handles held together, look through the viewing port and see if drill is The pawls should be seated in the helix of the drill. If incorrect, loosen chuck knob and repeat step 4. The jaws are most likely gripping the drill body too tightly and will not allow the drill to rotate into position. Once the drill has been...
Open the catalog to page 13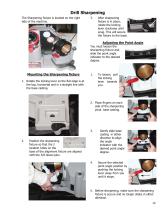
Drill Sharpening The Sharpening fixture is located on the right side of the machine. After sharpening fixture is in place, rotate the locking lever clockwise until snug. This will secure the fixture to the base. Adjusting the Point Angle You must loosen the sharpening fixture and slide the point angle indicator to the desired degree. Mounting the Sharpening fixture 1. Rotate the locking lever so the flat edge is at the top, horizontal and in a straight line with the base casting. To loosen, pull the locking lever towards you. 2. Place fingers on each side of the sharpening pivot base casting....
Open the catalog to page 14All Darex catalogs and technical brochures
 Large Drill Attachment LEX050
19 Pages
 V-390 Drill Sharpener
20 Pages

- Surface treatment brush
- Metal stand
- Circular brush
- Surface treatment wheel
- Sharpening machine
- Cylindrical grinding wheel
- Automatic sharpening machine
- Aluminium stand
- Diamond grinding wheel
- CNC sharpening machine
- Silicon carbide brush
- Manual tool sharpener
- Cutting tool sharpening machine
- Sharpening wheel
- CBN sharpening machine
- Machine stand
- Diamond brush
- High-productivity sharpening machine
- Sharpening machine with touch screen
- 4-axis sharpening machine