

V-390 Drill Sharpener

V-390 Drill Sharpener
Darex Corporation, established in 1973, specializes in manufacturing precision cutting tool sharpeners. The V390 model is tailored for small fabrication or job shops with lower drill sharpening needs, offering simplicity, accuracy, and affordability.
The V390 sharpens two-flute twist drill bits from 1/8" to 3/4" (3mm to 19mm) and is compatible with HSS, Cobalt, TiN coated, and Parabolic bits. An optional diamond wheel is required for carbide bits. It operates at 115 volts, 4.5 amps, and 3450 RPM, with a cycle time of 15 to 60 seconds per bit.
Users must read the manual before use. Key safety measures include wearing eye protection, keeping guards in place, maintaining a clean work area, and using correct tools and accessories. Proper grounding is essential to prevent electric shock.
Familiarize yourself with the V390's parts and features, including the wheel cover, vacuum port, point split port, and adjustment knobs for material removal and point angle.
The V390 sharpens standard 118º and high-performance 135º split-point drill bits, including carbide, parabolic, and cobalt bits with the appropriate wheel. It maintains factory relief and chisel edge angles for optimal performance.
1. Select the point angle and set the relief paddle and material removal knob accordingly.
2. Align the drill bit using the alignment port and adjustment features.
Regular maintenance involves emptying grinding dust and replacing the grinding wheel as needed. Detailed guidance is provided in the manual.
The manual includes a section to address common issues and questions related to the V390's operation.
A complete schematic breakdown and list of replacement parts are provided for maintenance and repair purposes.
This document provides detailed instructions for using the Darex V390 drill sharpener, including procedures for aligning, sharpening, and splitting drill bits, as well as troubleshooting common issues.
- Drill bits should ideally be around 3/8” in diameter for initial sharpening to observe point details.
- Use a point angle gauge to set the sharpener point angle plate to match the drill point angle.
- Adjust the relief paddle based on the material being drilled: softer materials require more relief, while harder materials require less.
- Set the material removal knob to #1 for minimal removal, increasing as needed for dull or chipped bits.
- Insert the drill bit into the chuck and adjust for a slip-fit.
- Align the chuck in the alignment port using the reference line and detent.
- Push the drill bit to the stop and secure it by tightening the chuck.
- Turn on the sharpener and insert the chuck into the sharpening port.
- Rotate the chuck in half increments, allowing the cam to guide the motion.
- Continue until grinding is complete, then inspect the drill point.
- Align the chuck in the point split port and perform a split on both sides of the drill bit.
- Adjust the point split depth as needed using the adjustment knob.
- If no material is removed during sharpening, ensure the drill bit is properly aligned and the chuck is tightened.
- For negative relief issues, adjust the relief paddle to increase the relief setting.
Follow these detailed instructions to effectively sharpen and split drill bits using the Darex V390. Adjust settings based on material and drill bit condition for optimal results.
- Material Removal: Adjust the Material Removal Knob to a lower setting and realign the drill bit if too much material is being removed.
- Off-Center Drill Point: Ensure no particles are between the chuck jaws and drill bit, tighten the closing knob, avoid uneven pressure during sharpening, and check for bent drills.
- Drill Alignment: Remove burrs from the drill shank and ensure the drill is neither too loose nor too tight in the chuck.
- Flat Spots: Apply firm, even pressure and rotate the chuck smoothly during sharpening.
- Chisel Edge Issues: Ensure pawls grip the flutes correctly and adjust heel relief settings.
- Rough Grind Finish: This may occur with a new wheel or if the chuck is rotated too fast.
- Uneven Point Split: Adjust by removing more material from the under split flute.
- Motor Issues: Check for wheel jams, machine tipping, voltage changes, or overheating. Allow the motor to cool if necessary.
- Cleaning: Use a dry paintbrush or cloth to clean the alignment, sharpening, and splitting ports. A vacuum can be used to remove grit.
- Wheel Maintenance: Remove the wheel cover using a hex wrench, clean the wheel area, and replace the wheel if necessary.
- Chuck Cleaning: Use pressurized air to clean the chuck and apply light lubrication to the threads.
- Vacuum Attachment: Attach a vacuum tube to the sharpening port for better maintenance.
- Wheel Cleaning: Clean CBN or diamond wheels with an oil-less solvent like automotive brake cleaner.
- Light Bulb Replacement: Follow specific steps to replace the bulb, ensuring the machine is unplugged.
- Periodically clean grindings from the chuck to maintain accuracy.
- Use the smallest material removal setting for very small drills.
- Ensure spring steel pawls are fully inside the drill flutes during alignment.
For further assistance, contact Darex Corporation at 1-800-547-0222 or visit their website at www.darex.com.
Catalog excerpts
DAREX V390 Drill Sharpener ® Operating Instructions CAUTION! To reduce the risk of injury, the user must read and understand this instruction manual before using product. Save these instructions for future referen
Open the catalog to page 1
The Darex Story Darex Corporation began in 1973 in Beecher, Illinois. The D, A and R of Darex are the initials of three generations of the Bernard family; David, Arthur and Richard Bernard. David and his father Richard founded Darex. Grandfather Arthur Bernard, who earlier founded the Bernard Welding Company contributed his energy and guidance to Darex until his death. Art’s inventions revolutionized the welding industry. In 1978, Darex relocated to Ashland, Oregon. Grandson Dave and son Dick carry on Arthur’s legacy of inventiveness. Darex grew to become the most recognized name in the cutting...
Open the catalog to page 3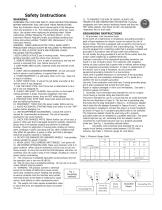
Safety Instructions 21. TO MINIMIZE THE RISK OF INJURY, ALWAYS USE PROPER EYE AND RESPIRATORY PROTECTION: Everyday REMEMBER FOR YOUR OWN SAFETY, READ INSTRUCTION MANUAL eyeglasses only have impact resistance lenses and they are BEFORE OPERATING TOOL AND SAVE THESE INSTRUCTIONS. NOT safety glasses. (See Decal at Left.) Use appropriate Wear Eye Protection. Never touch internal parts of the sharpener respiratory face or dust mask. when the sharpener is on. The rotating grinding wheel can cause injury. Use caution when replacing the grinding wheel. Follow GROUNDING INSTRUCTIONS instructions entitled...
Open the catalog to page 4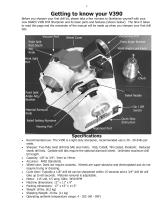
Getting to know your V390 Before you sharpen your first drill bit, please take a few minutes to familiarize yourself with your new DAREX V390 Drill Sharpener and its basic parts and features (shown below). The time it takes to read this page and the remainder of the manual will be made up when you sharpen your first drill bits. Vacuum Port Sharpening Port Wheel Cover Point Split Port Depth Adj. Knob Point Angle Bracket Point Angle Lock Knob Point Split Port Point Split Angle Adj. Bracket Relief Paddle Material Removal Knob Quick Step Instruction Relief Setting Numbers Viewing Port Alignment Port...
Open the catalog to page 5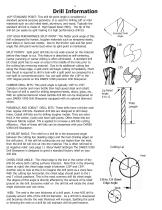
Drill Information 118º STANDARD POINT: This drill bit point angle is considered a standard general-purpose geometry. It is used for drilling soft or mild materials such as cold rolled steel, aluminum, and wood. Typically the standard drill bit is made of High Speed Steel (HSS). The tip of the drill bit can easily be split making it a high performance drill bit. Included Point Angle 135º HIGH PERFORMANCE SPLIT-POINT: The flatter point angle of this drill is designed for harder, tougher materials such as tempered steels, hard alloys or hard cast metals. Due to the thicker web and flat point angle...
Open the catalog to page 6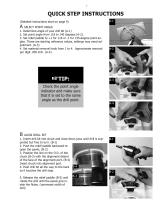
QUICK STEP INSTRUCTIONS A-1 (Detailed instructions start on page 9) SELECT POINT ANGLE 1. Determine angle of your drill bit (A-1) 2. Set point angle from 118 to 140 degrees (A-2). 3. Set relief paddle to +1 for 118 or -1 for 135-degree point angles. These are starting reference values, settings may need adjustment. (A-3) 4. Set material removal knob from 1 to 4. Approximate removal per digit .005 inch. (A-4) Check the point angle indicator and make sure that it is set to the same angle as the drill point. ALIGN DRILL BIT 1. Insert drill bit into chuck and close down jaws until drill is supported...
Open the catalog to page 7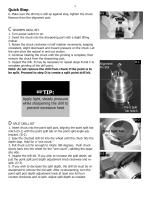
Quick Step 6. Make sure the drill tip is still up against stop, tighten the chuck. Remove from the alignment port. SHARPEN DRILL BIT 1. Turn power switch to on. 2. Insert the chuck into the sharpening port with a slight lifting motion. 3. Rotate the chuck clockwise in half rotation increments, keeping consistent, slight downward and inward pressure on the chuck. Let the cam drive the natural in and out motion. 4. Continue rotating the chuck until the grinding is complete, then remove the chuck from the sharpening port. 5. Inspect the drill. It may be necessary to repeat steps B and C to complete...
Open the catalog to page 8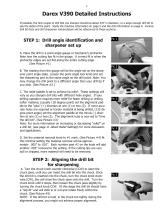
Darex V390 Detailed Instructions If possible, the first couple of drill bits you sharpen should be about 3/8” in diameter, or a large enough drill bit to see the detail of the point. Study the machine information on page 5 and the drill information on page 6. Various drill bit facts and drill sharpener nomenclature will be referenced in these sections. STEP 1: Drill angle identification and sharpener set up A. Place the drill in a point angle gauge or mechanic’s protractor. Note how the cutting lips fit in the gauge. A correct fit is when the protractor edges are set flat along the entire cutting...
Open the catalog to page 9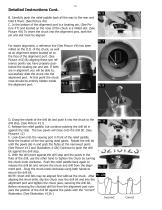
Detailed Instructions Cont. B. Carefully push the relief paddle back all the way to the rear and hold it there. (See Picture #6) C. In the bottom of the alignment port is a locating pin, (See Picture #7) and located on the nose of the chuck is a milled slot. (See Picture #8) To insert the chuck into the alignment port, both the pin and slot must be aligned. Pic 7 For easier alignment, a reference line (See Picture #9) has been milled on the O.D. of the chuck, as well as an alignment detent located on to the face of the alignment port. (See Picture #10) By aligning these two reference points you...
Open the catalog to page 10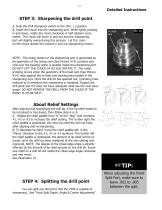
Detailed Instructions STEP 3: Sharpening the drill point A. Push the Drill Sharpener switch to the ON ( | ) position. B. Insert the chuck into the sharpening port. While lightly pushing in and down, rotate the chuck clockwise in half rotation increments. The chuck will move in and out and the sharpening port will slightly swing during this process. Let the cams on the chuck dictate the natural in and out sharpening motion. NOTE: The swing motion of the sharpening port is generated as the geometry of the swing cam (See Picture #14) contacts and rolls over the bearing which is located inside the...
Open the catalog to page 11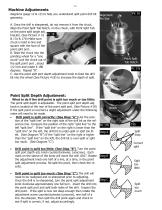
Machine Adjustments diagrams (page 12 & 13) to help you understand split point drill bit geometry. A. Once the drill is sharpened, do not remove it from the chuck. Align the Point Split Tab Notch, on the chuck, with Point Split Tab on the point split angle adj. bracket. (See Picture # 16 Pic 18 & 17a & 17b) Make sure chuck is held in-line and square with the face of the point split port. B. Slide the chuck into the grinding wheel for a “one count” pull the chuck out of the split point port , about 1/2 inch and rotate it 180 degrees. Repeat “B”. C. Use the point split port depth adjustment knob...
Open the catalog to page 12All Darex catalogs and technical brochures
 Large Drill Attachment LEX050
19 Pages


- Surface treatment brush
- Metal stand
- Circular brush
- Surface treatment wheel
- Sharpening machine
- Cylindrical grinding wheel
- Automatic sharpening machine
- Aluminium stand
- Diamond grinding wheel
- CNC sharpening machine
- Silicon carbide brush
- Diamond brush
- Manual tool sharpener
- Sharpening wheel
- Cutting tool sharpening machine
- Machine stand
- High-productivity sharpening machine
- Sharpening machine with touch screen
- CBN sharpening machine
- 4-axis sharpening machine