

Creasol UniRec1

Creasol UniRec1
Catalog excerpts

Creasol UniRecI Multifrequency 1CH receiver Usable with almost any remote control, AM and FM, fixed and rolling code Creasol UniRecI Multifrequency universal receiver with 1 opto-insulated output. Receives in 1 or 2 frequencies, selectable by the user, AM/FM: 433.42, 433.92, 434.15, 434.42, 868.3, 868.5, 868.8 MHz, 288-418MHz, AM/FM. Smart Home solutions http://www.creasol.it ENGLISH Introduction: this device, very compact and easy to be installed, has a solid-state relay output which permits to control any electronic board with a low-voltage input, by almost any remote control in the market transmitting in the range 433.42-868.8 MHz with AM or FM modulation and with a good frequency stability (using crystal or SAW resonators). Installation: this device has 5 wires, one of which is used as antenna and should not be connected anywhere. Two wires, marked as Supply, should be connected to the power supply 7-36Vdc or 7-27Vac. Two wires, marked as Sw1 + and Sw1-, should be connected to the input of the electronic board to be controlled, where it's connected the external switch start button, as shown in Fig. 1. 1. Check voltage on start button: it should be in the range 2-40V. 2. Measure the current through the start button: it should be less than 50mA. 3. Connect wires marked as Supply to the power supply: don't care about polarity. 4. Connect wires Sw1 + and Sw1- to the electronic board inputs, respecting polarity. 5. Configure the device (frequency, modulation, output type, ...) if needed. 6. Learn one or more remote controls, following the instructions below. It's also possible to use Sw wires to supply an external 5-24V relay coil, with a protection diode. Do not connect wires to a power supply source! Configuration: this device is supplied pre-configured to receive at 433.92 MHz, AM, and to activate the output for 500ms. To modify this configuration, press quickly the button Prog a number of times corresponding to the parameter to modify: Led will flash to notify the current value of that parameter. Then, press again button Prog for the number of times corresponding to the desired value, as specified in the table. If programming fails, a long red flash will be emitted. Learning remote controls: press the Prog button twice to enable learning mode: Led starts flashing slowly. Within 10s, press the button on the remote controls that should be learned. Every time a new code is learned, the 10s timeout is reload: Led flashes twice if the code is learned, 3 times if was already learned, 6 times if memory is full. Removing remote controls: press the Prog button 3 times, then press button on remote controls in the same way as learning procedure. Led flashes 4 times for any removed code. To blank the whole memory, press the Prog button 10 times, wait for Led flashing, then press Prog button 3 times; press 4 instead of 3 to do a factory reset. Learning master remote controls: press the Prog button 4 times, then press button on remote control: this remote controls will not activate the output, but can be used to enable learning procedure without the need to access the receiver. To learn new remote controls in this way, put the master remote control in trasmission for 2s, then keep in transmission for 2s the new remote controls that should be learned: every time a new remote control is learned, the 10s timer is reload to permit successive learnings. Security and safety: do not use in systems that require a high level of anti-theft security. Installation should be done by a qualified technician, in a well insulated enclosure, protected by dust, humidity, steam and contact with other circuits and metal parts. All responsibility, for any damage caused by not complying with the instructions in this manual, is declined. Warranty: the warranty complies with statutory requirements, and cover only defects, within the product itself, in material and manufacture. Your local stockist should be contacted in connection with any warranty-related matters. Creasol hereby declares that this receiver UniRec1 is in compliance with the essential requirements and other relevant provisions of Directive 2014/53/EU. Declaration of Conformity can be obtained from http://www.ce.creasol.it Einleitung: Dieses Gerat ist sehr kompakt und einfach zu installieren. Mit einen Spannungsausgang wird die Motorsteuerung am Niederspannungseingang angesteuert, Funkhandsender im Frequenzbereich von 433.42 bis 868.8MHz, AM oder FM- in rolling oder DIP-Schalter- Codierung konnen eingelernt werden. Installation: Dieser Empfanger hat 5 Kabel. Eines wird als Antenne benotigt und sollte nirgends angeschlossen werden. 2 Kabel, welche als Supply markiert sind, werden an das Netzteil 7-36Vdc oder 7-27Vac angeschlossen. Die beiden Kabel, welche als Sw1* markiert sind, werden an den Eingang der Steuerung (ab jetzt als Start Button bezeichnet) angeschlossen (wie in Abbildung 1 beschrieben). 1. Spannung am Start Button uberprufen: Dieser sollte zwischen 2-40V sein. 2. Den Durchgangsstrom vom Start Button messen: Er sollte weniger als 50mA. 3. Die als Supply Kabel mit dem Netzteil verbinden: Polung spielt keine Rolle. 4. Schliefien Sie die Kabel von Sw1 * an die Eingange der Elektronikplatine an. 5. Den Empfanger entsprechend: Frequenz, Modulation, Typ des Ausgangs, ... 6. Eine oder mehr Fernbedienungen gemafi Anleitung einlernen. Es ist auch moglich, Switch kabel zur Versorgung einer externen 5-24V-Relaisspule mit einer Schutzdiode zu verwenden. Schliefien Sie die Schalterkabel nicht an eine Stromquelle an! Konfiguration: Der Empfanger ist vorkonfiguriert mit der Frequenz von 433.92 MHz AM und einer Einschaltzeit von 500ms. Um diese Konfiguration zu andern, den Prog Knopf schnell drucken: Die LED-Anzeige leuchtet um die aktuelle Einstellung anzuzeigen. Den Prog Knopf so viel mal drucken, bis der gewunschte Parameter angezeigt wird (sieh Tabelle). Wenn die Programmierung fehlgeschlagen ist, leuchtet die LED-Anzeige lang auf. Sendr anlernen: Drucken Sie die Prog 2 mal, um den Lernmodus zu aktivieren: Led blinkt langsam. Drucken Sie eine Taste auf der Sender, die innerhalb von 10s gelernt werden sollte: Led blinkt zweimal, wenn der Code ist so programmiert, 3-mal, wenn bereits gelernt wurde, 6-mal, wenn der Speicher voll ist, dann ist es moglich, andere Fernbedienungen innerhalb von 10s zu lernen. Entfernen von Sender: Drucken Sie die Prog-Taste 3-mal, und drucken Sie Taste auf Sender, die entfernt werden sollen. Led blinkt 4-mal fur jeden entfernten Code auf. Um Leer den gesamten Speicher, drucken Sie die Prog 10mal,abwarten Led zu blinken, dann Prog 3-mal drucken; Presse 4 statt 3 einen Werksreset zu bekommen. Lernen Master Sender: Drucken Sie die Prog 4-mal, und drucken Sie Taste auf der Sender: Die Sender wird der Ausgang nicht aktiviert, kann aber verwendet werden, Lernverfahren, ohne dass der Empfanger den Zugang zu ermoglichen. Sicherheit: Verwenden Sie in nicht-Systeme, die ein hohes Mafi an Anti-Diebstahl-Sicherheit erfordern. Die Installation sollte von einem qualifizierten Techniker durchgefuhrt werden, in einem gut isolierten Gehause, durch Staub, hoher Luftfeuchtigkeit, Dampfen und Kontakt mit anderen Schaltungen und Metallteilen geschutzt. Alle Verantwortung fur Schaden, die nicht mit den Anweisungen in diesem Handbuch Einhaltung verursacht wird, zuruckgegangen. Garantie: erfullt die gesetzlichen Anforderungen und decken nur Defekte im Produkt selbst, in Material und Herstellung. Ihr Fachhandler sollte im Zusammenhang mit Gewahrleistungsfragen kontaktiert werden. CE-Konformitatserklarung: Creasol erklart hiermit, dass der Empfanger UniRec1 entspricht den grundlegenden Anforderungen der europaischen Richtlinie 2014/53/EU. Konformitatserklarung ist http://www.ce.creasol.it verfugbar.
Open the catalog to page 1All Creasol catalogs and technical brochures
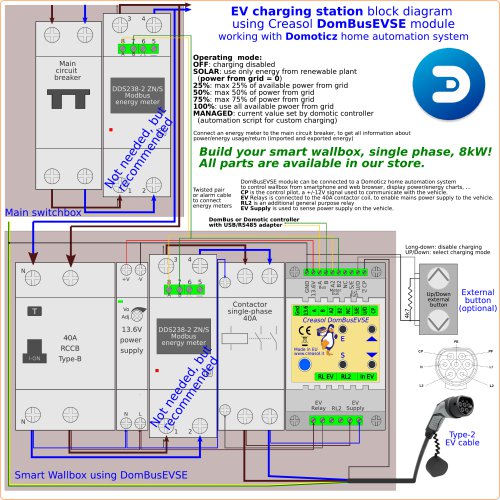 creDomBusEVSE_schema1
1 Page
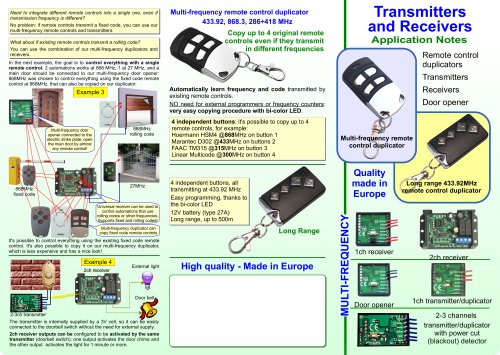 Transmitters and Receivers
2 Pages
 Creasol UniRec2
2 Pages
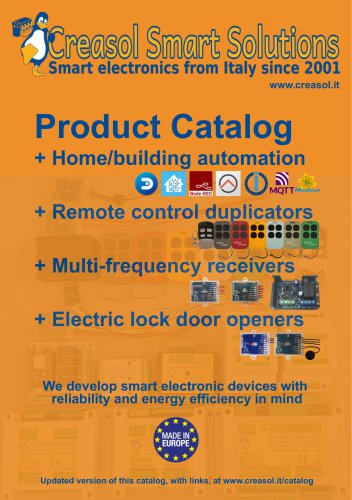 CreasolCatalog
22 Pages
- Digital I/O
- IO module
- Analog I/O
- Digital IO module
- Wireless remote control
- Remote control with buttons
- Analog IO module
- Serial I/O
- DIN rail mounted I O module
- Compact I/O
- Serial I/O module
- Modbus I/O
- Compact remote control
- Network I/O
- Modbus RTU IO module
- Lithium remote control
- Analog input module
- Network IO module
- RS-485 I/O module
- I/O card