
Catalog excerpts

Flexible Printed Electronics Metrology September 12 -13, 2012 National Institute of Standards and Technology The Strength of Thin Flexible Glass Sheets G. Scott Glaesemann Science and Technology Sullivan Park
Open the catalog to page 1
Flexible Electronics Applications Continuing to Emerge • Device applications include: – Display (e-paper, color filter, OLED, LCD) – Touch sensor – Photovoltaic – Lighting • Processes include: high-resolution and high-registration patterning and printing • Glass substrate opportunities progressing toward flexible sheets and web Flexible Glass Sheets
Open the catalog to page 2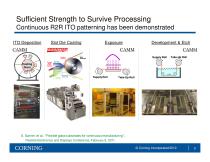
Sufficient Strength to Survive Processing Continuous R2R ITO patterning has been demonstrated ITO Deposition Development & Etch Supply Roll Take-Up Roll Cooling Drum Supply Roll Take-Up Roll S. Garner, et al., “Flexible glass substrates for continuous manufacturing”, Flexible Electronics and Displays Conference, February 9, 2011. © Corning Incorporated 2012
Open the catalog to page 3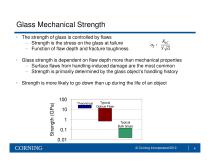
Glass Mechanical Strength • The strength of glass is controlled by flaws – Strength is the stress on the glass at failure – Function of flaw depth and fracture toughness • Glass strength is dependent on flaw depth more than mechanical properties – Surface flaws from handling-induced damage are the most common – Strength is primarily determined by the glass object’s handling history • Strength is more likely to go down than up during the life of an object Typical Optical Fiber Typical Bulk Glass
Open the catalog to page 4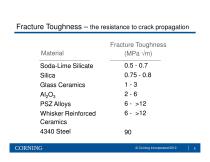
Fracture Toughness – the resistance to crack propagation Material Soda-Lime Silicate Silica Glass Ceramics Al2O3 PSZ Alloys Whisker Reinforced Ceramics 4340 Steel
Open the catalog to page 5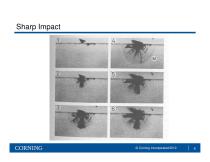
Sharp Impact
Open the catalog to page 6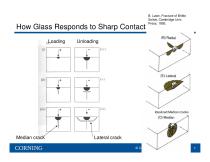
How Glass Responds to Sharp Contact Loading B. Lawn, Fracture of Brittle Solids, Cambridge Univ. Press, 1993. Idealized Median cracks Median crack Lateral crack © Corning Incorporated 2012
Open the catalog to page 7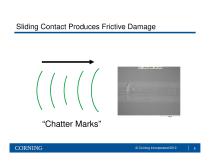
Sliding Contact Produces Frictive Damage “Chatter Marks” © Corning Incorporated 2012
Open the catalog to page 8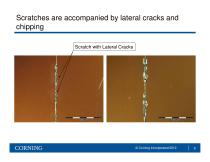
Scratches are accompanied by lateral cracks and chipping Scratch with Lateral Cracks
Open the catalog to page 9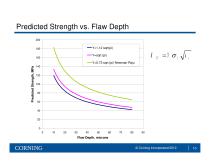
Predicted Strength vs. Flaw Depth 200 Flaw Depth, microns © Corning Incorporated 2012
Open the catalog to page 10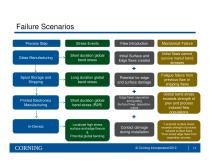
Failure Scenarios Process Step Stress Events Flaw Introduction Mechanical Failure Glass Manufacturing Short duration global bend stress Initial Surface and Edge flaws created Initial flaws cannot survive manuf bend stresses Spool Storage and Shipping Long duration global bend stress Potential for edge and surface damage Fatigue failure from previous flaw or shipping flaws Short duration global bend stress (R2R) Edge flaws: separation and guiding Surface flaws: deposition, rollers Global bend stress exceeds strength of prev and process induced flaw populations Localized high stress surface...
Open the catalog to page 11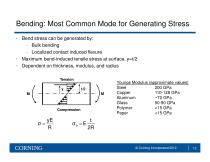
Bending: Most Common Mode for Generating Stress • Bend stress can be generated by: – Bulk bending – Localized contact induced flexure • Maximum bend-induced tensile stress at surface, y=t/2 • Dependent on thickness, modulus, and radius Tension y Youngs Modulus (approximate values) Steel 200 GPa Copper 110-128 GPa Aluminum ~70 GPa Glass 50-90 GPa Polymer <15 GPa Paper <15 GPa
Open the catalog to page 12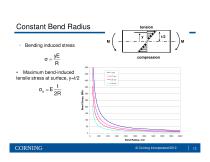
Constant Bend Radius • Bending induced stress • Maximum bend-induced tensile stress at surface, y=t/2
Open the catalog to page 13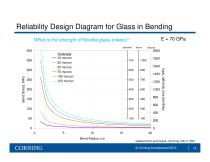
Reliability Design Diagram for Glass in Bending E = 70 GPa What is the strength of flexible glass sheets? seconds 2000 thickness 10 micron 25 micron 50 micron 75 micron 100 micron 125 micron hours seconds 125 proof Required Inert Strength, MPa 20 Glaesemann and Gulati, Opt Engr (30) 6 1991
Open the catalog to page 14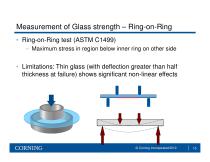
Measurement of Glass strength – Ring-on-Ring • Ring-on-Ring test (ASTM C1499) – Maximum stress in region below inner ring on other side • Limitations: Thin glass (with deflection greater than half thickness at failure) shows significant non-linear effects
Open the catalog to page 15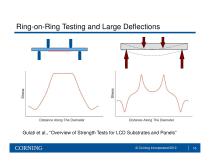
Ring-on-Ring Testing and Large Deflections Gulati et al., “Overview of Strength Tests for LCD Substrates and Panels” © Corning Incorporated 2012
Open the catalog to page 16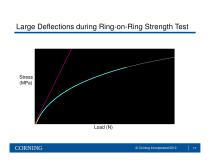
Large Deflections during Ring-on-Ring Strength Test
Open the catalog to page 17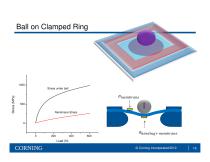
Ball on Clamped Ring Stress under ball
Open the catalog to page 18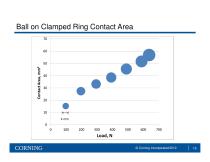
Ball on Clamped Ring Contact Area
Open the catalog to page 19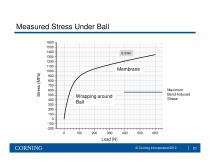
Maximum Bend-Induced Stress Wrapping around Ball Load (N) © Corning Incorporated 2012
Open the catalog to page 20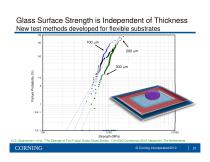
Glass Surface Strength is Independent of Thickness New test methods developed for flexible substrates 99 90 Failure Probability (%) Failure Probability, % Strength, (MPa) Strength M Pa G.S. Glaesemann, et al., “The Strength of Thin Fusion Drawn Glass Sheets,” 11th ESG Conference 2012, Maastricht, The Netherlands
Open the catalog to page 21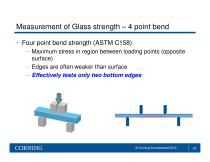
Measurement of Glass strength – 4 point bend • Four point bend strength (ASTM C158) – Maximum stress in region between loading points (opposite surface) – Edges are often weaker than surface – Effectively tests only two bottom edges
Open the catalog to page 22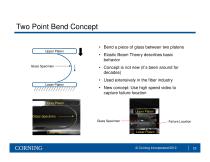
Two Point Bend Concept • Bend a piece of glass between two platens Upper Platen • Elastic Beam Theory describes basic behavior Glass Specimen • Concept is not new (it’s been around for decades) • Used extensively in the fiber industry Lower Platen • New concept: Use high speed video to capture failure location Upper Platen Upper Platen Glass Specimen Glass Specimen Lower Platen Failure Location Lower Platen
Open the catalog to page 23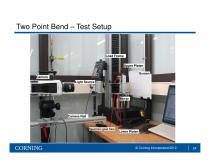
Two Point Bend – Test Setup Load Frame Upper Platen Screen Camera Light Source Camera Rail Specimen goes here Lower Platen
Open the catalog to page 24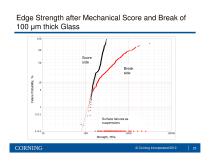
Edge Strength after Mechanical Score and Break of 100 m thick Glass 100 Score side Failure Probability, % Surface failures as suspensions 1. E-1 10
Open the catalog to page 25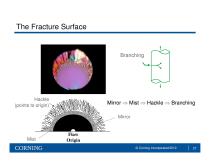
Hackle (points to origin) Flaw Origin © Corning Incorporated 2012
Open the catalog to page 27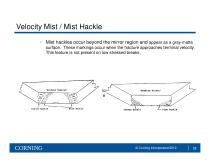
Velocity Mist / Mist Hackle • Mist hackles occur beyond the mirror region and appear as a gray-matte surface. These markings occur when the fracture approaches terminal velocity. This feature is not present on low stressed breaks. The shape of the hackle is indicative of the stress that was associated with the break. The above sketches are the extremes - the shape of the mist region can vary.
Open the catalog to page 28All CORNING Display Technologies catalogs and technical brochures
-
Gorilla® Glass 5
2 Pages
-
Corning Iris®
2 Pages
-
Aspheres by Corning
2 Pages
-
UltraFlat™
2 Pages
-
Tropel® FlatMaster® MSP
2 Pages
-
Optical Solutions
4 Pages
-
EAGLE XG® Slim
2 Pages
-
Scoring of AMLCD Glass
4 Pages
Archived catalogs
-
Jade® Product Information Sheet
3 Pages
-
Jade® Material Information Sheet
2 Pages


