


MDCW Carousel Plus Dryer

MDCW Carousel Plus Dryer
This user guide provides detailed instructions for the installation, operation, maintenance, and repair of MDCW Carousel Plus Dryer models 15, 25, 50, 75, and 100, featuring DC-1 controls. It highlights the importance of recording equipment details for service and emphasizes user responsibilities, including adherence to safety procedures and thorough review of the guide and equipment manuals.
The MDCW Carousel Plus Dryer is a mobile unit designed for drying plastic resin and conveying it using dehumidified air to a processing machine. It includes a dehumidifying dryer, drying hopper, conveying blower, and direct feed machine loader. It is suitable for contamination-free drying, with temperatures ranging from 100° to 375°F, throughput rates of 15 to 100 lbs per hour, and dewpoints of -40°F. Conveying is effective up to 8 feet vertically.
Installation involves unpacking, site preparation, connecting conveying lines, demand sensors, and main power, ensuring proper airflow, and following safety and grounding procedures to prevent electrical hazards.
The operation section details the use of the DC-1 control panel, including starting and stopping drying, conveying, and using features like auto start countdown and dewpoint control. It includes a flow chart and descriptions of control functions for efficient operation.
Regular maintenance is crucial for optimal performance. The guide includes a preventative maintenance checklist and instructions for cleaning components such as the hopper, filters, and coils, and advises on inspecting hoses and gaskets.
This section offers diagnostics and repair guidance, including identifying problems, addressing alarms, and troubleshooting dewpoint and drying issues. It covers replacing fuses, checking relays, and replacing heaters and the desiccant wheel assembly.
The appendices provide contact information for customer service, warranty details, and additional cleaning instructions for specific components.
The MDCW Carousel Plus Dryer supports drying temperatures from 100°F to 375°F, throughput rates of 15 to 100 lbs per hour, and achieves dewpoints of -40°F. Options include aftercoolers for high-temperature drying and precoolers for low-temperature settings.
The drying process involves a blower pulling moist air through filters and a desiccant wheel to remove moisture. The air is then heated to the desired drying temperature and distributed evenly through the material in the hopper. The cooling cycle involves cooling the regenerated desiccant before it re-enters the process cycle.
Air is heated to 350°F to purge moisture from the desiccant, which is then expelled through the exhaust.
The MDCW uses dry air to transport material from the drying hopper to the process machine. The system includes a vacuum receiver and a blower that operates based on material demand, ensuring continuous supply.
High-heat models are recommended for drying temperatures over 180°F. An aftercooler is advised for batch drying over 160°F or when throughput is below 50% capacity. Additional filtration may be necessary for materials with excessive fines or volatile production.
The document provides detailed specifications for various models, including airflow rates, dimensions, weight, voltage requirements, and water and compressed air needs. It advises consulting a representative for the latest information.
- Connecting the Main Power: Ensure the main power is disconnected and locked out before making electrical connections. Only qualified personnel should perform these tasks. Follow the wiring diagrams provided with the dryer.
- Checking for Proper Air Flow: This is crucial for non-conveying MDCW models 50, 75, and 100. Ensure the airflow direction is correct before filling the hopper with material to prevent damage.
- Mounting a Loader on the Hopper: Use the provided flange and mounting clips. Ensure material conveying hoses are away from the control panel to avoid static electricity damage.
- Connecting the Aftercooler: Requires a cooling water source and discharge line. Use flexible hoses for easy removal and cleaning.
- Testing the Installation: Verify all components are functioning correctly before loading the hopper and beginning operation.
- Control Panel Functions: The MDCW dryer control panel (DC-1) includes various functions such as auto start, dewpoint control, and setback temperature options. The control panel displays setpoints and actual values for process and regeneration temperatures.
- Starting and Stopping Drying: Use the start and stop buttons on the control panel. The auto start function can be set for a countdown time, and the dryer will begin operating once the countdown is complete.
- Alarm Codes: The system includes shutdown and passive alarms for various conditions such as high temperature and blower overload. Refer to the troubleshooting section for a complete list of alarms.
- Always refer to the wiring diagrams and follow electrical codes for your region.
- Ensure proper airflow direction before operation to prevent damage.
- Use flexible hoses for aftercooler connections to facilitate maintenance.
- Regularly test the installation to ensure all components are functioning correctly.
This document provides detailed instructions and specifications for operating a drying system, including setup, test modes, and alarm management. It outlines the control functions, temperature settings, and procedures for starting and stopping the drying process.
The system operates with a minimum sensor range of -40°F (-40°C). The process temperature setpoint can be adjusted between 100°F and 450°F (38°C to 232°C), although it is recommended not to exceed 375°F (191°C) to avoid nuisance alarms. Dewpoint control is enabled with a setpoint present, but will not activate if the setpoint equals -40°F (-40°C).
Access to setup, test mode, and alarm history screens requires specific access codes (754 for setup, 755 for test mode, and 756 for alarm history). The document details various screens for setting up and testing different components like process heaters, blowers, and temperature controls.
- Starting the Dryer: Ensure material is in the hopper, turn on the main power, set the drying temperature, and press the start button. The green light indicates successful startup.
- Stopping the Dryer: Press the stop button, allowing blowers to cool the heaters. Avoid using the main power switch to stop the dryer to prevent triggering alarms.
The document categorizes alarms into shutdown alarms (e.g., process high temp, process heater high temp) and passive alarms (e.g., process temp deviation). It provides a list of alarm codes and advises referring to the troubleshooting section for definitions.
Perform autotune on a cold dryer, ensure normal drying temperature is set before autotuning, and follow proper shutdown procedures to avoid damage. The document also advises against setting excessively high drying setpoints not in accordance with material recommendations.
- Load Time and Delay Adjustment: Set the load time and adjust delay time as necessary before starting the conveying process.
- Auto Start Countdown: Allows the dryer to start automatically at a predetermined time, adjustable from 0.1 to 150.0 hours.
- Disabling Auto Start: Cycle the power off and on to disable the auto start function.
- Protects the drying process from unauthorized settings. Recommended to set limits 10° higher than the maximum temperature setpoint.
- Conair advises against setpoint limits over 375°F due to potential alarms.
- Reduces energy consumption by adjusting regeneration air temperature based on the process dewpoint screen settings.
- Active with setpoint values of -39°F and higher; inactive at -40°F or lower.
- Designed to save energy and prevent over-drying by adjusting air temperature based on customer-set parameters.
- Requires careful selection of setpoint values for optimal operation.
- Preventative Maintenance Checklist: Includes tasks like cleaning the hopper, filters, and inspecting hoses and gaskets.
- Dewpoint Checking: Regular monitoring with a portable dewpoint monitor is recommended to ensure performance.
- Cleaning Procedures: Detailed steps for cleaning the hopper, process filter, and regeneration filter to maintain efficiency.
- Filter Cleaning: Use a small screwdriver to remove the filter grill, clean the filter with soap and water, and replace it securely. Ensure the control cabinet is closed during operation to filter regeneration air.
- Conveying Filter: Turn off the conveying function, remove and clean or replace the filter to maintain airflow and performance.
- Vacuum Receiver: Clean the vacuum receiver and replace the mesh filter if damaged. Disconnect hoses, clean the receiver and viewing chamber, and reassemble.
- Aftercooler Coils: Stop the dryer, disconnect water lines, remove the aftercooler, clean it, inspect the gasket, and reassemble.
- Precooler Coils: Clean the optional precooler coils as needed.
- Hoses and Gaskets Inspection: Inspect and tighten or replace any loose or damaged hoses and gaskets.
- Alarm Types:
- Shutdown Alarms: Indicate serious issues causing automatic dryer shutdown.
- Passive Alarms: Warn of potential problems without stopping the dryer.
- Common Alarms:
- Process High Temp: Caused by incorrect setpoints or failed relays.
- Process Loop Break: Triggered by temperature deviations.
- Heater High Temp: Due to excessive temperatures in heater tubes.
- Return Air High Temp: Occurs when return air temperature exceeds limits.
- Alarm Resolution: Use the control panel to diagnose and resolve alarms. Follow wiring diagrams for specific issues.
- Fuse Replacement: Check and replace fuses as needed.
- Heater and Sensor Checks: Inspect and replace solid state relays and temperature sensors.
- Desiccant Wheel Replacement: Follow specific steps for replacing the desiccant wheel.
Alarms:
1. Shutdown (A#): The dryer automatically shuts down due to a serious problem that could damage the material or dryer.
2. Passive (P#): The dryer continues to operate but warns of a problem that could prevent correct drying. Ignoring this could lead to a shutdown.
Process RTD Integrity (A10 & P26):
- Problem: Faulty process RTD can shut down the dryer.
- Causes: Loose connections, failed RTD, or control board issues.
- Solutions: Tighten connections, replace RTD or control board.
- Problem: Temperature exceeds deviation band.
- Causes: Loose RTD, failed heater, or SSRs.
- Solutions: Tighten connections, replace failed components.
- Problem: Temperature exceeds deviation band.
- Causes: Loose RTD, defective heater.
- Solutions: Tighten connections, replace heater.
- Problem: Return air temperature is too high.
- Causes: High drying temperature, insufficient water in aftercooler.
- Solutions: Adjust drying temperature, ensure water flow.
- Problem: Temperature exceeds high limit.
- Causes: Failed SSRs, control board issues.
- Solutions: Replace failed components.
- Problem: Dewpoint not below setpoint.
- Causes: Poor airflow, contaminated desiccant.
- Solutions: Remove airflow restrictions, replace desiccant.
- Problem: Temperature exceeds setpoint.
- Causes: Incorrect RTD installation, non-functioning blower.
- Solutions: Correct installation, fix blower issues.
- Problem: Temperature difference too high.
- Causes: Restricted air lines, loose hoses.
- Solutions: Check for blockages, tighten hoses.
- Regularly check and tighten all connections.
- Ensure proper installation and functioning of all components.
- Maintain clean and unobstructed air and water flow systems.
- Replace faulty components promptly to prevent further issues.
- Shutdown (A#): The dryer shuts down automatically due to a serious problem that could damage the material or dryer.
- Passive (P#): The dryer continues to operate but warns of a problem that could lead to a shutdown if ignored.
- A53 - Process Blower Overload: Occurs when the blower exceeds its amp rating or due to mechanical/electrical issues. Solutions include checking current draw, mechanical failures, electrical shorts, and overload settings.
- A54 & P23 - Conveying Blower Overload: Similar issues as the process blower, with solutions involving mechanical and electrical checks, and overload settings.
- A55 & P31 - Wheel Rotation Failure: Caused by motor or belt issues, with solutions involving checking motor, belt, and heater.
- A56 & P32 - Regeneration Outlet RTD Integrity: Involves checking RTD connections and replacing faulty components.
- P34 & P35 - Dewpoint Deviation: Caused by sensor issues or airflow problems, with solutions involving checking connections, airflow, and replacing sensors if necessary.
- CoS Er.4 or Co5 Er.4: Indicates an active alarm when the "Start" button is pushed.
- CoS Er.0 or Co5 Er.0: Communication issue between control and display boards.
- Err 004: Software mismatch between display and control boards.
- Er. L: Sensor connection problem.
- Er. H: Analog input section issue.
- Dryer not producing desired dewpoint: Caused by high return air temperature, low regeneration temperature, or leaks. Solutions include adjusting temperatures, checking filters, and verifying dewpoint readings.
- Temperature: Ensure air entering the hopper is at the correct drying temperature.
- Residence Time: Ensure material has adequate time to reach drying temperature.
- Airflow: Ensure adequate airflow to distribute heat throughout the material.
Catalog excerpts

www.conairgroup.com USER GUIDE UGD033-0311 MDCW Carousel Plus Dryer MDCW Models 15, 25, 50, 75, and 100 with DC-1 Controls Corporate Office: 724.584.5500 l Instant Access 24/7 (Parts and Service): 800.458.1960 l Parts and Service: 814.437.6861
Open the catalog to page 1
Please record your equipment's model and serial number(s) and the date you received it in the spaces provided. It's a good idea to record the model and serial number(s) of your equipment and the date you received it in the User Guide. Our service department uses this information, along with the manual number, to provide help for the specific equipment you installed. Please keep this User Guide and all manuals, engineering prints and parts lists together for documentation of your equipment. Date: Manual Number: UGD033-0311_ Serial Number(s): Model Number(s): * Display Firmware Version: * Control...
Open the catalog to page 2
Purpose of the User Guide This User Guide describes the Conair MDCW Carousel Plus sries dryers and explains step-by-step how to install, operate, maintain, and repair this equipment. Before installing this product, please take a few moments to read the User Guide and review the diagrams and safety information in the instruction packet. You also should review manuals covering associated equipment in your system. This review won't take long, and it could save you valuable installation and operating time later. How the Guide is Organized Symbols have been used to help organize the User Guide and...
Open the catalog to page 8
Your Responsibility as a User You must be familiar with all safety procdures concerning installation, opra驭tion and maintenance of this equipment. Responsible safety procedures include: Thorough review of this User Guide, paying particular attention to hazard warnings, appendices and related diagrams. Օ Thorough review of the equipment itself, with careful attention to voltage sources, intended use and warning labels. Thorough review of instruction manuals for associated equipment. Օ Step-by-step adherence to instructions outlined in this User Guide. 1-3
Open the catalog to page 9
ATTENTION: Read this so no one gets hurt We design equipment with the user's safety in mind. You can avoid the potential hazards identified on this machine by following the procedures outlined below and elsewhere in the User Guide. /\ WARNING: Improper installation, opration, or servicing may result in equipment damage or personal injury. This equipment should be installed, adjusted, and serviced by qualified technical personnel who are familiar with the construction, operation, and potential hazards of this type of machine. All wiring, disconnects, and fuses should be installed by qualified...
Open the catalog to page 10
ATTENTION: Read this so no one gets hurt We design equipment with the user's safety in mind. You can avoid the potential hazards identified on this machine by following the procedures outlined below and elsewhere in the User Guide. ITION: Hot Surfaces. Always protect yourself from hot surfaces inside the dryer and hopper. Also exercise caution around exterior surfaces that may become hot during use. These include the hopper door frame, the exterior of an uninsulated hopper, the return air hose and the dryer's process filter housing and moisture exhaust outlet. WARNING: Do not place arosol, compressed...
Open the catalog to page 11
How to Use the Lockout Device A CAUTION:Before performing maintenance or repairs on this product, you should disconnect and lockout electrical power sources to prevent injury from unexpected energization or start-up. A lockable device has been provided to isolate this product from potentially hazardous electricity. Lockout is the preferred method of isolating machines or equipment from energy sources. Your Conair product is equipped with the lockout device pictured below. To use the lockout device: 1 Stop or turn off the equipment. 2 Isolate the equipment from the electric power. Turn the rotary...
Open the catalog to page 12
What is the MDCW Carousel Plus Dryer? The MDCW Carousel Plus Dryer is a self-contained, mobile unit designed to dry plastic resin and convey it with dehumidified air directly to a processing machine. This mobile unit contains: A mobile dehumidifying dryer Օ Drying hopper with a material distribution box Conveying blower and filter* Օ Direct feed machine loader with a demand sensor* Quick disconnect conveying hoses *not on non-conveying models The dryer produces hot, low dewpoint air that removes moisture from hygroscopic plastics. When the conveying function is turned on, the conveying blower...
Open the catalog to page 14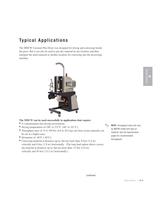
Typical Applications The MDCW Carousel Plus Dryer was designed for drying and conveying beside the press. But it can also be used to pre-dry material in one location, and then transport the dried material to another location for conveying into the processing machine. The MDCW can be used successfully in applications that require: A contamination-free drying environment. ^ ..Մ.,.. T, 3 ^ NOTE: Throughput rates will vary Drying temperatures of 100° to 375°F {66° to 191°C}. u..ՙ., ,,, 3 by MDCW model and type of Throughput rates of 15 to 100 lbs {6.8 to 45.4 kg} per hour (some materials can , Մ...
Open the catalog to page 15
Typical Applications (continued) The MDCW Carousel Plus Dryer can be used successfully in applications that require: A contamination-free drying environment Օ Drying temperatures within the ranges shown in the following table: Model Drying Temprature Range Low temprature (with precooler)* 100° - 150°F {38° - 66°C} Standard 150° - 240°F {66° - 116°C} High heat (with aftercooler)* 150° - 375°F {66° - 191°C} Low-high (with aftercooler & precooler)* 100° - 375°F {38° - 191°C} *See page 3-11, Appendix B 驕 Throughput rates of 15 to 100 lbs {6.8 to 37.3} per hour (some materials can be ran at a higher...
Open the catalog to page 16
How It Works □ The Process (Drying) Cycle The process blower pulls moist air from the top of the drying hopper. The air passes through the process filter and aftercooler, then into the desiccant wheel, where moisture is removed. The now dry air moves through the optional precooler (if installed) and process heater, where it is heated to the drying temperature selected by the operator. The hot, dry air is delivered to the hopper where a spreader cone evenly distributes the air through the material. ■ The Regeneration Cycle The regeneration blower pulls air through the regeneration filter into...
Open the catalog to page 17All Conair catalogs and technical brochures
 5000 Blender
4 Pages
 CH SERIES INSULATED HOPPERS
4 Pages
 HTC MODELS 600-5000
2 Pages
 GASTRAC PROCESS AIR HEATER
2 Pages
 MedLine® TrueFeed
4 Pages
 MedLine
4 Pages
 TrueRate™
3 Pages
 TrueWeigh
6 Pages
 INTERMIXER
2 Pages
 PET PREFORM SYSTEMS
12 Pages
 TRUEBLEND ™ TB45-4
4 Pages
 TRUEBLEND ™ TB100-4
4 Pages
 Economy cooling tank
2 Pages
 Heat Exchangers
11 Pages
 medical tubing products
4 Pages
 Water Pump Motors
1 Page
 Tower Isolation (PFT) Series
2 Pages
 Film Scrap Granulators
4 Pages
 Trim Pick-Up Inducers
2 Pages
 ScrapSaver Fluff Feeder
2 Pages
 TrueWeigh Continuous Blender
6 Pages
 TrueWeigh Line Manager
2 Pages
 TrueWeigh Hopper
2 Pages
 Dump Table
2 Pages
 ATC Series Coilers
2 Pages
 CPC Series
4 Pages
 Medline
6 Pages
 TPC Planetary Cutter
2 Pages
 CSC Series Cleated Puller
2 Pages
 Precision Series Belt Puller
2 Pages
 MCB Series Cooling Tank
2 Pages
 MEDVAC TANKS
4 Pages
 RESIN LEVEL DISPLAY
2 Pages
 HTR series
4 Pages
 VTR
VTR4 Pages
 TW-V
TW-V4 Pages
 TW-S
TW-S4 Pages
 TW-P
TW-P4 Pages
 TrueWeigh Control TWC1-12
2 Pages
 Equipment catalog
435 Pages
 Parts and accessories
262 Pages
 TAC series
2 Pages
 CLEAN ROOM READY
6 Pages
 WELDED SILOS
2 Pages
 TrueWeigh Continous Blenders
6 Pages
 TRUEFEED LIQUID FEEDER
2 Pages
 Gaylord Tilters
2 Pages
 Surge Bins, In-Plant
4 Pages
 MT VACUUM SIZING TANKS
4 Pages
 CBW GRANULATORS
2 Pages
 Tube Loader (TLM)
2 Pages
 HTMP SERIES
4 Pages
 NC GRANULATORS
2 Pages
 NCM GRANULATORS
2 Pages
 TrueBlend? TB45
4 Pages
 W Dryers (150-400)
4 Pages
 W Dryers (15-100)
4 Pages
 MICROWHEEL DRYERS
4 Pages
 CAML-EVB Evacuation System
2 Pages
 SCRAPSAVER (SSM)
2 Pages
 MDCW (15-100)
4 Pages
 THERMOLATOR® (TW) SERIES
4 Pages
 MDCW (150-200)
4 Pages
 PTFG
PTFG4 Pages
 CFC series
2 Pages
 EP2
EP28 Pages
 PTSS 0450
4 Pages
 EP1
EP16 Pages
 TrueBlend? High Heat
4 Pages
 TrueBlend? TB250
4 Pages
 SlimLine (SL) Dryer
4 Pages
 FLX-128
4 Pages
 Powder Loader (PL)
2 Pages
 Access? (AR) Receivers
4 Pages
 CAML-EVG Evacuation System
2 Pages
 Access? (AL) Loaders
4 Pages
 Mobile Surge Bins
2 Pages
 Bolted Silos
2 Pages
 Spiral Aluminum Silos
2 Pages
 GasTrac Process Air Heater
2 Pages
 HTC Temperature Controller
2 Pages
 Thermolator® vacuTrac
4 Pages
 BP Series Belt Pullers
2 Pages
 Pump Tank, Polymer
4 Pages
 WSB/GB Retrofit Control
2 Pages
 DM3-i Drying Monitor
2 Pages
 ResinWorks System
4 Pages
 BFS/BFH Metering Feeders
4 Pages
 CH Hoppers
4 Pages
 FL Filterless Receiver
2 Pages
 Vacuum Railcar Unloading
2 Pages
 Tube Loader (TLA)
2 Pages
 FLX Loading Control
2 Pages
 Silos, Spiral Steel
2 Pages
 Dust Collectors (DC)
2 Pages
 ELC Series Controls
4 Pages


- Cutting system
- Rail conveyor
- Vessel
- Vacuum generator
- Vacuum pump
- Chiller
- Belt conveyor
- Knife cutting system
- Packing machine
- Horizontal conveyor
- High-precision cutting center
- Single-stage vacuum pump
- High-speed cut-off machine
- Automatic packaging machine
- Metal tank
- Plastic cutting machine
- Tube cutting system
- Digital temperature control
- Lubricated vacuum generator