- Catalogs
- Cogsdill - Nuneaton
- Universal Burnishing Tools Selection and Operation Guide
- Products
- Catalogs
- News & Trends
- Exhibitions
Universal Burnishing Tools Selection and Operation Guide
1 /14Pages

Universal Burnishing Tools Selection and Operation Guide
1 /14Pages
Catalog excerpts

Cogsdill Tool Products, Inc. Universal burnishing tools TM For burnishing shafts, faces, tapers, contours, and relatively large IDs (greater than 2.750 inches/69.85mm) ■ ■ ■ ■ ■ ■ Boring-bar style and Indexable turning-holder style designs Tool designs to suit any part size or configuration, or any turning machine Low surface finishes Standard, available off-the-shelf Adjustable for optimum burnishing pressure Hardened steel or carbide rollers UBT-T1 indexable turning-holder style burnishing tool (Left-hand tool shown) UBT-B1 boring-bar style burnishing tool 44
Open the catalog to page 1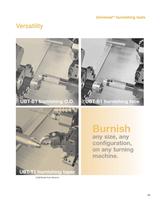
UniversalTM burnishing tools Versatility UBT-B1 burnishing O.D. UBT-B1 burnishing face Burnish any size, any configuration, on any turning machine. UBT-T1 burnishing taper (Left-hand tool shown) 45
Open the catalog to page 2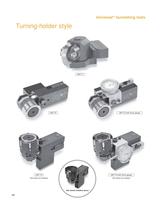
UniversalTM burnishing tools Turning-holder style UBT-T1 UBT-T2 with force gauge UBT-T2 UBT-T3 UBT-T3 with force gauge Roll shield not installed Roll shield not installed Roll shield installed above 46
Open the catalog to page 3
Universal™ burnishing tools Turning-holder style BURNISHING OUTSIDE DIAMETERS, FACES, Tool Holder LEFT HAND Tool Holder RIGHT HAND
Open the catalog to page 4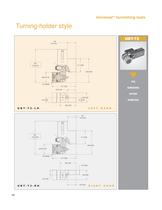
Universal™ burnishing tools Turning-holder style LEFT HAND RIGHT HAND
Open the catalog to page 5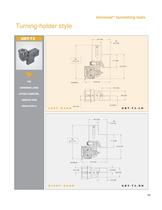
Universal™ burnishing tools Turning-holder style BURNISHING LARGE OUTSIDE DIAMETERS, (GREATER THAN LEFT HAND RIGHT HAND
Open the catalog to page 6
UniversalTM burnishing tools Set-up and operating instructions for UBT-T Tools Note: UBT™ single-roll burnishing tools do not have the advantage of an overlapping effect as with multi-roll tools, and for this reason slower feed rates and/or multiple passes over the part may be required in order to produce the desired finish. UBT-T1 tool set-up Loosen the load adjusting screw. Retighten the adjusting screw until it comes into contact with the spring. Continue to tighten screw 1/2 turn past snug. This is a recommended starting point for mild steel. Adjustments can be made to the burnishing force...
Open the catalog to page 7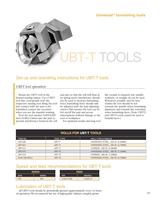
UniversalTM burnishing tools UBT-T TOOLS Set-up and operating instructions for UBT-T tools UBT-T tool operation Mount any UBT-T tool in the desired turning station. Use a UBT-T tool that corresponds with the respective turning tool. Bring the tool into contact with the part to be burnished; contact has occurred when you see the mandrel rotating. Feed the tool another 0.003-0.005 inch (0.08-0.13mm) into the part to provide interference between the roll and part so that the roll will float in its spring travel. Interference should not be used to increase burnishing force; burnishing force should...
Open the catalog to page 8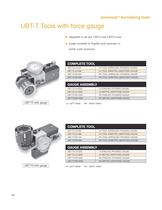
UniversalTM burnishing tools UBT-T Tools with force gauge ■ Adaptable to all new UBT-T2 and UBT-T3 tools. ■ Gauge available in English units (pounds) or metric units (newtons). COMPLETE TOOL UBT-T2-LH-GS LH TOOL W/ENGLISH (POUNDS) GAUGE UBT-T2-LH-GM LH TOOL W/METRIC (NEWTONS) GAUGE UBT-T2-RH-GS RH TOOL W/ENGLISH (POUNDS) GAUGE UBT-T2-RH-GM RH TOOL W/METRIC (NEWTONS) GAUGE GAUGE ASSEMBLY UBT-T2-LH-GSA LH METRIC (NEWTONS) GAUGE UBT-T2-RH-GSA RH ENGLISH (POUNDS) GAUGE UBT-T2-RH-GMA UBT-T2 with gauge LH ENGLISH (POUNDS) GAUGE UBT-T2-LH-GMA RH METRIC (NEWTONS) GAUGE LH- LEFT HAND RH - RIGHT HAND COMPLETE...
Open the catalog to page 9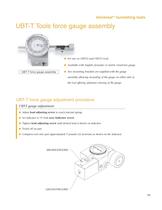
UniversalTM burnishing tools UBT-T Tools force gauge assembly ■ ■ UBT-T force gauge assembly For use on UBT-T2 and UBT-T3 tools. Available with English (pounds) or metric (newtons) gauge. ■ Two mounting brackets are supplied with the gauge assembly allowing mounting of the gauge on either side of the tool offering optimum viewing of the gauge. UBT-T force gauge adjustment procedure UBT-T gauge adjustment ■ Adjust load adjusting screw to touch internal spring. ■ Set indicator to “0” with zero indicator screw. ■ Tighten load adjusting screw until desired load is shown on indicator. ■ Touch off...
Open the catalog to page 10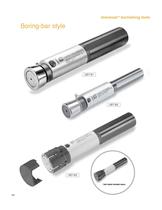
UniversalTM burnishing tools Boring-bar style UBT-B1 UBT-B2 UBT-B3 Roll shield installed above 54
Open the catalog to page 11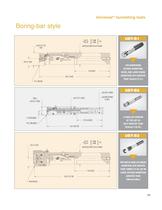
Boring-bar style Universal™ burnishing tools OUTSIDE DIAMETERS, FACES, AND LARGE INSIDE LARGE OUTSIDE DIAMETERS (GREATER THAN
Open the catalog to page 12
UniversalTM burnishing tools Set-up and operating instructions for UBT-B Tools Note: UBT™ single-roll burnishing tools do not have the advantage of an overlapping effect as with multi-roll tools, and for this reason slower feed rates and/or multiple passes over the part may be required in order to produce the desired finish. UBT-B1 tool set-up Loosen the load adjusting screws. Retighten the adjusting screws until they come into contact with the spring. Continue to tighten both screws one turn past snug. This is a recommended starting point for mild steel. Adjustments can be made to the burnishing...
Open the catalog to page 13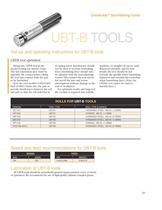
UniversalTM burnishing tools UBT-B TOOLS Set-up and operating instructions for UBT-B tools UBT-B tool operation Mount any UBT-B tool in the desired boring bar station. (Note: The red orientation spot must be opposite the contact point.) Bring the tool into contact with the part to be burnished. Feed the tool another 0.003-0.005 inch (0.08-0.13mm) into the part to provide interference between the roll and part so that the roll will float in its spring travel. Interference should not be used to increase burnishing force; burnishing force should only be adjusted with the load adjusting screws. This...
Open the catalog to page 14All Cogsdill - Nuneaton catalogs and technical brochures
 Nobur® Tool
5 Pages
 Generating Heads
8 Pages
 Nobur JA Recessing Head
8 Pages
 AEX Series
4 Pages
 U Series
2 Pages
 SR Series
6 Pages
 CX Machine Selection Guide
8 Pages
 Roll-a-Finish Bill of Materials
31 Pages
 Burnishing
64 Pages
 Smooth Edge Deburring Tool
12 Pages
 ZX Systems Overview
4 Pages
 ZX MBT-S brochure
5 Pages
 ZX MBT-T brochure
5 Pages
 Tools
Tools8 Pages
 Grooving
6 Pages
 Flipcut
16 Pages
 ZX Systems
36 Pages
 Recessing
64 Pages
 Reaming
48 Pages
 Deburring
28 Pages


- Milling tool
- Chuck
- Drilling tool
- Milling tool with replaceable insert
- Solid drill bit
- Clamping milling cutter
- Milling cutter with cylindrical shank
- Roughing milling cutter
- Steel drill bit
- Deburring tool
- BT chuck
- CNC machine chuck
- BT tool holder
- Reamer
- Metal deburring tool
- CNC machine tool holder
- Multifunction drill bit
- Chamfering tool
- Boring tool