- Catalogs
- Cogsdill - Nuneaton
- Flipcut
- Products
- Catalogs
- News & Trends
- Exhibitions
Flipcut

Flipcut
Catalog excerpts

COGSDILL TOOL PRODUCTS, INC. For back-spotfacing and back- or front-chamfering operations ٗ from one side, in one set-up. Flipcu > Back-Spotfacing&Chamfering t > TOOLS Available from stock for inch hole sizes from .281 to1.344, and metric hole sizes from 7.00 to 34.00mm. Back-Spotfacing size="-5">
Open the catalog to page 1
■ Cutter flips open to machine back spotface or back chamfer; flips back to closedposition for tool withdrawal. Can also be used for cutting front chamfers. No refixturing or repositioning of workpiece required. ■ Right-hand rotation opens cutter; left-hand rotation (spindle reversal) closes cutter. ■ Unique tool design: over-center cam action initiates positive mechanical closureof the cutter, aided by centrifugal force, for superior tool performance. ■ Brazed carbide cutter construction. Cutter is rigidly supported for enhanced accuracy and long tool life. ■ Both cutter and arbor are designed...
Open the catalog to page 2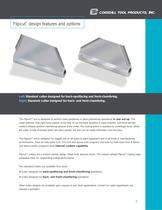
The Flipcut > TM tool is designed to perform back-spotfacing or back-chamfering operations in one set-up . Thecutter extends, with right-hand rotation of the tool, to cut the back spotface or back chamfer. Left-hand spindle rotation initiates positive mechanical closure of the cutter; the closing action is assisted by centrifugal force. When the cutter is fully enclosed within the arbor pocket, the tool can be easily withdrawn from the bore. The Flipcut > TM tool is designed for rugged use on all types of plant equipment and in all kinds of manufacturingenvironments. Tools for hole sizes from...
Open the catalog to page 3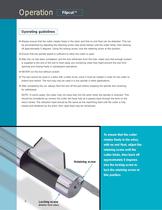
٢֠ Always ensure that the cutter rotates freely in the arbor and that no end float can be detected. This canbe accomplished by adjusting the retaining screw (see photo below) until the cutter binds, then backing off approximately 5 degrees. Using the locking screw, lock the retaining screw at this position. ■ Ensure that the spindle speed is sufficient to allow the cutter to open. ■ After the cut has been completed, and the tool withdrawn from the hole, make sure that enough coolantis supplied to the end of the tool to flush away any remaining chips that might prevent the tool from opening and...
Open the catalog to page 10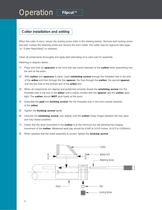
When the cutter is worn, loosen the locking screw (refer to the drawing below). Remove both locking screwand pad. Loosen the retaining screw and remove the worn cutter. The cutter may be reground (see page 12, ٓCutter Regrinding) or replaced.Clean all components thoroughly and apply light lubricating oil to each part for assembly.Referring to diagram belowԅ > Place and hold (2) spacers at the front and rear barrel diameter of the cutter while assembling intothe slot on the arbor. > With cutter and spacers in place, insert retaining screw through the threaded hole in the endof the arbor and then...
Open the catalog to page 12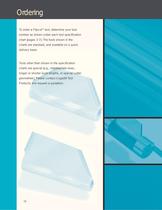
To order a Flipcut > TM tool, determine your toolnumber as shown under each tool specification chart (pages 3-7). The tools shown in the charts are standard, and available on a quick delivery basis.Tools other than shown in the specificationcharts are special (e.g., intermediate sizes, longer or shorter work lengths, or special cutter geometries). Please contact Cogsdill Tool Products and request a quotation. > 13 size="-1">
Open the catalog to page 14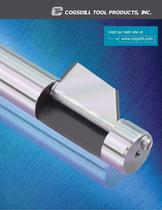
visit our web site at www.cogsdill.com >
Open the catalog to page 15
COPYRIGHT 2007 COGSDILL TOOL PRODUCTS, INC. ɢ֠ >
Open the catalog to page 16All Cogsdill - Nuneaton catalogs and technical brochures
 Nobur® Tool
5 Pages
 Generating Heads
8 Pages
 Nobur JA Recessing Head
8 Pages
 AEX Series
4 Pages
 U Series
2 Pages
 SR Series
6 Pages
 CX Machine Selection Guide
8 Pages
 Roll-a-Finish Bill of Materials
31 Pages
 Burnishing
64 Pages
 Smooth Edge Deburring Tool
12 Pages
 ZX Systems Overview
4 Pages
 ZX MBT-S brochure
5 Pages
 ZX MBT-T brochure
5 Pages
 Tools
Tools8 Pages
 Grooving
6 Pages
 ZX Systems
36 Pages
 Recessing
64 Pages
 Reaming
48 Pages
 Deburring
28 Pages


- Milling tool
- Chuck
- Drilling tool
- Milling tool with replaceable insert
- Solid drill bit
- Clamping milling cutter
- Milling cutter with cylindrical shank
- Roughing milling cutter
- Steel drill bit
- Deburring tool
- BT chuck
- CNC machine chuck
- Burnishing tool
- BT tool holder
- Reamer
- Metal deburring tool
- CNC machine tool holder
- Multifunction drill bit
- Chamfering tool
- Boring tool