
- Catalogs
- CLEMCO INDUSTRIES
- FLAT-TRAK ®

FLAT-TRAK ®

FLAT-TRAK ®
This manual for the FLAT-TRAK® Recovery Floor by Clemco Industries Corp. stresses the importance of understanding the manual for operator safety.
Preface
Employers must identify hazards and ensure operator training, complying with OSHA regulations to prevent injuries. The equipment is unsuitable for hazardous areas as per the National Electric Code.
OSHA Regulations
Key regulations include ventilation, noise exposure, personal protective equipment, and respiratory protection. Users should consult OSHA for detailed guidelines.
Product Information
Clemco's products are for experienced users in the abrasive blast industry. Users must ensure product compatibility and compliance.
General Instructions
Equipment must be installed and maintained by trained users. Hazards include dust and toxic materials. Employers must protect workers per OSHA regulations.
Operational Instructions
Operators need NIOSH-approved respiratory protection. Avoid abrasives with over one percent crystalline silica.
Blast Machines and Remote Controls
Machines must have pressure relief valves and remote controls. Exceeding pressure limits or modifying equipment can cause injury.
Hoses, Couplings, and Nozzle Holders
Proper sizing and installation are crucial to prevent disengagement and pressure loss.
Maintenance and Repair
Follow service instructions and maintenance intervals. Depressurize equipment before maintenance.
Warranty
The warranty covers defects for one year, excluding damages from improper use.
Daily Set-Up Checklist
Ensure operators are trained and equipped with protective gear. Check equipment components daily.
- Air Compressor: Ensure sufficient volume and pressure, with a 50% reserve for nozzle wear. Monitor carbon monoxide levels if oil-lubricated.
- Breathing-Air Compressor: Must provide Grade D quality air and be in a dust-free area.
- Supplied-Air Respirator: Use NIOSH-approved respirators, ensuring all components are intact.
- Carbon Monoxide Monitor/Alarm: Essential for detecting CO levels.
- Breathing-Air Filter: Required for removing moisture and particulates, not CO. Replace cartridges regularly.
- Blast Machine: Must be properly sized and grounded, with regular checks for leaks.
- Air Line Filter: Install close to the blast machine and maintain regularly.
- Remote Controls: Must be in perfect condition, using genuine parts only.
- Blast Hose: Should be appropriately sized and arranged to avoid sharp bends.
- Couplings and Nozzle Holders: Ensure snug fit and replace worn components.
- Nozzle: Check orifice size regularly and replace when worn.
- Abrasive: Use materials specifically manufactured for blasting, avoiding toxic substances.
- Scope: Covers installation, operation, and maintenance, including safety information and training requirements.
- Safety Alerts: Uses ANSI Z535.4-2011 signal words to indicate hazard levels.
- General Description: Describes the modular design of the recovery floor.
- Tools Requirement: Lists necessary tools for installation.
- Installation Notes: Provides guidelines for assembling the recovery floor.
- Uncrating and Layout: Instructions for organizing parts before assembly.
1. Perimeter Tracks:
- Ensure the perimeter is square and allow for necessary spacing.
- Install cross conveyor tracks and splice perimeter tracks.
2. Inside Tracks:
- Position inside tracks parallel to perimeter tracks and splice them together.
3. Rollers:
- Attach roller assemblies to tracks, ensuring proper alignment.
4. Carriages:
- Assemble carriages, ensuring proper alignment and movement.
5. Cylinders:
- Install cylinders, ensuring cleanliness to prevent wear.
6. Grating:
- Install grating sections over tracks.
7. Cylinder Control Timing Panel:
- Mount the control panel and connect electrical power.
Each panel has a 1/2 inch filter/regulator. The air supply line must handle 7 cfm at 100 psi per cylinder.
Control Tubing
- Floor Conveyor Tubing: Use 5/16 inch OD poly air tubing, ensuring it is free from dust.
- Cross Conveyor Tubing: Run tubing through the front cylinder mount.
Initial Test
Clear the floor area of objects and personnel before applying air. Adjust panel pressure and cylinder cycle time.
Bucket Elevator
Refer to the manual for assembly, ensuring adequate support.
Starter Controls
Electric controls are crucial. Components are interlocked to prevent overload.
Abrasive
- Selection: Use metallic abrasives like steel or iron grit.
- Loading: Calculate storage capacity and fill below capacity.
Adjustments
- Panel Pressure: Set to 90-100 psi.
- Cylinder Timing: Adjust using flow control valves.
Operation
Ensure familiarity with manuals. Start recovery equipment in sequence.
Maintenance
Lock-out and tag-out power before maintenance. Conduct periodic inspections.
Replacement Parts
Provides a detailed list of replacement parts for the floor conveyor.
Repair Kit Information:
Includes a rod gland kit and a piston kit.
Cross Conveyor Components:
Includes tracks, beams, frames, and brackets with specific stock numbers.
Cylinder Control Panel Components:
Includes solenoids, relays, pressure switches, and fittings with stock numbers.
General Notes:
Provides detailed part lists and stock numbers for ordering and maintenance.
Catalog excerpts

© 2015 CLEMCO INDUSTRIES CORP. One Cable Car Dr. Washington, MO 63090 Phone (636) 239-4300 Fax (800) 726-7559 Email: [email protected] www.clemcoindustries.com FLAT-TRAK® RECOVERY FLOOR O. M. 07763 DATE OF ISSUE: 10/30/93 Awarning Do not use this equipment until you have READ this MANUAL and YOU UNDERSTAND its contents. * These WARNINGS are included for the health and safety of the operator and those in the immediate vicinity. *If you are using a Clemco Distributor Maintenance and Parts Guide, refer to the orange warnings insert preceding the Index before continuing with the enclosed instructions. Electronic files include a Preface containing important information.
Open the catalog to page 1
• Employers are responsible for identifying all job site hazards, educating and training all persons who will operate and maintain these products, and ensuring that all blast operators and their assistants understand the warnings and information contained in these instructions relating to safe and proper operation and maintenance of this equipment. • Serious injury or death can result from failure to comply with all Occupational Safety and Health Administration (OSHA)regulations and all manufacturer’s instructions. • This equipment is not intended for use in any area considered hazardous per...
Open the catalog to page 2
OPERATOR SAFETY EQUIPMENT OSHA regulation 1910.134 requires appropriate respiratory protection for blast operators and workers in the vicinity of blasting. These workers must wear properly-fitted, properly-maintained, NIOSH-approved, respiratory protection that is suitable for the job site hazards. Blast respirators are to be worn only in atmospheres not immediately dangerous to life or health from which wearers can escape without use of the respirator. The employer must develop and implement a written respiratory protection program with required worksite- specific procedures and elements for...
Open the catalog to page 3
BLAST MACHINES AND REMOTE CONTROLS OSHA regulation 1910.169 describes the necessity of pressure relief valves on compressed air equipment. Do not operate blast machines with air compressors that are not equipped with properly functioning pressure relief valves. OSHA regulation 1910.244(b) requires the use of remote controls on blast machines. Serious injury or death can result from many sources, among them: Involuntary activation of the remote controls. Never modify or substitute remote control parts; parts are not compatible among different manufacturers. Welding hose is not suitable...
Open the catalog to page 4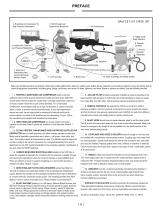
DAILY SET‐UP CHECK LIST 2. Breathing Air Compressor for High Pressure Respirators 3. NIOSH Approved Supplied-Air Respirator 6. ASME Code Blast Machine 8. Remote Controls or Ambient Air Pump for Low Pressure Respirators 7. Air Line Moisture Separator 12. Abrasive 11. Appropriately Sized Nozzle 4. External or Helmet Mounted Carbon Monoxide Monitor /Alarm 10. Hose Couplings and Safety Cables Make sure all blast operators are properly trained and suitably attired with a blast suit, safety boots, leather gloves, respiratory and hearing protection. Every day before start up, check all equipment...
Open the catalog to page 5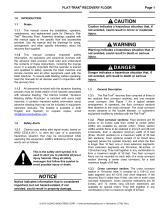
FLAT-TRAK® RECOVERY FLOOR 1.1.1 This manual covers the installation, operation, maintenance, and replacement parts for Clemco’s Flat-Trak® Recovery Floor. Assembly drawings supplied with this manual apply to the specific floor and accessories provided. Use the manual and the drawings for sizing, arrangement, and other specific information about the recovery floor supplied. 1.1.2 This manual contains important safety information. All operators and personnel involved with the abrasive blast process must read and understand the contents of these instructions, including the orange cover. It is equally...
Open the catalog to page 6
FLAT-TRAK® RECOVERY FLOOR Figure 1 © 2015 CLEMCO INDUSTRIES CORP. www.clemcoindustries.com Manual No. 07763, Re
Open the catalog to page 7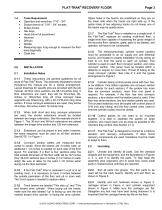
FLAT-TRAK® RECOVERY FLOOR 1.4 Tools Requirement • Open/box end wrenches, 7/16" - 3/4" • Socket wrench w/ 7/16" - 3/4" sockets • Screw drivers • Hex keys • Hand drill w/ bit assortment • Hammer • Drift pin • Welder • Measuring tape, long enough to measure the floor area diagonally • Chalk line sizes of Flat-Trak® floors. The assembly illustrations shown throughout the manual are for a typical arrangement. Layout drawings for specific jobs are provided with the job manual. All floor drive sections are 98-1/2-inches long. If floor extensions are used, they will be 30-inches, 60-inches, or...
Open the catalog to page 8
FLAT-TRAK® RECOVERY FLOOR © 2015 CLEMCO INDUSTRIES CORP. www.clemcoindustries.com Manual No. 07763, Re
Open the catalog to page 9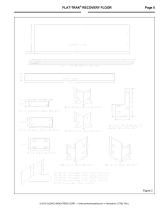
FLAT-TRAK® RECOVERY FLOOR © 2015 CLEMCO INDUSTRIES CORP. www.clemcoindustries.com Manual No. 07763, Re
Open the catalog to page 10
Floor- Drive Uylinder Parts © 2015 CLEMCO INDUSTRIES CORP. • www.clemcoindustries.com • Manual No. 07763, Rev L
Open the catalog to page 11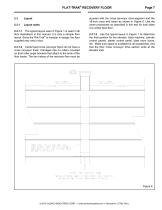
FLAT-TRAK® RECOVERY FLOOR Layout notes 2.3.1.1 The typical layout used in Figure 1 is used in all floor illustrations in this manual. It is only a sample floor layout. Since the Flat-Trak® is modular in design; the floor supplied may vary in size. 2.3.1.2 Center feed cross conveyor floors do not have a cross conveyor track. Carriages ride on rollers mounted on front roller angle brackets that attach to the ends of the floor tracks. The two halves of the recovery floor must be squared with the cross-conveyor drive-segment and the 18-inch cross end beam as shown in Figure 6. Use the same procedures...
Open the catalog to page 12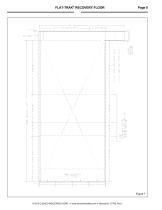
FLAT-TRAK® RECOVERY FLOOR © 2015 CLEMCO INDUSTRIES CORP. www.clemcoindustries.com Manual No. 07763, Re
Open the catalog to page 13
FLAT-TRAK® RECOVERY FLOOR 2.4 Perimeter Tracks, Ref. Figure 7 2.4.1 Run chalk lines around the perimeter of the floor. Make sure the perimeter is square. Recheck the final location for the elevator, cross conveyor and floor conveyor sections. Be sure to allow 1-1/2-inches around the perimeter. If the floor is mounted in a pit or existing room, allow 3-inches for service. See Sections 2.1.4 and 2.1.5. 2.4.2 Place the cross conveyor tracks (C channels) as shown in Figure 7. Beginning at the elevator location, place the left and right hand cross drive tracks, cross extensions (if used), and the...
Open the catalog to page 14All CLEMCO INDUSTRIES catalogs and technical brochures
Archived catalogs
 Cool Air Tube (Rev. B)
2 Pages
 CALIPSO Ambient Air Pump
2 Pages
 Bulk Abrasive Blast Machines
2 Pages
 Blast Suit & Gloves (Rev. E)
2 Pages
 Pre-assembled blast-room
4 Pages
 Super Comet
4 Pages
 INEX Blast Cabinet (Rev. E)
2 Pages
 CDF Dust Collectors (Rev. C)
4 Pages
 MB series
2 Pages
 BNP Suction Blast Guns
2 Pages
 Tumble Cabinets
2 Pages
 CAP-4 Ambient Air Pump
2 Pages
 Big Clem Bulk Blast Machines
2 Pages
 Internal Pipe Tools (Rev. A)
8 Pages
 Blast Suit & Gloves (Rev. I)
2 Pages
 RPH
RPH11 Pages
 RPC-2
RPC-212 Pages
 COMFORT VEST
7 Pages
 Clemco Mule
1 Page
 Pulsar III-P
2 Pages
 Operator Safety Equipment
8 Pages
 Pulsar IX Pressure PS
2 Pages
 Pulsar III-PE
2 Pages
 Pulsar III, VI & VI-P
6 Pages
 Pulsar VI-PE
2 Pages
 ZERO Automation
8 Pages
 Climate Control Tube (CCT)
2 Pages
 Apollo 60 and 600
4 Pages
 Options Plus
4 Pages
 Cabinet Dust Collectors
8 Pages
 Automated Air Blast Systems
8 Pages
 BNP A200 Series
4 Pages
 Debris Screen Basket
1 Page
 Tumble Cabinets
8 Pages
 CLASSIC SERIES
12 Pages
 Wetblast FLEX
2 Pages
 Apollo 20 HP
2 Pages
 Apollo 600
4 Pages
 Automated Air Blast Systems
6 Pages


- Manual valve
- Filter with cartridge
- Gas detector
- Dust collector
- Monitoring detector
- Miniature valve
- Flow controller
- Filter dust collector
- In-line filter
- Compressed air pre-filter
- Pneumatic flow regulator
- Detector with alarm
- Carbon monoxide detector
- Blast room
- Compact detector
- Sandblasting machine
- Recuperator
- Manual blast room