- Catalogs
- Clayton Power
- LPS II Installation guide
LPS II Installation guide
1 /1Page

LPS II Installation guide
1 /1Page
Catalog excerpts
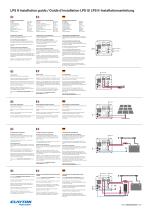
LPS II Installation guide / Guide d’installation LPS II/ LPS II-Installationsanleitung CONNECTION REQUIREMENTS DC-Input: DC-Out: DC Cable thickness: DC Max cable length: DC Cable shoe: Fuse box: Battery terminal: Ground point / lashing Eye: C1/C2: C1/C2 Cable shoe: EXIGENCES LIÉES AU BRANCHEMENT Entrée CC : M8 / 14 Nm Sortie CC : M8 / 12 Nm Épaisseur du câble CC : 16 mm² Longueur maximale du câble CC : 5 mètres Chaussure de câble CC : M8 - 16 mm² Boîte à fusibles : 5 Nm Borne de batterie : M8 / 10 Nm Point d'ancrage / Œillet d'arrimage : M8 / 10 Nm C1/C2 : M4 / 4 Nm Sabot de câble C1/C2 : M4 - 2,5 mm² ANSCHLUSSANFORDERUNGEN DC-Eingang: M8/14Nm DC-Ausgang: M8/12Nm DC Kabelstärke: 16mm2 DC Max. Kabellänge: 5 Meter DC Kabelschuh: M8 – 16mm2 Sicherungskasten: 5Nm Batterieanschluss: M8/10Nm Erdungspunkt/Zurröse: M8/10Nm C1/C2: M4/4Nm C1/C2 Kabelschuh: M4 – 2,5mm2 CONNECTING THE REMOTE Connect the remote to the M12 connector marked remote on the backside of the LPS. CONNEXION DE LA TÉLÉCOMMANDE Connectez la télécommande au connecteur M12 marqué remote à l'arrière du LPS. 230 VAC INPUT (BLUE CONNECTOR) To connect 230VAC to the LPS II unit, please use the enclosed power cord with the Blue Neutrik connector. ENTRÉE 230 VAC (CONNECTEUR BLEU) Pour connecter le 230 VAC à l'unité LPS II, veuillez utiliser le cordon d'alimentation fourni avec le connecteur Neutrik bleu. ANSCHLIESSEN DER FERNBEDIENUNG Schließen Sie die Fernbedienung an den mit „Remote“ gekennzeichneten M12-Anschluss auf der Rückseite der LPS an. Connect the Blue Neutrik to the Blue socket to start charging. 230 VAC OUTPUT (GREY CONNECTOR) For fixed 230VAC installations where accidental disconnection, or shock and vibrations may occur it is recommended to use the Neutrik 230VAC Out. Attention: Both 230VAC Outputs on the LPS (Plug on the front, Neutrik on the backside) are protected with 8A relays and a RCD, which allow you to make fixed 230VAC installations. Attention: If an installation is wired around the LPS, please note that separate relays must be used. Connectez le Neutrik bleu à la prise bleue pour commencer à charger. SORTIE 230 VAC (CONNECTEUR GRIS) Pour les installations fixes 230 VAC qui présentent un risque de débranchement accidentel, de chocs et de vibrations, il est recommandé d'utiliser la sortie 230 VAC Neutrik. Attention : Les deux sorties 230 VAC du LPS (prise à l'avant, Neutrik à l'arrière) sont protégées par des relais 8A et un RCD, ce qui vous permet de créer des installations fixes 230 VAC. Attention : Si une installation est câblée autour du LPS, veuillez noter que des relais séparés doivent être utilisés. 230 VAC-EINGANG (BLUE-ANSCHLUSS) Um 230VAC an das LPS II-Gerät anzuschließen, verwenden Sie bitte das beiliegende Netzkabel mit dem Blue Neutrik-Anschluss. Schließen Sie den Blue Neutrik an die Blue-Steckdose an, um den Ladevorgang zu starten. 230 VAC-AUSGANG (GREY-ANSCHLUSS) Für ortsfeste 230VAC-Installationen, die versehentlich getrennt werden könnten oder bei denen Erschütterungen und Vibrationen auftreten könnten, empfehlen wir die Verwendung des Neutrik 230VAC Out. Achtung: Beide 230VAC-Ausgänge der LPS (Stecker vorne, Neutrik hinten) sind durch 8A-Relais und einen RCD geschützt. Dies ermöglicht Ihnen ortsfeste 230VAC-Installationen durchzuführen. Achtung: Beachten Sie bitte, dass separate Relais verwendet werden müssen, wenn eine Installation um die LPS herum verdrahtet wird. 12 VDC OUTPUT Positive: Connect directly to the appliance. SORTIE 12 VDC Positive : Branchez directement sur l'appareil. 12 VDC-AUSGANG Plus: Direkt an das Gerät anschließen. Negative: Connect directly to the appliance. (Ground can be connected through a lashing eye.) Négative : Branchez directement sur l'appareil. (La mise à la terre peut être branchée par un œillet d'arrimage). Minus: Direkt an das Gerät anschließen. (Die Erdung kann über eine Zurröse erfolgen.) Attention: When connecting the 12VDC to the LPS unit, make sure to use the correct cable size and tighten the cable shoes carefully. Failure to do so, can result in bad connections and overheating. Attention : Lors du branchement du 12 VDC à l'unité LPS, veillez à utiliser un câble de taille correcte et à serrer soigneusement les cosses du câble. Le non-respect de cette consigne peut entraîner de mauvaises connexions et une surchauffe. Achtung: Achten Sie beim Anschließen des 12VDC an die LPS darauf, die richtige Kabelgröße zu verwenden und ziehen Sie die Kabelschuhe vorsichtig fest. Andernfalls kann es zu einer schlechten Verbindung und Überhitzung kommen. Attention : Si une sortie CC est nécessaire, il est recommandé d'utiliser un fusible qui correspond au besoin de l'installation/de l'utilisation. Max. 180 A. Achtung: Wenn ein DC-Ausgang benötigt wird, sollte eine Sicherung verwendet werden, die den Anforderungen der Installation/Verwendung entspricht. Max. 180 A. Attention: If there is a need for DC Output, it is recommended to use a fuse that matches the need of the installation/usage. Max. 180 A. Please see the CONNECTION REQUIREMENTS at the top. Veuillez consulter les EXIGENCES LIÉES AU BRANCHEMENT plus haut. Bitte die oben beschriebenen ANSCHLUSSANFORDERUNGEN beachten. SOLAR PANEL CONNECTION Positive: Connect the Positive terminal from the solar panel to the C2 connecter. BRANCHEMENT DU PANNEAU SOLAIRE Positive : Branchez la borne positive du panneau solaire au connecteur C2. ANSCHLIESSEN VON SOLARPANELEN Plus: Schließen Sie den Pluspol des Solarmoduls an den C2-Anschluss an. Negative: Connect the Negative terminal to a ground point. Négative : Branchez la borne négative à un point de masse. Minus: Schließen Sie den Minuspol an einen Erdungspunkt an. Attention: Solar panels must be wired in a parallel circuit. Input: 15-40 VDC. Attention : Les panneaux solaires doivent être câblés en circuit parallèle. Entrée : 15-40 VDC. Achtung: Solarmodule müssen in Parallelschaltung verdrahtet werden. Eingang: 15-40 VDC. Connect all positive terminals of the solar panels, as well as all the negative terminals of the solar panels. Branchez toutes les bornes positives des panneaux solaires, ainsi que toutes les bornes négatives des panneaux solaires. Verbinden Sie alle Pluspole der Solarmodule miteinander und alle Minuspole der Solarmodule miteinender. CHARGING FROM ALTERNATOR CHARGE À PARTIR DE L'ALTERNATEUR Connect D+ for key wakeup On most cars and vans it is possible to connect the engine starter to the D+ connector, which is usually found underneath the dashboard. Brancher D+ pour le réveil de la touche Sur la plupart des voitures et des camionnettes, il est possible de brancher le démarreur du moteur au connecteur D+, qui se trouve généralement sous le tableau de bord. D+ zur Aktivierung der Tasten anschließen Bei den meisten Autos und Transportern besteht die Möglichkeit, den Motorstarter an den D+-Anschluss anzuschließen, der normalerweise unter dem Armaturenbrett zu finden ist. *Vérifiez les spécifications de votre voiture pour savoir comment brancher le LPS II à D+. *Für mehr Information zum Anschließen der LPS II an D+ sehen Sie bitte in der Spezifikation Ihres Fahrzeugs nach. *Check the specification for your car, to see how to connect the LPS II to D+. Connecting alternator Positive: When connecting the Positive wire make sure to use a Mega Fuse Box (60A) between the LPS and the battery. Negative: It is important to run the Negative cord through a ground point such as a lashing eye in a car and not directly between the LPS and the battery. Attention: When connecting the 12VDC to the LPS unit, make sure to use the correct cable size and tighten the cable shoes carefully. Failure to do so, can result in bad connections and overheating. Please see the CONNECTION REQUIREMENTS at the top. Branchement de l'alternateur Positif : Lorsque vous branchez le fil positif, assurez-vous d'utiliser une boîte à fusibles Mega (60A) entre le LPS et la batterie. Négatif : Il est important de faire passer le cordon négatif par un point de mise à la terre, tel qu'un œillet d'arrimage dans une voiture, et non directement entre le LPS et la batterie. Attention : Lors du branchement du 12VDC à l'unité LPS, veillez à utiliser un câble de taille correcte et à serrer soigneusement les cosses du câble. Le non-respect de cette consigne peut entraîner de mauvaises connexions et une surchauffe. Veuillez consulter les EXIGENCES LIÉES AU BRANCHEMENT plus haut. Lichtmaschine anschließen Plus: Beim Anschließen des Pluskabels ist es notwendig einen Mega-Sicherungskasten (60A) zwischen der LPS und der Batterie einzusetzen. Bitte die oben beschriebenen ANSCHLUSSANFORDERUNGEN beachten. Minus: Wichtig: Das Minuskabel muss durch einen Erdungspunkt geführt werden, beispielsweise durch eine Zurröse im Fahrzeug und darf nicht direkt zwischen der LPS und Batterie eingesetzt werden. Achtung: Achten Sie beim Anschließen des 12VDC an die LPS darauf, die richtige Kabelgröße zu verwenden und ziehen Sie die Kabelschuhe vorsichtig fest. Andernfalls kann es zu einer schlechten Verbindung und Überhitzung kommen. CHARGING FROM ALTERNATOR WITH SUPER CHARGE See the text CHARGING FROM ALTERNATOR and below for complete installation. Connect the 12VDC input to the fuse box. It must be on the same side as the LPS II. Attention: When connecting a Super Charge DC-DC Converter, the fuse for 12VDC must be changed to a 125A on the Positive cable. Connect the Output from the Super Charge DC-DC Converter to the DC Output of the LPS II. Attention: If there is a need for DC Output, it is recommended to use a fuse that matches the need of the installation/usage. Max. 180 A. CHARGE DE L'ALTERNATEUR AU MOYEN D'UN SUPER CHARGE AUFLADUNG PER LICHTMASCHINE MIT SUPER CHARGER Voir le texte CHARGE DE L'ALTERNATEUR et ci-dessous pour une installation complète. Siehe AUFLADUNG PER LICHTMASCHINE und die Anweisungen unten für eine komplette Installation. Branchez l'entrée 12 VDC à la boîte à fusibles. Il doit se trouver du même côté que le LPS II. Verbinden Sie den 12VDC-Eingang mit dem Sicherungskasten. Er muss sich auf der gleichen Seite wie die LPS II befinden. Attention : Lors du branchement d'un convertisseur Super Charge DC-DC, le fusible pour 12 VDC doit être remplacé par un 125 A sur le câble positif. Branchez la sortie du convertisseur CC-CC Super Charge à la sortie CC du LPS II. Attention : Si une sortie CC est nécessaire, il est recommandé d'utiliser un fusible qui correspond au besoin de l'installation/de l'utilisation. Max. 180 A. Achtung: Beim Anschluss eines Super Charge DC-DCWandlers muss die Sicherung für 12VDC auf 125A am Pluskabel gewechselt werden. Verbinden Sie den Ausgang des Super Charge DC-DCWandlers mit dem DC-Ausgang der LPS II.
Open the catalog to page 1All Clayton Power catalogs and technical brochures
 The LPS II range
20 Pages

- Power supply unit
- DC power supply
- AC/DC power supply
- DC-DC converter
- Photovoltaic solar panel
- Digital power supply
- Chassis-mounted DC/DC converter module
- Black solar panel
- DC/DC converter for the automobile industry
- Vehicle DC/DC converter module
- Battery charger power supply
- Mobile power supply
- Inverter power supply
- Polycrystalline silicon solar module
- MPPT power supply
- CIGS photovoltaic module